

jono grant
-
Posts
607 -
Joined
-
Last visited
Posts posted by jono grant
-
-
Come on, somebody has a trick to go full screen....
-
10 hours ago, Robert Bone said:
The clipping may not occur on the individual track you are recording with peaks hitting -1 dBFS, but that is almost certainly going to be too hot for many of your plugins to process properly - particularly those that emulate analog gear - as those plugins are designed to work best with an input level at 0 dB VU (which is an average, and they calibrate most VU Meters to -18 dBFS, using a 1k pure sine wave).
In addition, if you start running your tracks to various buses, that feed additional busses, you will end up with the signal clipping, eventually.
I think it far better to record at lower levels, so that there is a good bit of headroom left for mastering. I believe you would end up with a cleaner and better sound, by lowering your recording levels right from the start, and then if too quiet, simply raising the speaker volume would get it loud enough for your listening, while keeping enough room for a proper mix and master.
Don't take my word for it - do a little digging on the internet, and while there are numerous opinions on what a proper recording level is, I would bet you wouldn't find much, if any, guidance that would suggest recording with peaks hitting -1 dBFS.
For whatever the worth, I set track gain at or near 0 dB VU, with no peaks louder than -6 dBFS. That gives me an average level that leaves me around 18 dB of headroom, with room for sharp transients to get up to, but not exceding, -6 dBFS. I also have a limiter on the Master Bus set to -1dBFS, to prevent speaker or ear damage. I also make sure that each plugin is gain-neutral , meaning the output volume of any plugin is adjusted to it matches its input gain, through either makeup-gain or gain reduction. I try to run all the way through each channel and its plugins, at that 0 dB VU target, except drums - which I use a target of somwhere between -18 dBFS and maybe -14 dBFS, with no drum peaks above -6 dBFS.
Best of luck to you, in any case.
")
Bob Bone
Thanks man. Appreciate you spending all sorts of time telling me how to record levels. I've been doing it for 35 years and am well aware how it works. Sometimes you're playing a flute sound and need a little more juice, that's all. Nobody's peaking anything, I said that previously. Thanks for the tip on turning the default up in Kontakt, even though it will destroy everything I'm recording forever!!! LOL
-
43 minutes ago, Robert Bone said:
Wow - you bring Kontakt instruments in at 0? I cannot imagine being that hot on input. How could you not end up clipping?
Bob Bone
Just tested it at zero with a few beat driven synths like Damage and Signal, the loudest peak was about -1 db. I'm sure if I held my hand down on a bunch of loops at once I could make it peak but it's easy for me to turn stuff down. The issue is when I have a lot of automation etc. but then need additional volume. If my volume automation is already at the highest level and the sound still isn't loud enough, that's what happens most of the time.
I have no other controls set to diminish the volume, everything is at zero. Not sure why you would get peaks at zero. Perhaps related to our sound controllers. I'm using UAD. I'm very careful with gain staging, I won't let a peak go by anywhere. Always checking my reverbs etc. for that sort of thing.
My original post had to do with other synths doing this as well. Like Omnisphere for instance. It doesn't seem to respond to any cakewalk automation unless I learn the volume control in Omnisphere. Perhaps it's a setting in there somewhere.
Thanks
J
-
1 minute ago, Robert Bone said:
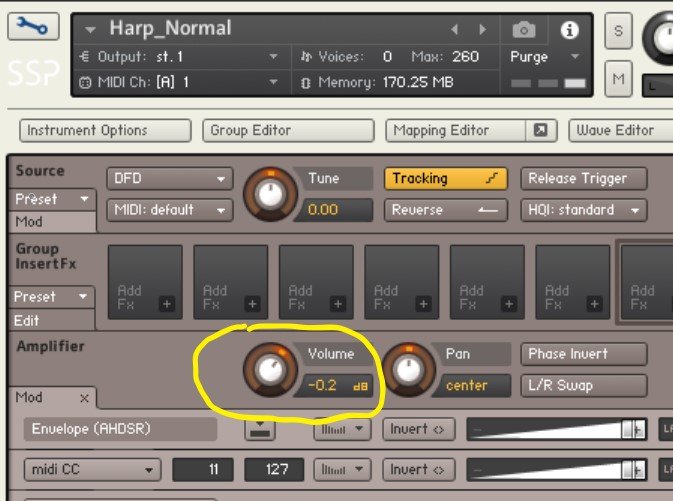
Kewl - yeah, because the Kontakt default is to set each instrument up to a -6 dB level, which is usually WAY too hot for recording, you can take advantage of its default checked parameter telling each instrument to respond to standard controllers for volume and pan, by adjusting the instrument volume using the midi track fader, stops it from making the volume jump back to that default -6 dB level. It will just stay on whatever level you set on the midi track fader.
The only thing with that, is that the scale on the midi track fader is from 0-127 - the midi scale, and that doesn't correspond to a dBFS value, so to get around that, try the following steps:
1) As soon as a Kontakt instrument gets loaded, drop its midi track fader to zero.
2) Alternate between moving the midi track fader up, and playing some notes on that instrument, so that you move up into the range you like to record at (for me that is around - 18 dBFS. (so as you play some notes, every time you move that fader up, look at the associated audio track(s) for that instrument, to see the peak.
Doing it the above way, keeps the volume from being insanely loud to begin with, (even if you have a limiter on your Master Bus to prevent speaker or ear damage), and only takes a few seconds to do. After you do this a few times, you will get a feel for approximately where the midi track fader needs to be to result in a peak of around -18 dBFS, or whatever you generally use. If you use VU Meters instead, shoot for around 0 dB VU, which is usually calibrated to be at -18 dBFS - but if you use VU Meters for gain staging, there are a couple considerations: 1) make sure nothing peaks (on the Peak meter) above -6 dBFS, and also, if you have an instrument with sharp transients (like drums), you are better off setting that instrument using the Peak Meter (dBFS) , because the slow reaction of VU Meters could result in clipping.
Bob Bone
I just saw this. yeah, with the default set to 0, when I load a synth I can just decrease the volume in cakewalk and proceed with automation is what I'm thinking. Anyhow, you gave me a few ideas here. Cheers
J
-
55 minutes ago, Robert Bone said:
Yeah, but I think you can avoid having to even go into the instrument, by simply adjusting the midi track fader for the instrument.
Bob Bone
Actually, I think your method of changing the default instrument volume to 0 instead of -6 will work great for me. My issue is usually wanting more volume so this should work great. It's global so I can set it and forget it as well.
Cheers and thanks again!
J
-
Anyone got a way to do this?
Thanks
J
-
5 minutes ago, Robert Bone said:
Yeah, but I think you can avoid having to even go into the instrument, by simply adjusting the midi track fader for the instrument.
Bob Bone
Okay, thanks, I'll check that out!
Cheers
J
-
It would be great to have a simple button to have cakewalk go into full screen video. Rather that the 3-click process of right-clicking the video and selecting stretch options and then full screen.
Failing that, can anyone think of a way to either:
1. Save a screen-set in full screen mode (not sure that's possible) or
2. Set "full screen" to a custom module button or
3. Create a key binding? (didn't see one)
Thanks for any help!
Cheers
Jono
-
On 1/8/2020 at 4:03 PM, Robert Bone said:
Regarding my above post - I used to set the instrument-level setting to sever that acceptance of standard controllers for volume and pan, however I no longer do that.
The REASON I used to change that parameter to stop Kontakt from resetting to that -6dB, was that every time I had dropped the Kontakt instrument output volume level - in the Kontakt UI, as soon as I would hit play, it would instantly jump back to a level of -6 dB, which infuriated me.
So, while changing that Instrument Options Controller setting DOES stop that from happening, there is a different way to get that to stop happening, without having to change that setting.
NOW, I leave that setting alone completely, and instead, when I load an instrument into Kontakt, I know that by default, it will have an initial setting of -6 dB, because of that global option I mentioned in my first post. Since I want to drop that level by a bunch, to meet my gain staging neighborhood prior to recording, (which I used to do with the audio track gain knob), I now instead drop the midi track's volume fader down to a pretty low level, usually around a midi volume setting of 64, which if you were to pull the fader down to that level, then click and hold on the volume fader in the Kontakt UI - Kontakt will then display the current volume setting in terms of dB, and a midi track midi volume fader level of 64 corresponds to a Kontakt UI master volume fader value for the instrument, of around -17.8 dB. )I usually set instruments to around -18 dBFS as a starting point. I am not going to get into a whole gain staging approach discussion here. I just illustrate that this method eliminates that 'jumping' of volume back to a value of -6 dB, which is what was driving you nuts, and me too prior to incorporating this alternative technique of stoppinf that behavior.
With using the midi track fader to pull down Kontakt (and Battery, and likely their other engines too), volumess upon instrument loading, I no longer have that issue of the volume instantly jumping back to -6 dB, and I don't have to alter and save every loaded instrument, AND, by it working in this manner, it seems obvious to me that this is the methoed they kind of intended for the manner of controlling it, otherwise every instrument would not have that setting set to 'On' for accepting standard controllers for volume and pan, so I decided to go ahead and start controlling volumes using the midi track fader instead, and it works wonderfully that way.
I sincerely HOPE that I have made some sense with both my first post, and this rather confusing attempt at explanation. I think that once you get used to it, this method works well, and has completely eliminated what was a maddening and baffling, and unwanted, instant change of instrument volume to a setting WAY higher than wanted.
Bob Bone
Very helpful to know, thanks!
I've actually now been using the amplifier volume in Kontakt. It seems to act as an overall volume, sort of like offset mode in cakewalk. Retaining the automation or DXF but globally setting the volume for that track. This works for me!
-
It seems random too, like sometimes the synth won't obey CW volume and other times it will.
Sometimes I just want to turn up the volume slide on the kontakt track, but if I hit play and it immediately changes back to whatever it was, even though whatever it was doesn't relate to anything in the cakewalk track.
Must be a setting somewhere that will alter this behavior. Not sure what.
-
Hey there, I can never seem to figure out why sometimes cakewalk track volume will control a synth and other times it won't, many times I have to use the volume in the soft synth. Kontakt does this all the time. I have to learn a control and automate it.
Is there a way to force synths to only follow cakewalk's track volume and automation on that track rather than the synth itself? Or, follow cakewalks volume AND also allow an overall volume change from the synth. (like keep CW's volume automation and also be able to apply a global volume change to it.)
Thanks
Jono
-
19 hours ago, David Baay said:
If you set Workspaces to 'None', the layout and current zoom level will be saved and restored on re-opening the project. Selecting a Workspace will override that, but the last saved 'internal' layout of the project will be restored whenever you set Workspaces to 'None'. Personally, I still am not using Workspaces as I'm so used to every project having it's own focus and layout that evolves over time and is appropriate for what I was doing with it when I last saved it (usually with a description of the last major change I made included in the name).
Thank you! That's what I was looking for! J
-
20 hours ago, R Henn said:
Check Lenses/Workspaces/Screensets
Right, I can play with that a bit, thanks!
I'm wondering if there's a way that Cakewalk will open a session how it was last saved in terms of the zoom?
-
-
Wondering if anyone knows what's happening here. I even saved the basic template at the zoom I want and it still opens with the timeline zoomed way in.
Also, changing the time ruler to only show bars and beats/ saving the basic template and when I open a new file etc. the ruler is not how I set it.
Why is Cakewalk not remembering these settings even when saved to the basic template?
Any help appreciated!
Thanks
Jono
-
Hi, just wondering why when I save a session and I'm zoomed out to see the whole project, I reopen the session, it's all zoomed way in and not how I saved it?
Thanks
Jono
-
9 hours ago, Toddskins said:
You do know, don't you, that you can simply double-click the particular synth in the synth rack that you are currently using in a project? That brings it back to life from its "minimized" status.
Your post appears to not be aware of this, but perhaps I'm overlooking something you're inquiring about.Yes, I do know that. Just wondering why they are minimizing behind the UI and they didn't used to.
-
41 minutes ago, kevro2000 said:
I wish it would minimize and stay within (visible) the main CW window, rather than get lost somewhere else. If it stays within the proggy, it would be one click to restore back to size.
It's supposed to!! I think it's a bug in one of the updates. What's the point of minimizing if it just flies off somewhere that you can't get at?
-
Actually, it does minimize, but it minimizes behind the cakewalk window so you have to minimize cakewalk and then maximize again to see the syth minimized down on the left.
Is this a bug?
J
-
Hi there, whenever I minimize a synth, it seems to completely go away. I'm used to it just minimizing to the bottom left of the Cakewalk screen. This seems like new behavior unless it's a setting somewhere.
Anybody know?
Thanks
Jono
-
On 12/21/2019 at 2:37 PM, Heinz Hupfer said:
Hi😊
Can you give us some pictures? Fuzzi can mean all or nothing. ....
Bassman
I've tried to do a screen shot of this but once I paste it into another program, it looks fine! It's only how it looks through the 4k monitor that is fuzzy. I understand that the graphics inside cakewalk might not be compatible with 4k and scaling but wondering why the windows menus would also have this issue. Very odd.
-
5 hours ago, CJ Jacobson said:
Overclocking will not cause dropouts in Cakewalk or any other DAW.
Dropouts are caused by the CPU load being too high and the audio cannot be buffered within the buffer rate you set it to. This can be because of your audio sound card drivers not being at a setting that is efficient for that specific Cakewalk project you have open at that specific time. In other words, raise your buffers to keep up with the current work-load.
FYI: There is also a setting in the aud.ini file that deals with how Cakewalk dropouts. Its called the 'dropoutmsec' or something close to that. You may want to raise that setting.
Thanks. The dropoutmsec setting is set to 250. What would you suggest raising it to?
Can't believe my new system would get dropouts on the session I'm working on. Really not a lot in it and my new machine smokes my old on in every spec. This is why I though perhaps it was something related to the overclocking. I had issues years ago where overclocking was too powerful for the Korg 1212 sound card I was using. (Decades ago actually)
Thanks
Jono
-
On 12/25/2019 at 9:54 AM, chuckebaby said:
Juno, what do your cores look like across the board (performance module)?
Are they even, are they maxing out ?
They are even
-
Hey, I'm getting the odd dropout, very quick and occasionally in Cakewalk. I'm on a new Win 10 computer using UAD thunderbolt Apollos.
The computer is overclocked, It's a 3.60 GHz but it's been overclocked to 4.73 GHz
Has anyone heard of issues in Cakewalk with overclocked computers?
I've also asked the UAD forum in case it has to do with that.
I didn't have any issues previously running UAD firewire on Win 8.1 but this is a new system for me.
Thanks!
Jono
Full screen video
in Cakewalk by BandLab
Posted
I was able to set a keybinding for video full screen. To use it, you have to click the video screen, hit the key binding and then click back on the timeline. It works though, awesome!
Thanks
Jono