

Mike Z
-
Posts
48 -
Joined
-
Last visited
Everything posted by Mike Z
-
Copy the selected clip, then pick "Paste Special..." from the menu. Under Repititions type in how many times you want it to repeat the clip.
-

Latency, LatencyMon and Audio Engine dropout
Mike Z replied to Harley Dear's topic in Cakewalk by BandLab
I'm pretty sure that's your problem. As @msmcleod stated, many laptops reduce performance when running on battery power. I had some hair-pulling-out moments when I was trying to do some mixing on my laptop without the power cord plugged in. Problems disappeared once power cord was plugged in. -
My guess is that you've recorded overtop the clip and your waveform is underneath the top layer. try grabbing and moving the clip to another track to see what's underneath.
-
[CLOSED] Cakewalk 2022.06 Early Access [Updated to Build 22]
Mike Z replied to Morten Saether's topic in Early Access Program
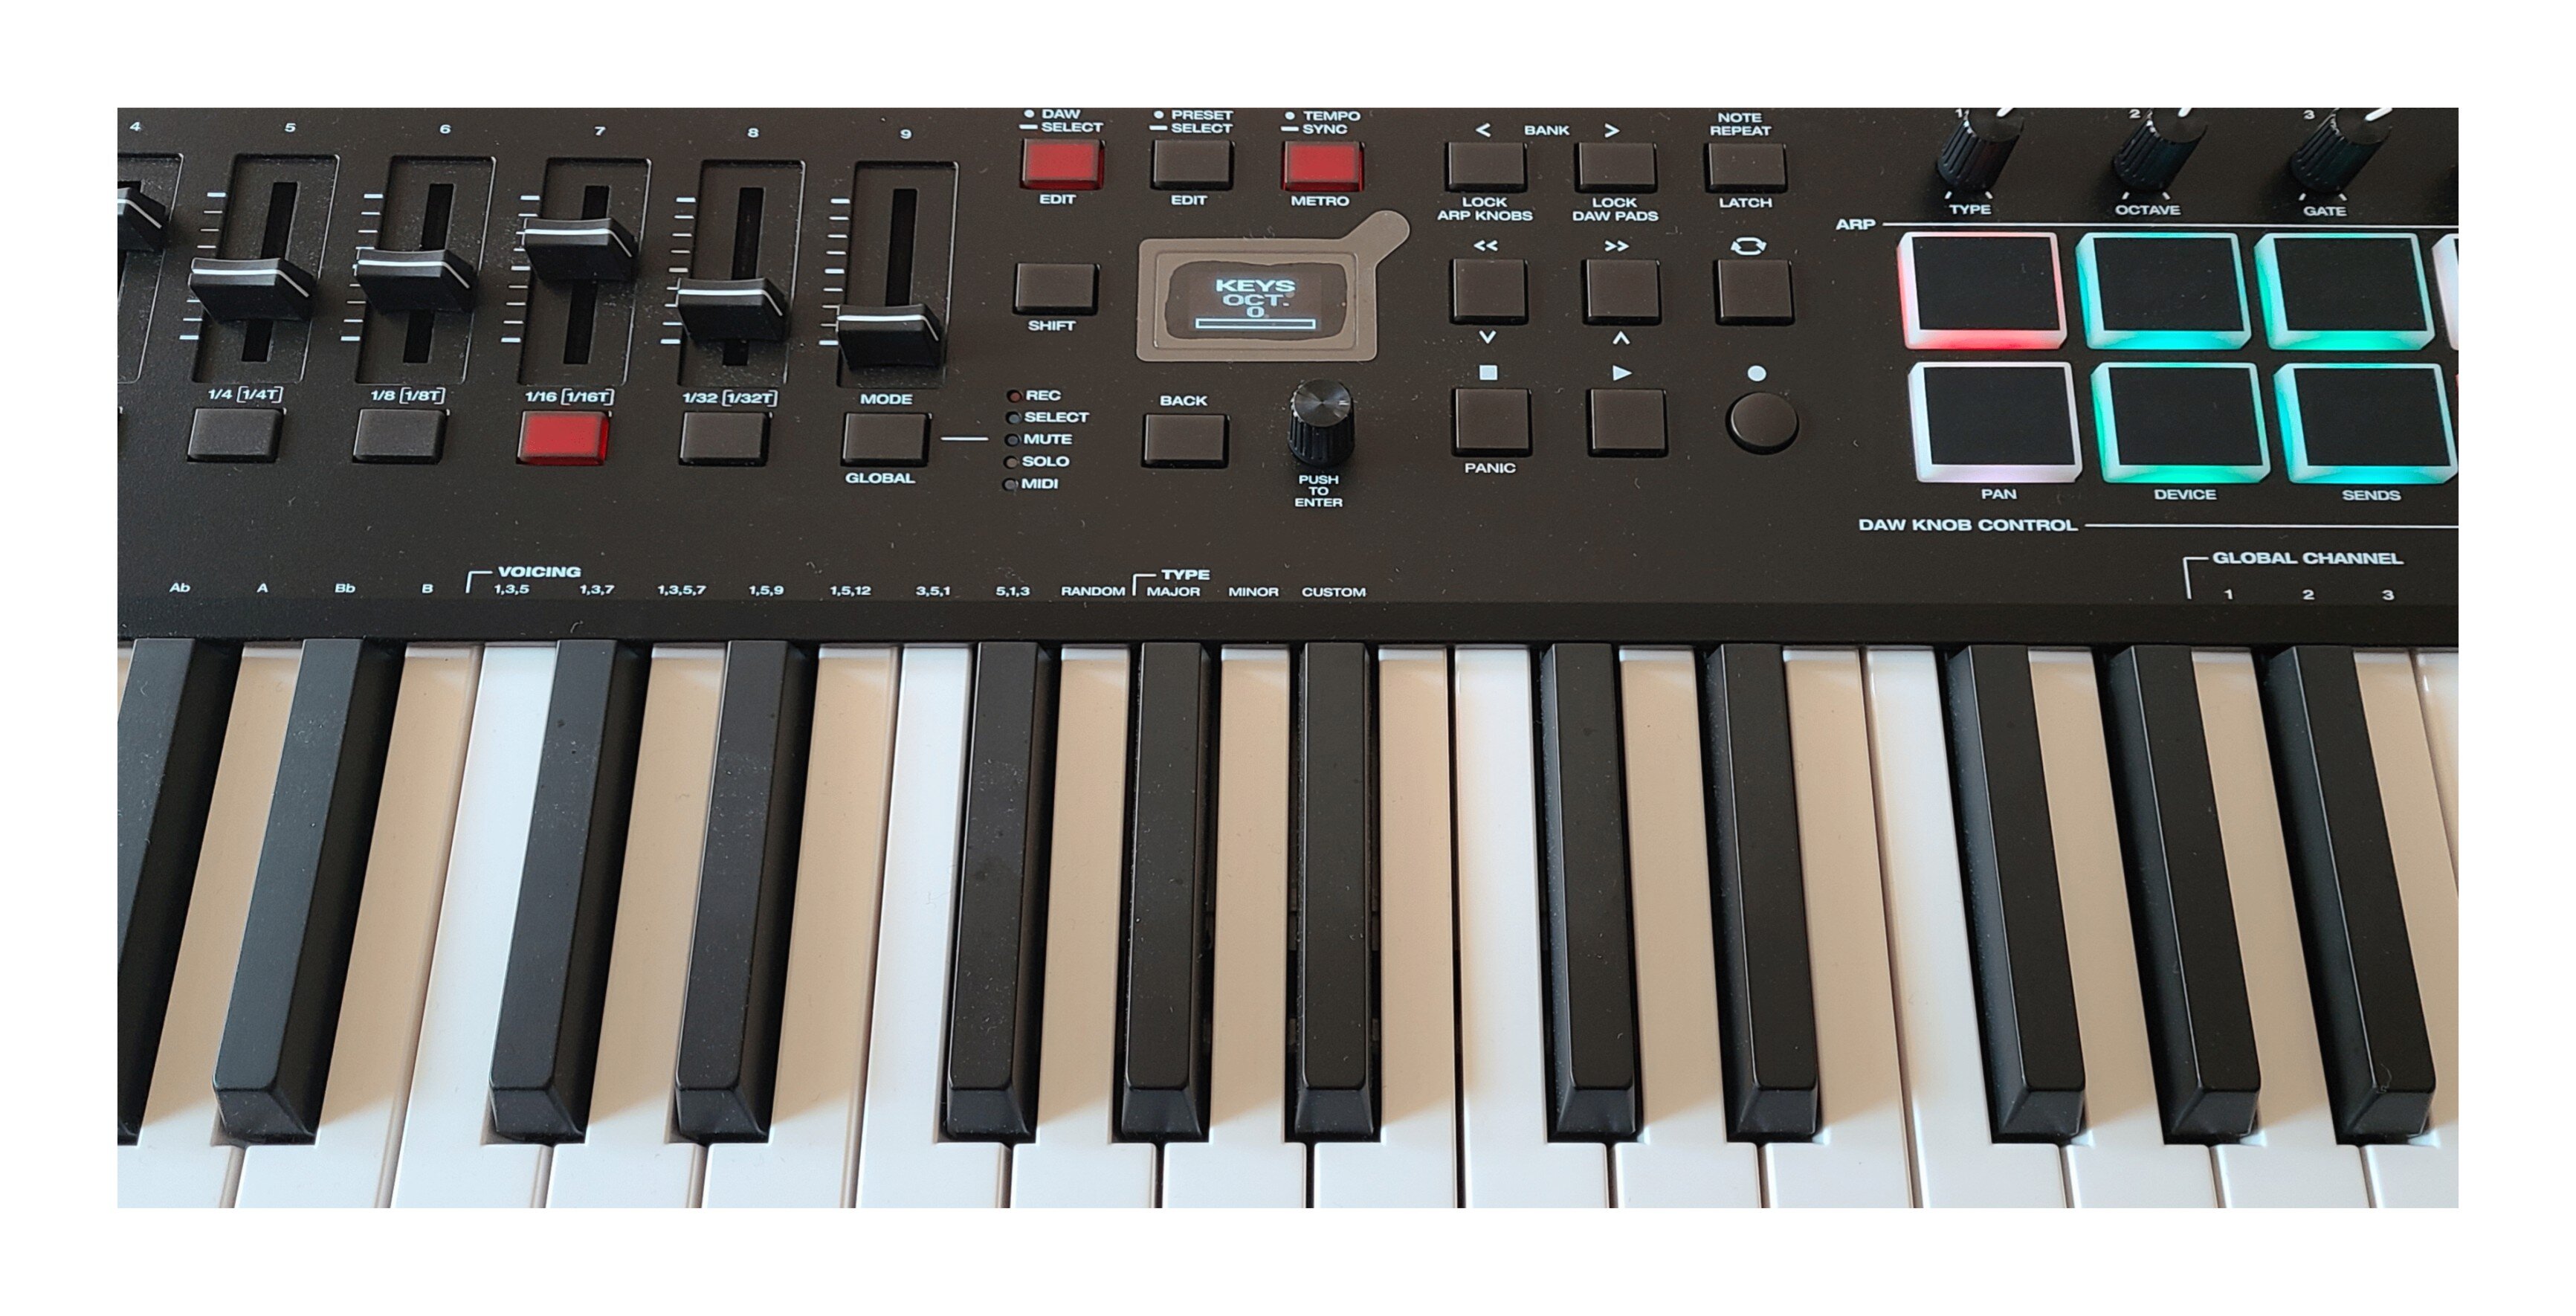
I've been trying this with an Oxygen Pro 49, I assume it's the same firmware as your Pro 61. Similarly, the pan knobs don't work properly (not full 100% range of motion, only around 75%) but this isn't new to this release. I can't find any reference to high or standard resolution so I don't think that's a solution. I can make the pan work using ACT learn, but it would be nice to have it work properly in Cubase mode. -
I can confirm this bug too. Although it's not neccessarily nodes that go off-screen that aren't highlighted, it's only the first one. Meaning, if I select 6 nodes and 3 of them go out of view, when I scroll back to look, the first one isn't hightlighted (ie not selected) but the other 2 are.
-
I can't offer definite answers to your issue but maybe I can point you in the right direction. I bought an M-Audio Oxygen Pro keyboard and it includes support for many DAWs but not Cakewalk by Bandlab. After many hours of trial and error (and other peoples' contributions and advice) I found that changing the DAW type on the keyboard to Bitwig is close to perfect. The reason is that Bitwig sends commands in Mackie mode, as opposed to MPC (which uses CC commands). You can use CC commands in CbB but you'll need to manually teach it how to interpret each command using ACT learning. It's time consuming but it's a decent workaround. I don't have the Akai keyboard so I don't know what's involved in changing the DAW type, you'll have to do your own research on that. If Bitwig isn't a choice for you, then try Studio1 or or Cubase or Reaper (they all send using Mackie mode).
-
Yes, it flows Left to Right, and yes, you can rearrange the order to suit your preferences
-
Trying To Set Up New M-Audio Oxygen PRO controller
Mike Z replied to Mark Morgon-Shaw's topic in Instruments & Effects
Thanks Jesse! As you've noticed, there's a huge learning curve when starting out and it's been very helpful to see what others have tried. I'm also using the Bitwig preset; most controls work immediately (except for the Loop function). I found a way to get Fader 9 working without using ACT training, you might be interested in my method. In Cakewalk's Mackie Control dialog box (Utilities --> Mackie Control - 1) I changed the Master Fader to Bus (I think default was Master). Now F9 controls the volume on the Master Bus. As you pointed out, using the M-Audio preset editor does some weird things with the Bitwig preset, especially with regard to Pan and Pitch shift._LI.thumb.jpg.cb8391915bcff21cc7e3e78f4947f685.jpg)
-
Trying To Set Up New M-Audio Oxygen PRO controller
Mike Z replied to Mark Morgon-Shaw's topic in Instruments & Effects
Thanks @Kai-Jürgen Lietz for your video. I've been following this thread for awhile now, and even posted some of my findings here. After watching your video I tried to reproduce your results but things didn't work the same for me. For example, when I loaded the preset for Logic and looked at the preset editor, all controls were set for Mackie, not HUI. I have the Oxygen Pro 49 (purchased a year ago) and it occured to me that maybe I had old firmware. So first step for me was to download/install the latest firmware V2.1.1 Now when I look at the preset for Logic, all controls are set to HUI. I think this could explain why so many people here are seeing different results if different FW versions are sending different types of commands. However, I still can't get the Logic preset to work properly with Cakewalk. For me, the best is to use one of the presets that use Mackie controls (Studio1, Bitwig, Cubase, Reaper, and FLStudio all default to Mackie). Most controls work properly except for the Loop button and Pan knobs. Pan is inconsistent; works better on Bitwig than the others but even that is somewhat unstable. So I use ACT to change the settings for Pan knobs and Loop button. It's important to note that Handshake must be disabled in the Mackie Control settings. That's probably why I couldn't get any of the Mackie controls to work the first time I tried all the DAW presets (Handshake is enabled by default). I'm working on typing up a step-by-step instruction on how I got everything to work for anyone who is still struggling. I had given up with most of the controls on my Oxygen keyboard, now it's all working perfectly. Thanks to everyone who has posted on this thread; this has been a huge learning experience for me. -
Deleting extra measures not needed at end of project
Mike Z replied to J. King's topic in Cakewalk by BandLab
I believe this is the correct answer. If you have unused (and seemingly empty) measures at the end of your project, you probably have something in an automation lane. This isn't always obviously visible but if you open the automation lanes it'll be easy to see. No need to delete the measures; once you delete the automation info the extra measures will disappear. -
Take a look at Steven Slate Drums 5.5; there's a free demo that never expires. Includes 3 sample kits with lots of room to edit the sounds.
-
inspector looks different in some projects
Mike Z replied to charles kasler's topic in Cakewalk by BandLab
Is it C, or Shift-C? -
Hi Dave, this post might be of some use to you. I struggled to set up my Oxygen Pro 49, spent a lot of time trying out various options. My post linked here covers the steps I took to make it work (more or less, there are still some issues) but take the time to read through the entire thread because there's a lot of good information about setting up controllers.
-
I'm not sure I understand exactly what you are asking... you can use the Piano Roll View to edit midi notes. Move them individually, or select a range of notes and move them all at once.
-
What's your biggest bar count on a track? Mine's 260,000
Mike Z replied to Olaf's topic in Cakewalk by BandLab
My guess is that you have something on one of the automation lanes that extends far beyond the music on your tracks. Go to the end of the project, open the lanes up one at a time, look for any automation there. -
Probably what happened is you started Cakewalk before your audio interface was running. That's happened to me before. Even when I exited the program, started the interface, and restarted Cakewalk, the driver settings didn't revert back to the original settings until I changed them manually.
-
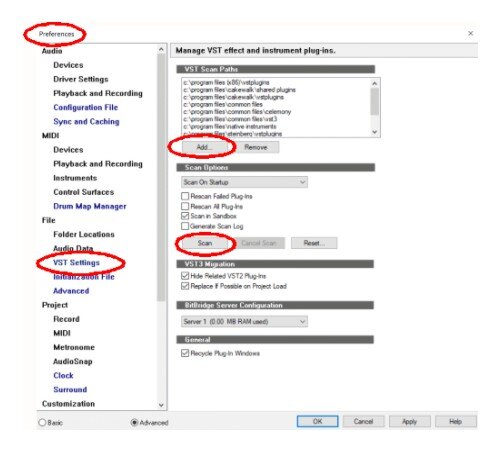
On my computer, the Studio Instruments files are located: Local disk (C:)>ProgramData>Cakewalk>Studio Instrument This was the default location so yours should be the same. Take a look for the files there. Then... make sure Cakewalk scans the folder looking for plugins: In Cakewalk, from the menu bar, select Edit > Preferences. From the left menu select VST Settings; you should see VST Scan Paths at the top. If you don't see the location of your Studio Instruments, click "Add", then browse to the correct folder, then "OK". Under that part, in the "Scan Options" section, make sure "Scan on startup" is enabled. You can hit the "Scan" button, or restart the program. Hope this is helpful to you.
-
How do I find my Spitfire Audio plugin?
Mike Z replied to RICHARD HUTCHINS's topic in Cakewalk by BandLab
Thanks for that note. I'm aware that my plugins are a little scattered and could use some cleanup. I have plugins that came with my M Audio keyboard and more with my Steinberg interface, plus anything I've downloaded to try out; I let them install in their default locations. I figure there's no real harm in scanning several folders (even scanning folders multiple times) other than speed; CbB boots up so quickly that it doesn't bother me. -
How do I find my Spitfire Audio plugin?
Mike Z replied to RICHARD HUTCHINS's topic in Cakewalk by BandLab
-
How do I find my Spitfire Audio plugin?
Mike Z replied to RICHARD HUTCHINS's topic in Cakewalk by BandLab
I'll see if I can walk you through this... Under Preferences, look on the left sidebar for File -> VST Settings You should see at the top "VST Scan Paths"; click "Add" Navigate to the spitfire audio folder, click OK. You probably have to manually scan again (click the "Scan" button) Hope that works for you! -
Don't be too modest, you already impressed me with the chicken sandwich trick. : )
-
Is this Master Too Loud? (LUFS/Youleanmeter)
Mike Z replied to Marcello's topic in Cakewalk by BandLab
Hi Marcello, I've been following this thread, maybe I can offer some help too. YouLean loudness meter has a way to show you the true peaks in real time (not just the average or integrated levels). If you disable the Short-term loudness graph you'll see a different picture. If you have any large peaks (for example a kick that is putting out a high level in the sub-50 Hz range) you'll see it quickly. Also, you mentioned the red lines/dots at the top of the meter; I believe those are spots where the peaks exceed the True Peak Max level setting. I'm using the free version and I think the preset for that is -1 dB. Any peaks higher than that will show up with a red dot. If you have the Pro version I believe you can set your True Peaks manually. For me, looking at the True Peak loudness gave me a lot of information about why my songs were showing up as "too loud" even though they didn't sound loud.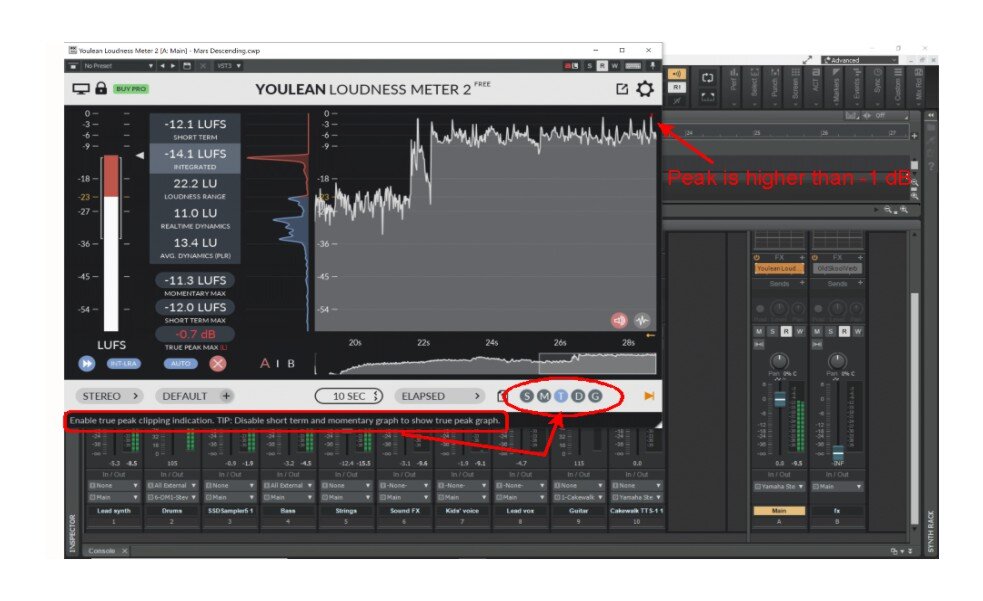
-
I used SAW32 for awhile back in the early 2000s, I agree it was a great DAW for the time. I recently found a list of "DAWs through the ages" or something like that, and SAW wasn't mentioned so I had to search for it. Apparently there is still a cult-like following for SAW, mainly because of how streamlined and stable it is.
-
I bet you could shake that abacus and make a nice percussive sound.
-
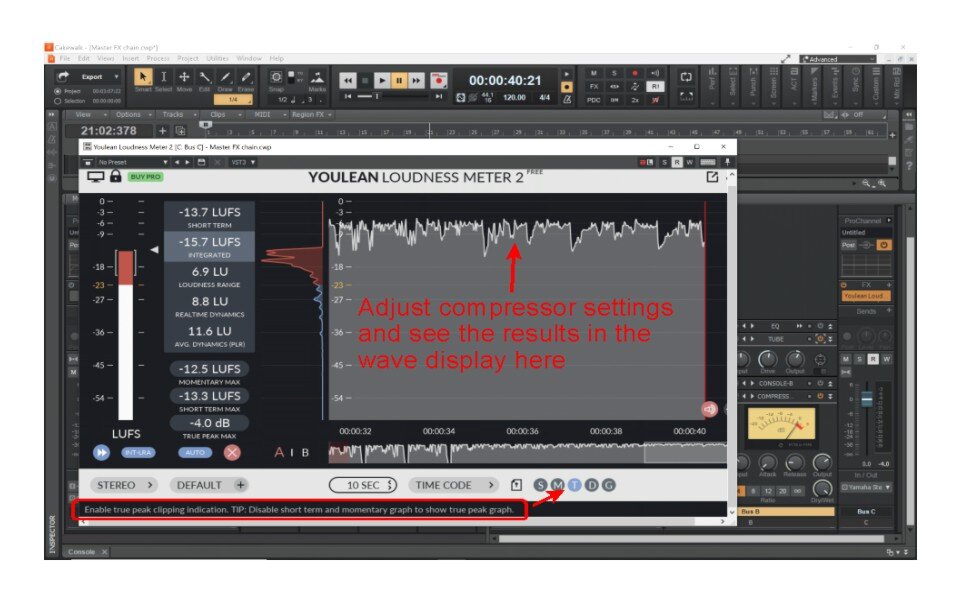
Try downloading Youlean Loudness Meter... there's a free version as well as the pro. Set the display to show True Peak values and you will watch the wave in real time. If you change the compressor settings (ratio, threshold, etc.) you can see how that affects the peaks and overall volume levels.

_LI.jpg.a9532c13de99f3fe4f6568b24edae000.jpg)

