Leaderboard


Popular Content
Showing content with the highest reputation on 09/23/2021 in all areas
-
9 points
-
I'm sure @Anxiousmofo's wife already finds you charming. Maybe you could charm a free MIDI controller out of her? (couldn't resist)6 points
-
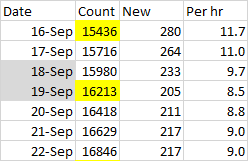
So, the numbers from the first day-plus chasing the 20k carrot are... not superb. If there's to be a bump, or a multi-bump bump, in the numbers following the extension teaser, we haven't seen it yet. Here's the average number and rate per day since the last big surge on 9/15: Starting around 3pm on the 21st, 14.4 signups/hour would have reached 20,000 on the 30th. The actual rate of signups since then is 9.1/hour, and it would now take an average of 15.6/hour the rest of the way to hit the mark. The news isn't all grim, though. Since the website glitch around 11am yesterday, when the "20k race rate" bottomed out below 8/hour, it's been steadily, if sloooowly, rising. And 15/hour -- even 30/hour -- has been achieved over the course of a whole day. Over the last three days of August, in fact, and twice in September. Another, possibly better, way to look at the current state is that the count has fallen "behind" the pace needed to reach 20k by around 220 signups. A smallish surge in the next day or two would close that gap. The bigger question is whether the between-surge rate would stay high enough for a final push to the finish line. But first things first, assuming the weekend will slow a bit as others have.
 6 points
 -
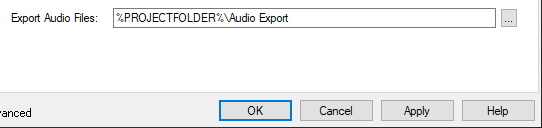
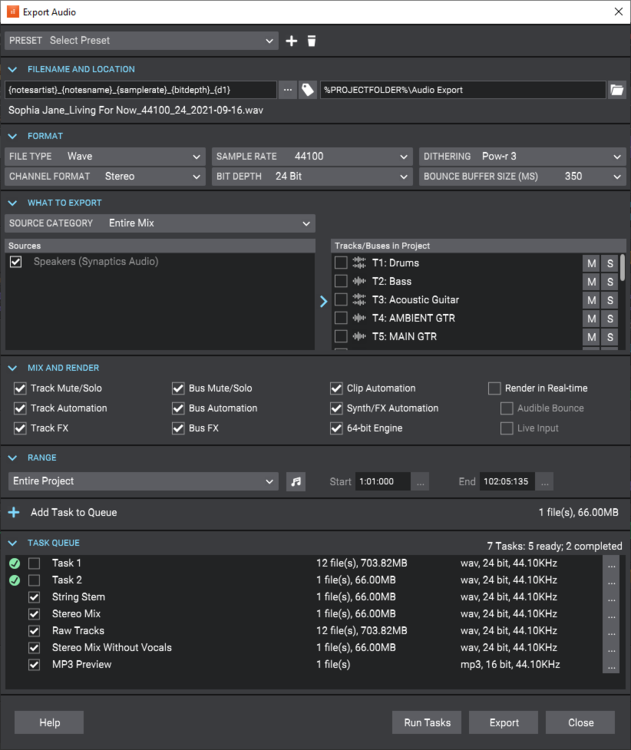
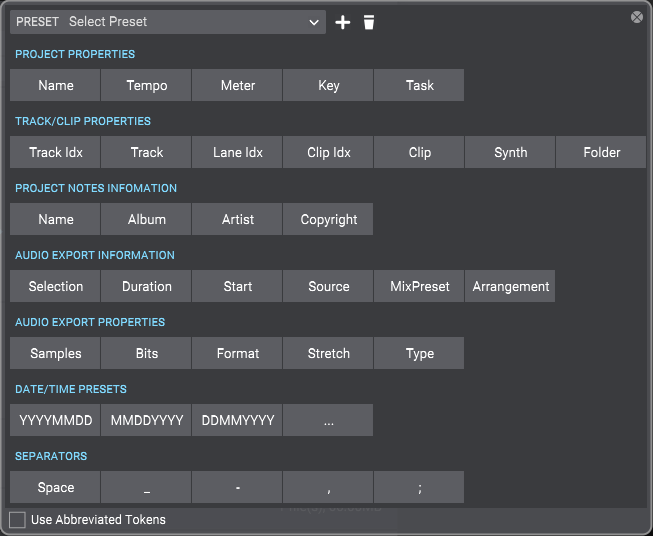
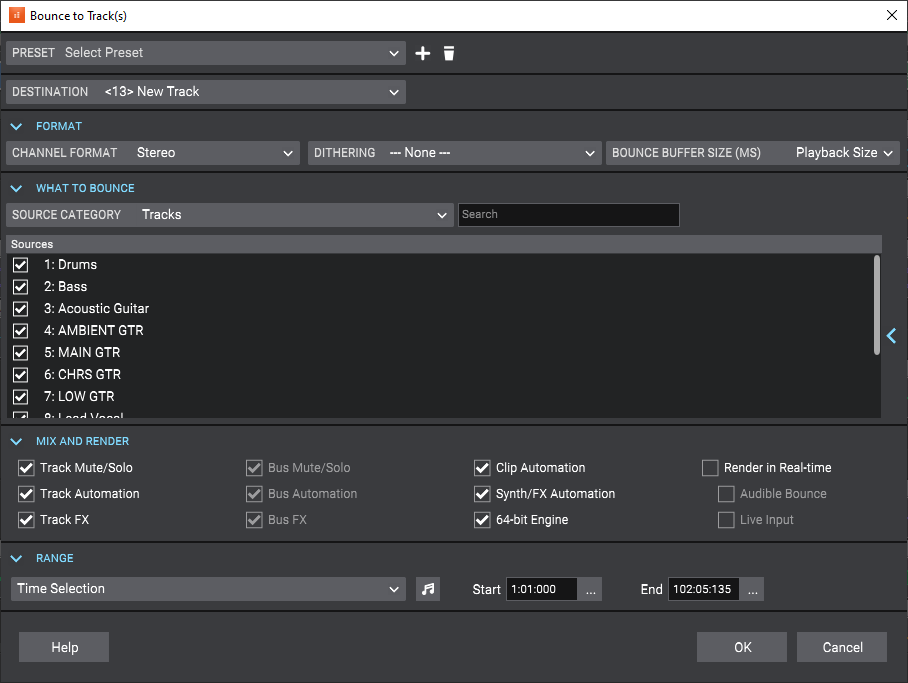
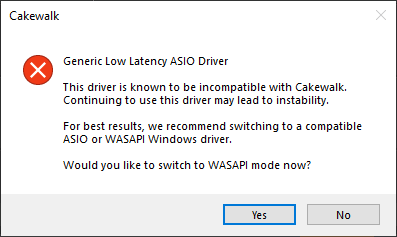
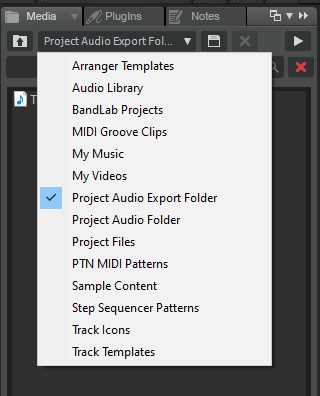
[UPDATE 4-Oct-2021: Cakewalk 2021.09 Update 1 (build 27.09.0.145) now available] We're pleased to announce the 2021.09 release! This release includes enhanced audio file export, batch exporting, filename tokens, completely redesigned Export Audio and bounce dialogs, improved AudioSnap transient detection, several bug fixes and lots of other enhancements and optimizations, all in keeping with our goal of making Cakewalk as reliable and enjoyable as possible. Please note that in order to automatically keep your activation status up to date, Cakewalk will renew your activation status whenever a new version of the application is installed and run for the first time, and when you sign in to BandLab from within Cakewalk. If you have never signed in to BandLab from within Cakewalk, you will be prompted once to sign in. Thanks, The Bakers For new feature details, see New Features. Should you need to revert to the 2021.06 release, you can download the Cakewalk 2021.06 Rollback installer. Update Oct 4 2021: 2021.09 Update 1 (build 27.09.0.145) Bug fixes Stability: S-Gear 2 VST3 plug-in crashes when inserted Intermittent crash when closing Arranger section context menu Exporting audio with plug-ins on a surround bus can hang the export while flushing plug-in buffers In rare cases certain plug-ins could hang export while flushing plug-in buffers Export: MP3 Export Options dialog does not show recalled task settings MP3 Export Options dialog should default to 256 kbps Changes to Notes Browser tab are not reflected in the ID3 MP3 Export Options dialog until Cakewalk restart Export as MIDI exporting whole project if selection at time zero Windows notification sound when opening Export Audio dialog in some projects Export Audio dialog uses default project sample rate instead of actual project sample rate Large bounce buffer sizes cause flatline audio when exporting or bouncing clips with 96K or higher sample rates Export task fails with no meaningful message if drive or path is invalid Export with External encoder was not functional Warn if duplicate filenames in export task queue Expand width of file overwrite prompt when exporting multiple files and make the list scrollable Export as MIDI File should not show audio track warning message Misc.: Bounce to Track(s) dialog forces render sample rate to 44100 always Bounce to Track(s) should always use project sample rate to prevent unnecessary sample rate conversion Bounce to Clips unexpectedly uses bounce buffer size from Export Audio dialog 2021.09 Highlights New export audio features Improved AudioSnap transient detection Misc. enhancements Bug fixes New export audio features The Export Audio feature has been greatly improved and optimized to handle the most demanding rendering tasks. Highlights: An intuitive new UI with collapsible panels to make it easier to get to the most commonly used features,. Task queues for export automation. Complete control over output file names using tag based file name presets. New additional export categories available: "Tracks Through Entire Mix" for track stems, exports the audio from each chosen track as heard through the main output. This is a useful way to create track stems as heard through master effects. "Track Folders" for any non-empty track folders. "Arranger sections" allows you to export each individual arrangement section as a separate audio file. Export uses significantly less memory and runs faster by eliminating making an extra copy of the project in memory. Support for setting the export buffer size independently from the audio driver buffer size. (can speed up export times) Convenient access to select and mute or solo tracks directly from the export UI. Set export time ranges or export entire project directly from the export UI. Automatic effects tail flushing is now part of export/bounce to prevent left over effects tails from leaking into exports or being heard. New default Export Audio Files folder setting in Edit > Preferences > File - Folder Locations. Toast notification on export completion with link to the completed render. More details: Related settings are organized into collapsible panels. The size, position and expanded state of each section is remembered once you close the dialog. The task queue allows you to create multiple export tasks and run them all as a batch. A task in the export queue contains the set of export settings including the mix settings, export file name, selection, location, and the time range. The export queue is saved in the project and can be recalled and re-executed. Any prompts appear at the time of adding the task, so you can run the whole queue without any user intervention. To batch export all tasks in the task queue, click Run Tasks. To export a single job with the current export settings, click Export. Filename and location are shown as two separate fields. Filename is the name of the file you want your exported audio to be called, and location is the directory where it should be saved. When you first open the dialog, the location will be set to the default location as specified in Edit > Preferences > File - Folder Locations under Export Audio Files. The default is \Audio Exports under the current project directory, where the current project folder is indicated by the %PROJECTFOLDER% environment variable. You can change the export directory by clicking on the browse location button , and this location will be remembered for the duration of the project’s session. You can change the global export location for all projects with the Export Audio Files path in Edit > Preferences > File - Folder Locations. Filename tokens. Filenames now support substitution tags for common project and export properties. You can type tags directly into the filename edit box, or use the filename builder pop-up to add them for you. You can still type while this pop-up is showing, so you can mix literal characters with tags, or use backspace to correct any mistakes. Filename presets let you save and recall custom filename formats. The filename itself now supports both literal characters and substitution tags (“tokens”). Substitution tags replace tags within the filename with common project and export properties. Each tag is contained within curly brackets. You can type in the tags directly into the filename edit box, or use the filename builder pop-up to add them for you. It’s worth mentioning that you can still type while this pop-up is showing, so you can mix literal characters with tags, or use backspace to correct any mistakes. A preview of the first audio export filename is shown below the filename edit box. The filename builder pop-up also support filename presets, so you can easily recall a formatted filename by selecting it from the drop-down. As with all Cakewalk presets, you can save new presets, replace existing ones, or delete one’s you don’t want. Export presets can now store a default filename. In the What to Export section, Track Folders has been added as a source category. This setting exports the tracks in each of the selected track folders as heard through the entire mix, as separate files. This provides yet another convenient way to export stems without modifying the source project. In addition to arrangements, individual Arranger sections are available as an export category. This allows you to export each individual section as a separate audio file. Under Format, the Bounce Buffer Size (ms) setting is used to specify the audio buffer size that will be used during export. This value defaults to use the current playback buffer size and can be changed to a max size of 350 ms. While small buffer sizes are useful to minimize latency, they add to CPU load and can slow down export operations significantly. A larger buffer size can speed up the export process in large projects by allowing the CPU to process data more efficiently. Caution: Some plugins can be unstable or crash with large buffer sizes so use this with caution. Depending on the plugins used, we recommend using moderate sizes like 50-100 msec rather than higher sizes. Also if you are using plugin automation, large buffer sizes will not sound smooth if you are using plugins that do not support sample accurate automation. The Bounce Buffer Size settings only applies when Render in Real-time is disabled. The playback latency buffer size is used when Render in Real-time is enabled. Tracks Through Entire Mix has been added as a new source category under What to Export. It exports individual tracks including all downstream bus effects and automation. The result is the same as if you solo one track at a time during export. When exporting multiple files as MP3 or Windows Media Advanced Streaming (WMA) format, the Export Options dialog box has a new Use These Settings for All option that lets you apply the same settings to all files instead of prompting for each file. Export works on the current project selection. The What to Export panel contains a fly-out project selection editor. This allows you to modify the current track selection and the mute and solo status of each track and bus, without exiting the Export Audio dialog box. This is especially convenient if you if you want to create several tasks, each with a different selection, or if you want to export multiple stems. Simply solo the tracks that you want to include in the stem, then add as a new task. A track that is checked means it’s included in the selection. If all the tracks are unchecked, that means there is no selection, and all tracks will be available. Changing the project selection changes which source items are available. A note about selection and the Tracks export category: When the source category is Tracks, the project selection has a special meaning: Having a project selection means there is also a time selection. So if you have tracks selected in your project selection, then all the tracks chosen in your audio source will be exported at exactly the length of the selection. In other words, the length of each tracks’ audio file will be the same. If you have nothing selected in your project, then no specific export time range has been set, and the length of each tracks’ audio file will be the length of each individual track. To the right of the What to export drop-down is a search filter, which lets you search for a particular track, bus, arrangement, section, or Mix Recall preset, should you have a large number of sources to search through. Tip: To quickly select all/none in the source list, hold down CTRL+SHIFT and click any checkbox. To select all, press CTRL+A. To check/uncheck the selected sources, press SPACEBAR. The Range panel specifies the time range to be exported. The drop-down provides the following choices: Entire Project = The entire length of the project. Time Selection = A specified time selection. The Start and End edit boxes allow you to manually enter the start and end times of the export range. Clicking the button to the left of the Start label will toggle between musical and absolute time. The buttons to the right of the Start and End edit boxes will allow you to choose a time based on defined project landmarks, such as the beginning of the project, the now time, or marker locations. Set Time Selection to Loop Range = Set the time selection to the current loop region. Set Time Selection to Punch Range = Set the time selection to the current punch region. Note: The 2021.09 installer will delete the old factory export presets and replace them with new and updated presets. If you have overwritten the factory preset names, those presets will be replaced. Other custom export presets will not be affected. Batch exporting audio files using task queues Using the Export button is fine if you have a single export. But what if you want to tweak your project and export again, or you want several different types of exports? You may want a task for exporting your stems, another task for exporting individual tracks, and another for exporting your final mix as a stereo file. You can now create multiple export tasks, such as stems or different file formats, and add them to an export queue. A task in the export queue contains the set of export settings including the mix settings, filename, location, selection, and the time range. You can add as many export tasks as you like, and run all export tasks as a batch without any user intervention. The task queue is per project and is saved with the project. Adding a task to the queue To create a task, simply go through the normal process of defining your export, then instead of clicking the Export button, click the Add Task to Queue button . This adds a task with the current settings to the task queue. If you are exporting multiple files as part of a task, a list of the filenames will be shown in a confirmation prompt. Any further prompts required for additional format settings will also be shown at this time… that way, you won’t get any prompts when you actually run the task. Once you’ve confirmed any prompts, enter a name for your new task. Simply type the name of the task in, and press ENTER. Tip: The name of the task can also be used in your filename by using the {taskname} tag. Repeat the above steps for any additional tasks you need. To the right of the task name you’ll see the number of files to be exported by each task, an estimated size (if it’s a wave file), and a summary of the file format. Editing tasks in the task queue You can update tasks that you already added to a task queue. To update an existing task: Do one of the following: Double-click on the task within the task list. Click the task’s menu button , then select Recall Task Settings. The task’s settings are recalled in the Export Audio dialog box. Make any desired edits to the current export settings. Click the task’s menu button , then select Update Task with Current Settings. The task is updated with the current settings. All other tasks in the task queue remain unchanged. Renaming a task To rename a task, do one of the following: Right-click the task and select Rename. Click the task’s menu button , then select Rename. Duplicating a task To duplicate an existing task: Do one of the following: Double-click on the task within the task list. Click the task’s menu button , then select Recall Task Settings. This recalls all the task settings in the Export Audio dialog box. [Optional] Make any desired edits to the current export settings. Click Add Task to Queue. Deleting tasks To delete a single task, right-click the task and select Delete, or click the task’s menu button , then select Delete. To delete multiple tasks, select the tasks that you want to delete (Tip: press CTRL+A to select all tasks), then right-click any selected task and select Delete. The task(s) is removed from the task queue. Executing task queue export To execute all checked tasks in the queue, click the Run Tasks button. The tasks in the queue are exported one after another. The status of each task is updated as the queue is executing, and a summary is shown in the task queue header. Once a task is completed, the task is unchecked. Checking a task resets it. Clicking on the Run Tasks button resets all checked tasks before executing each task. While the queue is running, the Run Tasks button changes to a Cancel button, which allows you to cancel the execution of the task queue at any time. The checked status of a task persists when opening/closing the Export Audio dialog box, and with the project. Resetting a completed task Tasks are automatically unchecked on successful completion. To reset a task so it will execute again the next time you click Run Tasks, simply check the task. Canceling an in-progress queue export While the queue is running, the Run Tasks button changes to a Cancel button, which allows you to cancel the execution of the task queue at any time. Opening a task’s export location To open a task’s export location, click the task’s menu button , then select Open Export Location. Using export filename tags and presets You can now use “tokens” to define filenames for exported audio files. Tokens allow you to use placeholder tags that automatically extract the corresponding information (such as the project name, artist, sample rate, bit depth, current date or time, etc.) from a project and adds it to the resulting filename. For example, instead of manually typing the project name and date into the filename edit box, you can enter the following: {projectname}_{d} This will automatically use the project’s name and the current date. Each token is enclosed by curly brackets (aka braces) e.g. {d}. Adding filename tags To enter a tag, do one of the following: Open the Tags panel and click a tag. You can still type while this pop-up is showing, so you can mix literal characters with tags, or use backspace to correct any mistakes. Type in the tags directly into the filename edit box. Be sure to enclose each token by curly brackets (aka braces) e.g. {d}. Tokens are case sensitive. A preview of the first audio export filename is shown below the filename edit box. To see all tokens that can be used to specify the filename, click the Build Filename Using Tags button to open the Tags pop-up panel. To add a tag, click a tag button, or manually type the tag in the filename edit box. Below are some common tokens: Project name = {projectname} or {P} Name field in Notes Browser = {notesname} or {N} Artist field in Notes Browser = {notesartist} or {A} Sample rate = {samplerate} or {sr} Bit depth = {bitdepth} or {bd} Channel format = {channelformat} or {cf} Track name = {trackname} or {T} Track number = {tracknumber} or {t} Date = {d} Tempo = {tempo} or {b} Meter / time signature = {meter} or {m} Key = {key} or {k} Task = {taskname} or {TN} Press the Build Filename Using Tags button to display all available tokens. Most tags have a long token and a short token. For example, the project name token can be {projectname} or {P}. Each tag’s tooltip shows its full and abbreviated tokens. To always use abbreviated tokens when you click a tag, select Use Abbreviated Tokens in the filename builder pop-up panel. You can freely use either format. Tokens can be combined as in the examples below: {notesartist}_{notesname}_{d} {notesartist}_{notesname}_{samplerate}_{bitdepth}_{channelformat}_{d=Ymd} You can combine tokens and regular text, as in the following example: Client Name_{samplerate}Hz_{bitdepth}b_{channelformat}_{d=Ymd} Saving filename presets You can save your custom export filename format as a preset in the filename tag panel. To open the filename tag panel, click the Build Filename Using Tags button next to the filename edit box. To save the current filename as a preset, type a name in the Presets combobox, then press ENTER or click the Create Preset button . To delete a preset, select the preset in the Presets combobox, then click the drop-down menu and select Delete Preset. By using filename tokens to define a naming scheme and saving the filename format as a preset, you can reuse the presets in any project without having to manually type a filename. Misc. export enhancements Improved support for exporting track stems Creating per track mixdowns commonly called track stems is a common post production requirement when exporting projects to audio. There are several convenient improvements to aid with the process of exporting stems without modifying the source project: Use Tracks Through Entire Mix in the What to Export section to quickly exports the audio from each chosen track as heard through the main output. This is a useful way to create track stems as heard through master effects. Aux track and sidechain track dependencies are now automatically included when exporting individual tracks as well as when soloing such tracks. Use Track Folders in the What to Export section, to export the tracks in each of the selected track folders as heard through the entire mix, as separate files. Use the fly-out project selection editor in the What to Export panel to modify the current track selection or set the mute and solo status of each track and bus, without exiting the Export Audio dialog box. This is a convenient way to create export tasks for stems. Simply solo the tracks that you want to include in the stem, then add as a new task. Improved handling of aux tracks and sidechains when exporting or soloing tracks When exporting with source category Tracks, sidechain or aux track sends or outputs are now properly included in the export for the track containing the sidechain. The same applies to aux tracks. When soloing a track that contains a sidechain plugin, any sends from other tracks in the project are now automatically included, similarly to how it behaves with sends to aux tracks. Automatic effects tails flushing during bounce Many VST plug-ins do not properly flush their effects tails via reset state transitions. In some cases, exporting multiple clips or arrangements could result in tails unexpectedly appearing in the export/bounce. To address this, Cakewalk now automatically flushes effects tails during export/bounce operations to prevent left over effects tails from leaking into exports or being heard. By default, tails are flushed until a threshold of -70dB is reached or 20 seconds of silence is detected, whichever occurs first. The dB threshold and max duration can be changed via the following variables in Edit > Preferences > Audio - Configuration File: BounceFlushTailsMaxDurationSec=n (0 to 60; default is 20; set to 0 to disable tails flushing) Effects tails maximum flush length while bouncing (seconds). BounceFlushTailsThresholdDb=n (-120 to -40; default is -70) Effects tails flush gain threshold while bouncing (dB). On export, the audio engine will first hard flush any effects tails from all active plug-ins referenced in the project, including track/bus effects, clip effects, effects chains, ProChannel as well as instruments. Flushing tails is done both pre and post bounce/export in order to prevent unwanted tails from sounding after a bounce or appearing in exports after playing a project. Effects tails flushing is done in efficiently using parallel processing when the multi processing engine is enabled and is normally very fast. Flushing progress is shown on the toolbar during the bounce. If you wish to disable this, set BounceFlushTailsMaxDurationSec to zero. Default ‘Export Audio Files’ folder A new Export Audio Files folder path has been added to Edit > Preferences > File - Folder Locations. This path is used as the default location when you open the Export Audio dialog box. The default path is %PROJECTFOLDER%\Audio Export, which is an \Audio Exports subfolder in the current project directory. The current project folder is indicated by the %PROJECTFOLDER% environment variable. Tip: If you change the folder path in the Export Audio dialog box, you can restore the %PROJECTFOLDER%\Audio Export path by opening Edit > Preferences > File - Folder Locations and clicking OK or Apply. There is also a new content location preset in the Media Browser to jump directly to the Project Audio Export Folder. This preset always takes you to %PROJECTFOLDER%\Audio Export. Toast notification with link to open export location Upon completion of a single export job via the Export button, a toast notification appears with a link to open the export location in Windows Explorer. If the toast notification has been closed you can reopen the project audio folder again by selecting the media browser content location preset Project Audio Export Folder. Updated Bounce to Track(s) dialog box The Bounce to Tracks(s) dialog box has been redesigned similar to the Export Audio dialog box. Improved AudioSnap transient detection The transient detection algorithm has been greatly improved to more accurately detect audio transients in a variety of source material. Transients are useful when using audio snap and are also used for time stretching as well as when snapping to the transient pool. The AudioSnap transient detection method can now be specified in Edit > Preferences > Project - AudioSnap under Transient Detection. There are three methods: Magnitude Spectral (default for legacy projects) Multi-Resolution (default for new projects) Multi-Resolution is the new default transient detection method for new projects, and Spectral and Magnitude are the older legacy modes. The Multi-Resolution transient detection algorithm provides improved transient analysis that works well with most audio source material. The detection mode is stored in the project and older projects will continue to use Spectral until changed via Edit > Preferences > Project - AudioSnap. Note: The new transient analysis will not be used by default on previously saved projects. You must explicitly pick the Multi-Resolution algorithm from Edit > Preferences > Project - AudioSnap before this will take effect for that project. Once you resave the project with this change it will continue to use the new algorithm for all audio. When the detection method is changed, you will be prompted that project audio waveforms will be recomputed. After regeneration of the waveforms are complete, the new transients will be visible when switching the edit filter to Transients. The default transient threshold (available in the AudioSnap palette) is different for each transient detector mode. Note that any edited transients are retained when switching the transient detector mode. Misc. enhancements Mackie Control revspread VPot DataType On the Mackie Control surface, a VPot’s datatype defines the type of control being edited and how it should be displayed on the VPot LED halo. Currently, the Mackie Control surface supports a spread DataType for the LEDs that surround the VPots. The LEDs start in the middle for small values, then "spread" around the VPot for larger values. With certain parameter types, such as an equalizer "Q" setting, where a small Q value means a large spread, and a large Q value means a narrow spread, the VPots show the opposite in the LED spread, which is confusing. To address this, the Mackie Control surface now supports a new revspread VPot DataType that can be assigned in MackieControl.ini (C:\Program Files\Cakewalk\Shared Surfaces). With the revspread VPot DataType, high values show a narrow LED spread, and low values show a wide LED spread. This doesn't affect the actual numerical value being shown, just the way the LEDs spread around the VPot. For details, see the instructions in MackieControl.ini. Allow multiple MIDI files to be dragged into a project simultaneously You can now import multiple MIDI files into a project by dragging from Windows or the Media Browser. By default, multiple tracks are created. To import back-to-back instead, hold down CTRL+SHIFT when dragging the MIDI files into a project. ASIO driver compatibility checking Some ASIO drivers, such as Realtek ASIO, ASIO4All and Generic Low Latency ASIO Driver, are known to be incompatible with Cakewalk and can lead to instability or crashes. Cakewalk will now detect use of known incompatible ASIO drivers and warn the user to switch to a different native ASIO driver or WASAPI Shared mode for a better experience. Note: This warning doesn't prevent you from using these drivers. If you need to use them for some reason you can still select and use them. Bug fixes Stability Crash Freezing Track with synth in project Crash when bouncing with sidechain FX Crash exporting user project as OMF Crash when cloning track with synth envelopes UI Aim Assist draws incorrectly after collapsing/expanding MultiDock Arm Tracks command arms hidden audio track in Instrument tracks Aim Assist can appear unexpectedly when turned off Selection module does not automatically update display after setting display times to SMPTE Misc. Process slide not sliding some track envelopes Paste Special behaves unexpectedly when combining Paste to One Track and Paste Into Existing Clips When the Snap module set to Measure or any value below that in the list, the Snap Value drop box fails to turn snap on/off Save Copy As MIDI interferes with project cwp save Last File 1-4 key bindings are all linked unexpectedly Unable to copy/paste multiple Arranger tracks between projects Modal message boxes do not always disable the main app window Cannot copy special selection with tempos from SONAR to Cakewalk Latest release notes are here. See prior release notes. Check out all new features released to date.


 6 points
 -
Our Brand New Creative Gate Sequencer Gatelab is Here! (and it's free) We're thrilled to announce that our new gate sequencer plugin is now available! ..and it's awesome. a modern sequencer, volume Modulation generator and beyond.. Gatelab randomizes a unique combination of parameters and is delivering endless rhythmic effects. It can also send MIDI data, giving it the ability to randomize parameters in other plug-ins. https://audiomodern.com/free/5 points
-
Yeah. The Sunset is NICE. I had resisted it before when it was on sale recently because I thought I had enough reverbs already that I hardly use. I picked it as one of my freebies and it immediately became my . go-to. I tend to be very sparing with reverb. Most of them get real overwhelming real fast. This is like I just stuck the band together in a room that has a really nice natural, subtle reverb.5 points
-
Anyone that is poo poo’ing EZBass is really just missing the big picture. It makes perfect sense that Toontrack is not sampling multiple notes per string and keeping the EBX sample sizes so much smaller than other commercial bass libraries on the market. They need to leave room for their future release of “Superior Bass!”5 points
-
Thank you everyone for the incredible feedback and participation this early access! 2021.09 has now been officially released. Please use the main 09 release feedback thread for any further comments.5 points
-
There are two differences: 1. CA2A is a VST that can be used in any DAW, whereas PC2A is pro-channel only 2. CA2A has a sidechain input, PC2A doesn't.5 points
-
People who guessed 16, you know the rules! Pants around your ankles and one lap around the entire world! Go!4 points
-
We pitched this cover song for a trailer trailer opportunity and although it made the short list, we didn't get gig so I'm able to share. CBB used for the whole thing with various Kontakt Libraries etc.
 3 points
 -
I was thinking it was kind of like The Seeds of Love album cover by Tears For Fears...3 points
-
https://www.plugin-alliance.com/en/products/x-sonible-smart-reverb.html Use this voucher code during checkout! SMART-REVERB-4999 Offer ends September 24, 11:59 PM California Time This is a fixed price offer! The price for this product will not change if you add more plugins to your order. But you will get dynamic discounts of 20-60% on any additional plugins you may purchase.3 points
-
With a PA $25 loyalty voucher discount this deal becomes truly a no-brainer @ $24.993 points
-
I was once fortunate to sit next to a hearing expert on a flight, who I'd noticed was using an SPL meter to measure noise levels on the plane. A professor and researcher from the University of Washington, he was very happy to talk about his specialty. One cruel factoid I learned that day was that audio professionals lose their hearing faster than the general population. Another discouraging observation was that teenagers in the US today have the ears of 50-year-olds 60 years ago. It's projected that hearing impairment will become a global epidemic when those teens are over 50. A more encouraging lesson was that "age-related" hearing loss is not age-related at all. Hearing tests were given to some remote Amazonian tribes, people never subjected to the everyday noise of urban life. There, 80-year-olds had the hearing acuity of a 10-year-old. It's too late for me, but those of you still young enough to do something about it - protect your ears!3 points
-
Hi all - please use this topic to post feedback specific to 2021.09. Release-specific feedback is valuable to us, and consolidating it in a single topic is extremely helpful. Thanks in advance! 2021.09 Release Notes2 points
-
[UPDATE 4-Oct-2021: Cakewalk 2021.09 Update 1 (build 27.09.0.145) now available] Introduction The 2021.09 release introduces powerful new audio export capabilities including batch export, filename tokens, advanced stem export capabilities, fresh new intuitive Export Audio and bounce dialogs, a brand new AudioSnap transient detection algorithm, numerous enhancements and optimizations, and lots of bug fixes, all in keeping with our goal of making Cakewalk as reliable and enjoyable as possible. Please note that in order to automatically keep your activation status up to date, Cakewalk will renew your activation status whenever a new version of the application is installed and run for the first time, and when you sign in to BandLab from within Cakewalk. If you have never signed in to BandLab from within Cakewalk, you will be prompted once to sign in. The following highlights are intended to provide an overview of the more significant changes. Please also refer to the new features section of our documentation for more detailed information on the features. Please give us feedback on this release. We hope you like it! Update Oct 4 2021: 2021.09 Update 1 (build 27.09.0.145) Bug fixes Stability: S-Gear 2 VST3 plug-in crashes when inserted Intermittent crash when closing Arranger section context menu Exporting audio with plug-ins on a surround bus can hang the export while flushing plug-in buffers In rare cases certain plug-ins could hang export while flushing plug-in buffers Export: MP3 Export Options dialog does not show recalled task settings MP3 Export Options dialog should default to 256 kbps Changes to Notes Browser tab are not reflected in the ID3 MP3 Export Options dialog until Cakewalk restart Export as MIDI exporting whole project if selection at time zero Windows notification sound when opening Export Audio dialog in some projects Export Audio dialog uses default project sample rate instead of actual project sample rate Large bounce buffer sizes cause flatline audio when exporting or bouncing clips with 96K or higher sample rates Export task fails with no meaningful message if drive or path is invalid Export with External encoder was not functional Warn if duplicate filenames in export task queue Expand width of file overwrite prompt when exporting multiple files and make the list scrollable Export as MIDI File should not show audio track warning message Misc.: Bounce to Track(s) dialog forces render sample rate to 44100 always Bounce to Track(s) should always use project sample rate to prevent unnecessary sample rate conversion Bounce to Clips unexpectedly uses bounce buffer size from Export Audio dialog 2021.09 Highlights New export audio features Improved AudioSnap transient detection Misc. enhancements Bug fixes New export audio features The Export Audio feature has been greatly improved and optimized to handle the most demanding rendering tasks. Highlights: An intuitive new UI with collapsible panels to make it easier to get to the most commonly used features,. Task queues for export automation. Complete control over output file names using tag based file name presets. New additional export categories available: "Tracks Through Entire Mix" for track stems, exports the audio from each chosen track as heard through the main output. This is a useful way to create track stems as heard through master effects. "Track Folders" for any non-empty track folders. "Arranger sections" allows you to export each individual arrangement section as a separate audio file. Export uses significantly less memory and runs faster by eliminating making an extra copy of the project in memory. Support for setting the export buffer size independently from the audio driver buffer size. (can speed up export times) Convenient access to select and mute or solo tracks directly from the export UI. Set export time ranges or export entire project directly from the export UI. Automatic effects tail flushing is now part of export/bounce to prevent left over effects tails from leaking into exports or being heard. New default Export Audio Files folder setting in Edit > Preferences > File - Folder Locations. Toast notification on export completion with link to the completed render. More details: Related settings are organized into collapsible panels. The size, position and expanded state of each section is remembered once you close the dialog. The task queue allows you to create multiple export tasks and run them all as a batch. A task in the export queue contains the set of export settings including the mix settings, export file name, selection, location, and the time range. The export queue is saved in the project and can be recalled and re-executed. Any prompts appear at the time of adding the task, so you can run the whole queue without any user intervention. To batch export all tasks in the task queue, click Run Tasks. To export a single job with the current export settings, click Export. Filename and location are shown as two separate fields. Filename is the name of the file you want your exported audio to be called, and location is the directory where it should be saved. When you first open the dialog, the location will be set to the default location as specified in Edit > Preferences > File - Folder Locations under Export Audio Files. The default is \Audio Exports under the current project directory, where the current project folder is indicated by the %PROJECTFOLDER% environment variable. You can change the export directory by clicking on the browse location button , and this location will be remembered for the duration of the project’s session. You can change the global export location for all projects with the Export Audio Files path in Edit > Preferences > File - Folder Locations. Filename tokens. Filenames now support substitution tags for common project and export properties. You can type tags directly into the filename edit box, or use the filename builder pop-up to add them for you. You can still type while this pop-up is showing, so you can mix literal characters with tags, or use backspace to correct any mistakes. Filename presets let you save and recall custom filename formats. The filename itself now supports both literal characters and substitution tags (“tokens”). Substitution tags replace tags within the filename with common project and export properties. Each tag is contained within curly brackets. You can type in the tags directly into the filename edit box, or use the filename builder pop-up to add them for you. It’s worth mentioning that you can still type while this pop-up is showing, so you can mix literal characters with tags, or use backspace to correct any mistakes. A preview of the first audio export filename is shown below the filename edit box. The filename builder pop-up also support filename presets, so you can easily recall a formatted filename by selecting it from the drop-down. As with all Cakewalk presets, you can save new presets, replace existing ones, or delete one’s you don’t want. Export presets can now store a default filename. In the What to Export section, Track Folders has been added as a source category. This setting exports the tracks in each of the selected track folders as heard through the entire mix, as separate files. This provides yet another convenient way to export stems without modifying the source project. In addition to arrangements, individual Arranger sections are available as an export category. This allows you to export each individual section as a separate audio file. Under Format, the Bounce Buffer Size (ms) setting is used to specify the audio buffer size that will be used during export. This value defaults to use the current playback buffer size and can be changed to a max size of 350 ms. While small buffer sizes are useful to minimize latency, they add to CPU load and can slow down export operations significantly. A larger buffer size can speed up the export process in large projects by allowing the CPU to process data more efficiently. Caution: Some plugins can be unstable or crash with large buffer sizes so use this with caution. Depending on the plugins used, we recommend using moderate sizes like 50-100 msec rather than higher sizes. Also if you are using plugin automation, large buffer sizes will not sound smooth if you are using plugins that do not support sample accurate automation. The Bounce Buffer Size settings only applies when Render in Real-time is disabled. The playback latency buffer size is used when Render in Real-time is enabled. Tracks Through Entire Mix has been added as a new source category under What to Export. It exports individual tracks including all downstream bus effects and automation. The result is the same as if you solo one track at a time during export. When exporting multiple files as MP3 or Windows Media Advanced Streaming (WMA) format, the Export Options dialog box has a new Use These Settings for All option that lets you apply the same settings to all files instead of prompting for each file. Export works on the current project selection. The What to Export panel contains a fly-out project selection editor. This allows you to modify the current track selection and the mute and solo status of each track and bus, without exiting the Export Audio dialog box. This is especially convenient if you if you want to create several tasks, each with a different selection, or if you want to export multiple stems. Simply solo the tracks that you want to include in the stem, then add as a new task. A track that is checked means it’s included in the selection. If all the tracks are unchecked, that means there is no selection, and all tracks will be available. Changing the project selection changes which source items are available. A note about selection and the Tracks export category: When the source category is Tracks, the project selection has a special meaning: Having a project selection means there is also a time selection. So if you have tracks selected in your project selection, then all the tracks chosen in your audio source will be exported at exactly the length of the selection. In other words, the length of each tracks’ audio file will be the same. If you have nothing selected in your project, then no specific export time range has been set, and the length of each tracks’ audio file will be the length of each individual track. To the right of the What to export drop-down is a search filter, which lets you search for a particular track, bus, arrangement, section, or Mix Recall preset, should you have a large number of sources to search through. Tip: To quickly select all/none in the source list, hold down CTRL+SHIFT and click any checkbox. To select all, press CTRL+A. To check/uncheck the selected sources, press SPACEBAR. The Range panel specifies the time range to be exported. The drop-down provides the following choices: Entire Project = The entire length of the project. Time Selection = A specified time selection. The Start and End edit boxes allow you to manually enter the start and end times of the export range. Clicking the button to the left of the Start label will toggle between musical and absolute time. The buttons to the right of the Start and End edit boxes will allow you to choose a time based on defined project landmarks, such as the beginning of the project, the now time, or marker locations. Set Time Selection to Loop Range = Set the time selection to the current loop region. Set Time Selection to Punch Range = Set the time selection to the current punch region. Note: The 2021.09 installer will delete the old factory export presets and replace them with new and updated presets. If you have overwritten the factory preset names, those presets will be replaced. Other custom export presets will not be affected. Batch exporting audio files using task queues Using the Export button is fine if you have a single export. But what if you want to tweak your project and export again, or you want several different types of exports? You may want a task for exporting your stems, another task for exporting individual tracks, and another for exporting your final mix as a stereo file. You can now create multiple export tasks, such as stems or different file formats, and add them to an export queue. A task in the export queue contains the set of export settings including the mix settings, filename, location, selection, and the time range. You can add as many export tasks as you like, and run all export tasks as a batch without any user intervention. The task queue is per project and is saved with the project. Adding a task to the queue To create a task, simply go through the normal process of defining your export, then instead of clicking the Export button, click the Add Task to Queue button . This adds a task with the current settings to the task queue. If you are exporting multiple files as part of a task, a list of the filenames will be shown in a confirmation prompt. Any further prompts required for additional format settings will also be shown at this time… that way, you won’t get any prompts when you actually run the task. Once you’ve confirmed any prompts, enter a name for your new task. Simply type the name of the task in, and press ENTER. Tip: The name of the task can also be used in your filename by using the {taskname} tag. Repeat the above steps for any additional tasks you need. To the right of the task name you’ll see the number of files to be exported by each task, an estimated size (if it’s a wave file), and a summary of the file format. Editing tasks in the task queue You can update tasks that you already added to a task queue. To update an existing task: Do one of the following: Double-click on the task within the task list. Click the task’s menu button , then select Recall Task Settings. The task’s settings are recalled in the Export Audio dialog box. Make any desired edits to the current export settings. Click the task’s menu button , then select Update Task with Current Settings. The task is updated with the current settings. All other tasks in the task queue remain unchanged. Renaming a task To rename a task, do one of the following: Right-click the task and select Rename. Click the task’s menu button , then select Rename. Duplicating a task To duplicate an existing task: Do one of the following: Double-click on the task within the task list. Click the task’s menu button , then select Recall Task Settings. This recalls all the task settings in the Export Audio dialog box. [Optional] Make any desired edits to the current export settings. Click Add Task to Queue. Deleting tasks To delete a single task, right-click the task and select Delete, or click the task’s menu button , then select Delete. To delete multiple tasks, select the tasks that you want to delete (Tip: press CTRL+A to select all tasks), then right-click any selected task and select Delete. The task(s) is removed from the task queue. Executing task queue export To execute all checked tasks in the queue, click the Run Tasks button. The tasks in the queue are exported one after another. The status of each task is updated as the queue is executing, and a summary is shown in the task queue header. Once a task is completed, the task is unchecked. Checking a task resets it. Clicking on the Run Tasks button resets all checked tasks before executing each task. While the queue is running, the Run Tasks button changes to a Cancel button, which allows you to cancel the execution of the task queue at any time. The checked status of a task persists when opening/closing the Export Audio dialog box, and with the project. Resetting a completed task Tasks are automatically unchecked on successful completion. To reset a task so it will execute again the next time you click Run Tasks, simply check the task. Canceling an in-progress queue export While the queue is running, the Run Tasks button changes to a Cancel button, which allows you to cancel the execution of the task queue at any time. Opening a task’s export location To open a task’s export location, click the task’s menu button , then select Open Export Location. Using export filename tags and presets You can now use “tokens” to define filenames for exported audio files. Tokens allow you to use placeholder tags that automatically extract the corresponding information (such as the project name, artist, sample rate, bit depth, current date or time, etc.) from a project and adds it to the resulting filename. For example, instead of manually typing the project name and date into the filename edit box, you can enter the following: {projectname}_{d} This will automatically use the project’s name and the current date. Each token is enclosed by curly brackets (aka braces) e.g. {d}. Adding filename tags To enter a tag, do one of the following: Open the Tags panel and click a tag. You can still type while this pop-up is showing, so you can mix literal characters with tags, or use backspace to correct any mistakes. Type in the tags directly into the filename edit box. Be sure to enclose each token by curly brackets (aka braces) e.g. {d}. Tokens are case sensitive. A preview of the first audio export filename is shown below the filename edit box. To see all tokens that can be used to specify the filename, click the Build Filename Using Tags button to open the Tags pop-up panel. To add a tag, click a tag button, or manually type the tag in the filename edit box. Below are some common tokens: Project name = {projectname} or {P} Name field in Notes Browser = {notesname} or {N} Artist field in Notes Browser = {notesartist} or {A} Sample rate = {samplerate} or {sr} Bit depth = {bitdepth} or {bd} Channel format = {channelformat} or {cf} Track name = {trackname} or {T} Track number = {tracknumber} or {t} Date = {d} Tempo = {tempo} or {b} Meter / time signature = {meter} or {m} Key = {key} or {k} Task = {taskname} or {TN} Press the Build Filename Using Tags button to display all available tokens. Most tags have a long token and a short token. For example, the project name token can be {projectname} or {P}. Each tag’s tooltip shows its full and abbreviated tokens. To always use abbreviated tokens when you click a tag, select Use Abbreviated Tokens in the filename builder pop-up panel. You can freely use either format. Tokens can be combined as in the examples below: {notesartist}_{notesname}_{d} {notesartist}_{notesname}_{samplerate}_{bitdepth}_{channelformat}_{d=Ymd} You can combine tokens and regular text, as in the following example: Client Name_{samplerate}Hz_{bitdepth}b_{channelformat}_{d=Ymd} Saving filename presets You can save your custom export filename format as a preset in the filename tag panel. To open the filename tag panel, click the Build Filename Using Tags button next to the filename edit box. To save the current filename as a preset, type a name in the Presets combobox, then press ENTER or click the Create Preset button . To delete a preset, select the preset in the Presets combobox, then click the drop-down menu and select Delete Preset. By using filename tokens to define a naming scheme and saving the filename format as a preset, you can reuse the presets in any project without having to manually type a filename. Misc. export enhancements Improved support for exporting track stems Creating per track mixdowns commonly called track stems is a common post production requirement when exporting projects to audio. There are several convenient improvements to aid with the process of exporting stems without modifying the source project: Use Tracks Through Entire Mix in the What to Export section to quickly exports the audio from each chosen track as heard through the main output. This is a useful way to create track stems as heard through master effects. Aux track and sidechain track dependencies are now automatically included when exporting individual tracks as well as when soloing such tracks. Use Track Folders in the What to Export section, to export the tracks in each of the selected track folders as heard through the entire mix, as separate files. Use the fly-out project selection editor in the What to Export panel to modify the current track selection or set the mute and solo status of each track and bus, without exiting the Export Audio dialog box. This is a convenient way to create export tasks for stems. Simply solo the tracks that you want to include in the stem, then add as a new task. Improved handling of aux tracks and sidechains when exporting or soloing tracks When exporting with source category Tracks, sidechain or aux track sends or outputs are now properly included in the export for the track containing the sidechain. The same applies to aux tracks. When soloing a track that contains a sidechain plugin, any sends from other tracks in the project are now automatically included, similarly to how it behaves with sends to aux tracks. Automatic effects tails flushing during bounce Many VST plug-ins do not properly flush their effects tails via reset state transitions. In some cases, exporting multiple clips or arrangements could result in tails unexpectedly appearing in the export/bounce. To address this, Cakewalk now automatically flushes effects tails during export/bounce operations to prevent left over effects tails from leaking into exports or being heard. By default, tails are flushed until a threshold of -70dB is reached or 20 seconds of silence is detected, whichever occurs first. The dB threshold and max duration can be changed via the following variables in Edit > Preferences > Audio - Configuration File: BounceFlushTailsMaxDurationSec=n (0 to 60; default is 20; set to 0 to disable tails flushing) Effects tails maximum flush length while bouncing (seconds). BounceFlushTailsThresholdDb=n (-120 to -40; default is -70) Effects tails flush gain threshold while bouncing (dB). On export, the audio engine will first hard flush any effects tails from all active plug-ins referenced in the project, including track/bus effects, clip effects, effects chains, ProChannel as well as instruments. Flushing tails is done both pre and post bounce/export in order to prevent unwanted tails from sounding after a bounce or appearing in exports after playing a project. Effects tails flushing is done in efficiently using parallel processing when the multi processing engine is enabled and is normally very fast. Flushing progress is shown on the toolbar during the bounce. If you wish to disable this, set BounceFlushTailsMaxDurationSec to zero. Default ‘Export Audio Files’ folder A new Export Audio Files folder path has been added to Edit > Preferences > File - Folder Locations. This path is used as the default location when you open the Export Audio dialog box. The default path is %PROJECTFOLDER%\Audio Export, which is an \Audio Exports subfolder in the current project directory. The current project folder is indicated by the %PROJECTFOLDER% environment variable. Tip: If you change the folder path in the Export Audio dialog box, you can restore the %PROJECTFOLDER%\Audio Export path by opening Edit > Preferences > File - Folder Locations and clicking OK or Apply. There is also a new content location preset in the Media Browser to jump directly to the Project Audio Export Folder. This preset always takes you to %PROJECTFOLDER%\Audio Export. Toast notification with link to open export location Upon completion of a single export job via the Export button, a toast notification appears with a link to open the export location in Windows Explorer. Updated Bounce to Track(s) dialog box The Bounce to Tracks(s) dialog box has been redesigned similar to the Export Audio dialog box. Improved AudioSnap transient detection The transient detection algorithm has been greatly improved to more accurately detect audio transients in a variety of source material. Transients are useful when using audio snap and are also used for time stretching as well as when snapping to the transient pool. The AudioSnap transient detection method can now be specified in Edit > Preferences > Project - AudioSnap under Transient Detection. There are three methods: Magnitude Spectral (default for legacy projects) Multi-Resolution (default for new projects) Multi-Resolution is the new default transient detection method for new projects, and Spectral and Magnitude are the older legacy modes. The Multi-Resolution transient detection algorithm provides improved transient analysis that works well with most audio source material. The detection mode is stored in the project and older projects will continue to use Spectral until changed via Edit > Preferences > Project - AudioSnap. Note: The new transient analysis will not be used by default on previously saved projects. You must explicitly pick the Multi-Resolution algorithm from Edit > Preferences > Project - AudioSnap before this will take effect for that project. Once you resave the project with this change it will continue to use the new algorithm for all audio. When the detection method is changed, you will be prompted that project audio waveforms will be recomputed. After regeneration of the waveforms are complete, the new transients will be visible when switching the edit filter to Transients. The default transient threshold (available in the AudioSnap palette) is different for each transient detector mode. Note that any edited transients are retained when switching the transient detector mode. Misc. enhancements Mackie Control revspread VPot DataType On the Mackie Control surface, a VPot’s datatype defines the type of control being edited and how it should be displayed on the VPot LED halo. Currently, the Mackie Control surface supports a spread DataType for the LEDs that surround the VPots. The LEDs start in the middle for small values, then "spread" around the VPot for larger values. With certain parameter types, such as an equalizer "Q" setting, where a small Q value means a large spread, and a large Q value means a narrow spread, the VPots show the opposite in the LED spread, which is confusing. To address this, the Mackie Control surface now supports a new revspread VPot DataType that can be assigned in MackieControl.ini (C:\Program Files\Cakewalk\Shared Surfaces). With the revspread VPot DataType, high values show a narrow LED spread, and low values show a wide LED spread. This doesn't affect the actual numerical value being shown, just the way the LEDs spread around the VPot. For details, see the instructions in MackieControl.ini. Allow multiple MIDI files to be dragged into a project simultaneously You can now import multiple MIDI files into a project by dragging from Windows or the Media Browser. By default, multiple tracks are created. To import back-to-back instead, hold down CTRL+SHIFT when dragging the MIDI files into a project. ASIO driver compatibility checking Some ASIO drivers, such as Realtek ASIO, ASIO4All and Generic Low Latency ASIO Driver, are know to be incompatible with Cakewalk and can lead to instability or crashes. Cakewalk will now detect use of known incompatible ASIO drivers and warn the user to switch to a different native ASIO driver or WASAPI Shared mode for a better experience. Note: This warning doesn't prevent you from using these drivers. If you need to use them for some reason you can still select and use them. Latest release notes are here. See prior release notes. Check out all new features released to date. Previous release: 2021.06 Feature Overview 2021.04 Feature Overview 2021.01 Feature Overview 2020.11 Feature Overview 2020.09 Feature Overview 2020.08 Feature Overview 2020.05 Feature Overview 2020.04 Feature Overview 2020.01 Feature Overview 2019.11/12 Feature Overview 2019.09 Feature Overview 2019.07 Feature Overview
 2 points
 -
The birds and the bees!2 points
-
Even worse technically the post said to look UNDER them! And before I let this opportunity pass... Do you know what you won't find there? That free MIDI controller2 points
-
Wanna keep hiding all that charm...?2 points
-
Reminds me that monthy python pictures in movies...2 points
-
With a plate reverb😉2 points
-
2 points
-
Really on a serious note Pete you should consider a raffle to help it along. Give gear credits away to a few lucky winners who have joined the group buy. Wouldn't cost much and think of the good will . Wink wink nudge nudge 😀2 points
-
i just want the rest of t-racks so the stupid thing doesn't keep bugging me about how i am missing licenses for items.2 points
-
Don't underestimate the power of a final day flurry/surge. I may well join again if I can convince my wife that I'm charming.2 points
-
^^^ This exactly. That's why we need an AUB for MODO Bass. Come on, IKM! Time to step up to the plate. I have CoreBass Pear from OTS and it's very good, but I'd like a MODO Bass AUB, too.2 points
-
In fact ther best way to have a good sounding stereo acoustic guitar is recording by mic and put it on left side and recording the same acoustic guitar by her pickup and put it on the right side.2 points
-
Robyn Hitchcock - The Black Crow Knows2 points
-
This is from EZ BAss manual: As incredible as EZbass is as a pure virtual instrument, it is intended as a songwriting tool. Songwriting can start out in the details, but is more productive when making broad strokes that flow well together and gradually choosing finer and finer tools.2 points
-
I bought Freakshow just because of the beyond great anti-marketing.2 points
-
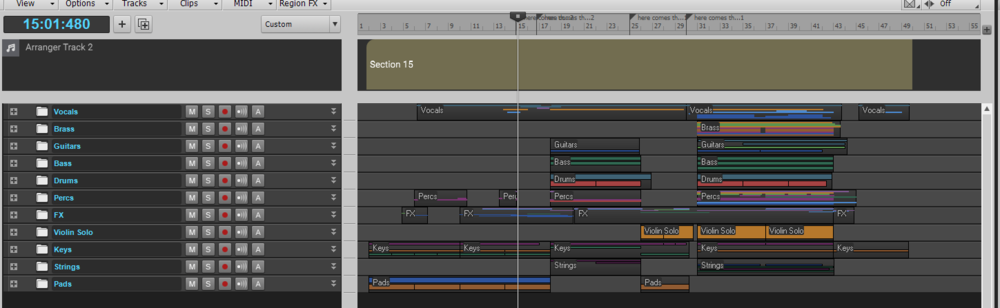
Notice on the upper right side- you have the Workspace set to "Basic". It's doing this by design. Set this to "None" instead.2 points
-
Good one. Sonible rocks.2 points
-
Insert the Event Filter MIDI FX in the bin of each MIDI track with appropriate min and max 'key' settings. Keep in mind that the default octave numbering in Cakewalk designates Middle as C5: https://www.cakewalk.com/Documentation?product=Cakewalk&language=3&help=EditingMIDI.64.html2 points
-
So why would we even suggest the Assistant when something better is now available? The Assistant has been the worst software I’ve been forced to use ever. I’m so glad that it is been replaced with a proper solution2 points
-
Are the dropouts actually impacting your work or is the message and audio stopping bothering you? If so you can turn off the dropout detection here:
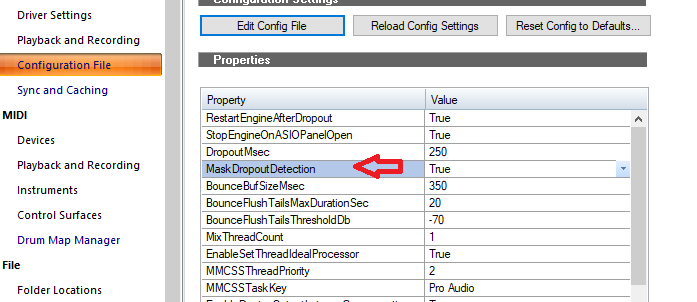 2 points
 -
Keeping my coat2 points
-
Way to go!!! Appreciate the update! I'm so glad to see the environment variable problem on exporting file solved in the very last day. This official release solves the problem. Thanks @Noel Borthwick , @msmcleod, @Jesse Jost , and all dev team for the best effort. As always, love you all guys! Thank you so much for everything. Keep up the good work, stay health, and be happy! Love! Jaymz2 points
-
Husker Du - Don't Want To Know If You Are Lonely2 points
-
I've known a few girls like that.2 points
-
I herr wot u did dare1 point
-
Very nice... Well done-1 point
-
@Skyline_UK There should be no decrease in bounce speed. The only new step added is to flush effects tails. Please read the release notes there is a way to disable that if necessary. In fact if you are bouncing the entire project it should be faster because we no longer duplicate the project in memory in that scenario. Also check your audio buffer size. If its set low bounces will be slower unless you use the new bounce buffer size to set it to a higher value.1 point
-
After posting on E.A.137, I verified it again. Everything from 2021.06 to E.A.134 was working fine. However, from E.A.137, it was not possible to export normally except for "buffer size: playback" and "real time bounce". Ver 2021.09 cannot output normally, I would like to use E.A.134, which was the most stable, for the time being.1 point
-
Thanks for posting. It serves as a reminder to me. I copped this 'free' a while back. They are all trippy and mostly unpredictable. I told myself I'd cop some of their mech if I thought they were cool, and I do so I guess now is the time.1 point
-
BA was primarily designed in Singapore for BandLab, the web-based DAW. It was pressed into service as a CbB install/updater in order to have something on day one. The new installer is being developed by the CbB team. The new installer is primarily for new installs although it will update too. Users with CbB 2020.09 and newer installed should use the in-app update process.1 point
-
Very nice! The combination of bells and pads is quite cool!1 point
-
Rolling Stones - Brown Sugar:1 point
-
Providing excellent support for Cakewalk by BandLab has always been and remains a top priority for us. With a rapidly growing user base, we must focus our support on issues that directly concern the usage and functionality of the Cakewalk by Bandlab application software. However, we receive a significant number of technical support requests related to non-Cakewalk issues, such as: Hardware/driver problems Windows configuration 3rd party plug-ins The best avenue to troubleshoot issues like these is our peer-to-peer forums, where you can find many knowledgeable power users with deep expertise in using DAWs. If you are unable to diagnose or resolve any such issues on your own or via the forum, or require general consultation or training, or are a professional studio on a production deadline, we recommend our friends at the following respected companies for their expertise in delivering top notch services at very reasonable prices. Since 2004, OBEDIA has provided phone and remote desktop training and support for recording musicians and content creators. OBEDIA keeps you focused, productive and offers custom-built digital audio production computers through its PCAudioLabs line. Having worked closely with Grammy winning producers, engineers, musicians, composers and DJs, OBEDIA and PCAudioLabs have built a stellar reputation of delivering the power, stability and support necessary to facilitate demanding productions. Cakewalk by BandLab Training Get started with OBEDIA Purrrfect Audio, headed by long time Cakewalk power user and familiar forum member Jim Roseberry, has been providing support and designing/building custom PCs for audio/video since 1994. Book a consultation with Purrrfect Audio Troubleshooting Better problem reporting: How to capture a crash dump Diagnosing plug-in compatibility problems and crashes in Cakewalk Cakewalk Help Center Contact Cakewalk Support NOTICE OF NON-AFFILIATION AND DISCLAIMER This list of participating independent third-party service providers is strictly for your convenience, and the use of third party services is done at your own discretion. These independent third-party service providers are not agents for, not joint ventures of, not employed by, and do not work for BandLab Technologies.

 1 point