Leaderboard


Popular Content
Showing content with the highest reputation on 04/24/2020 in all areas
-
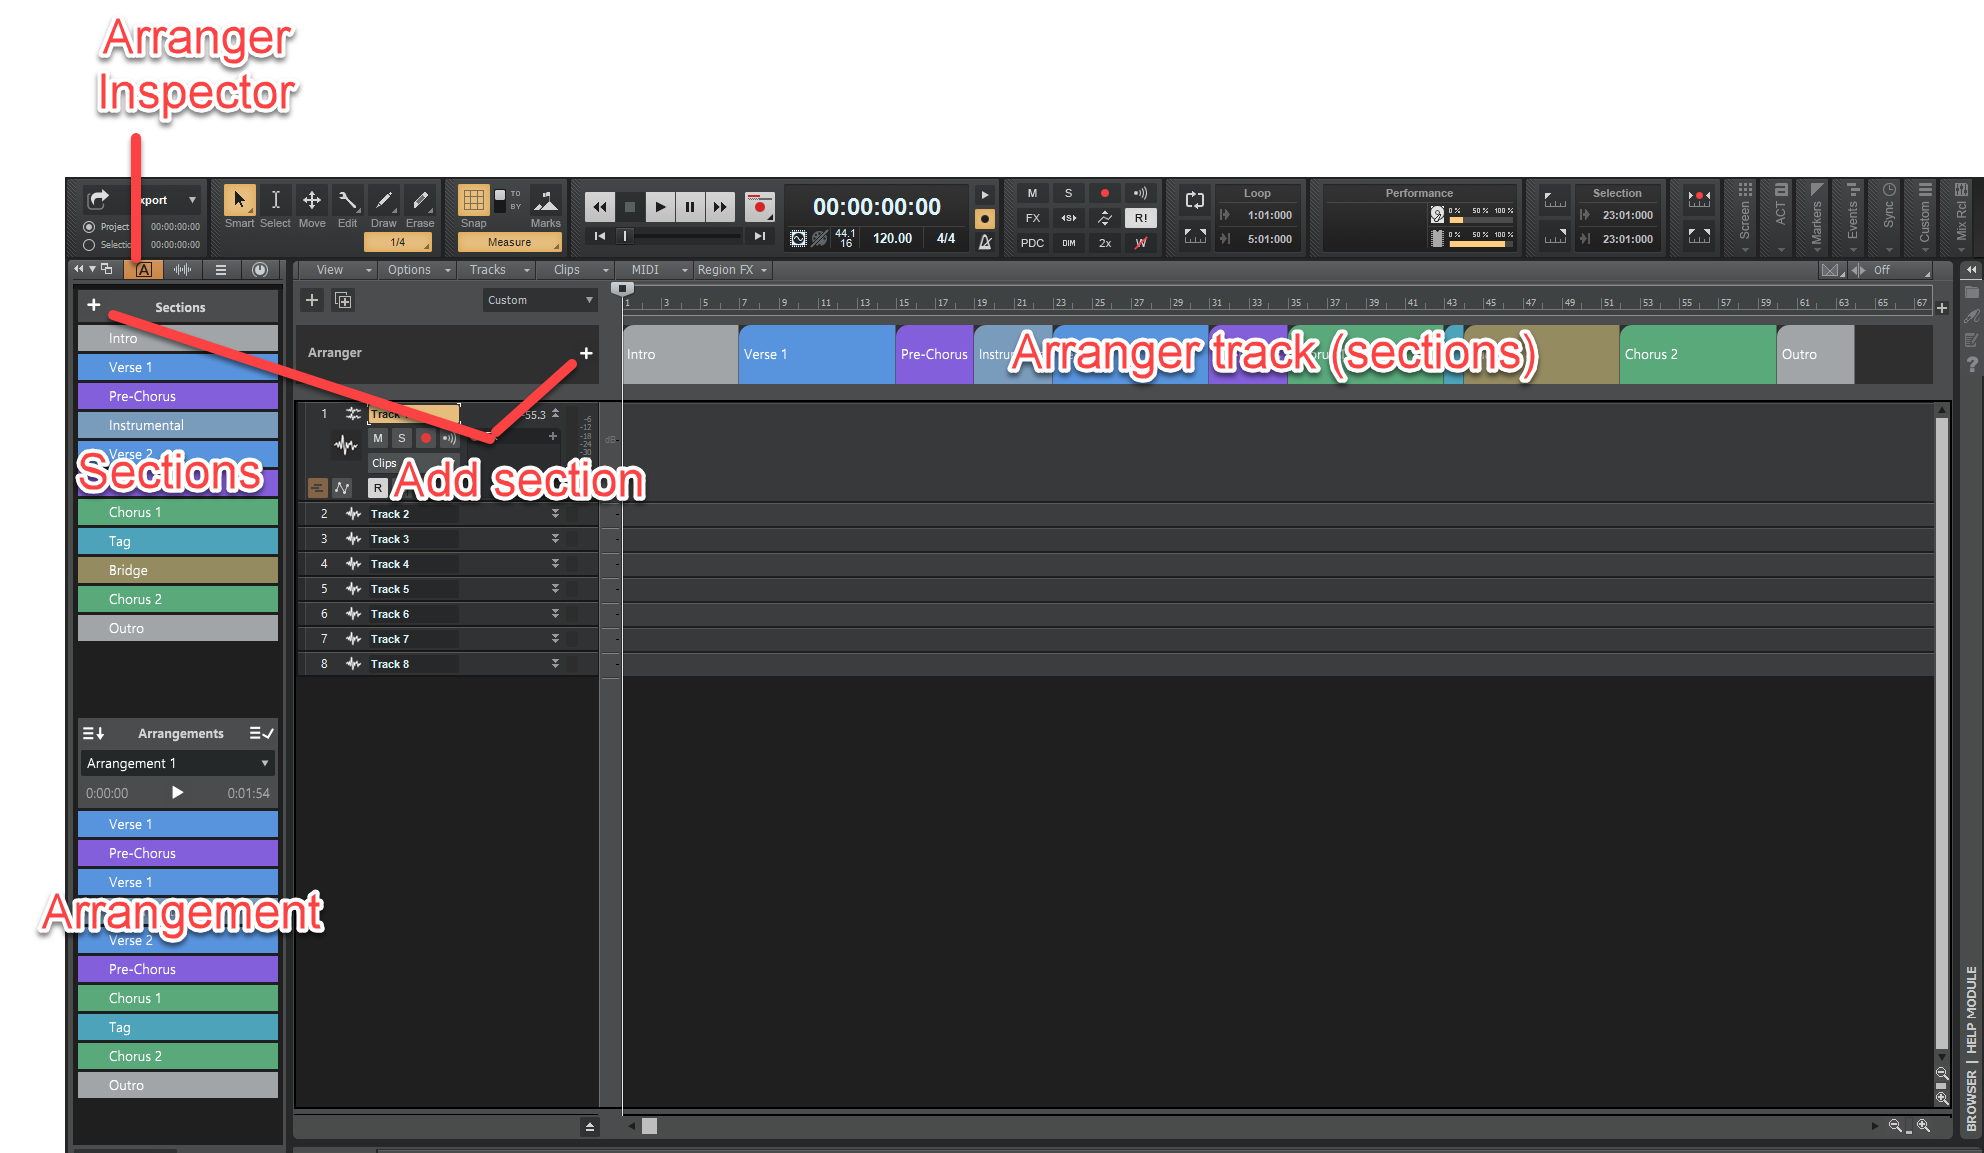
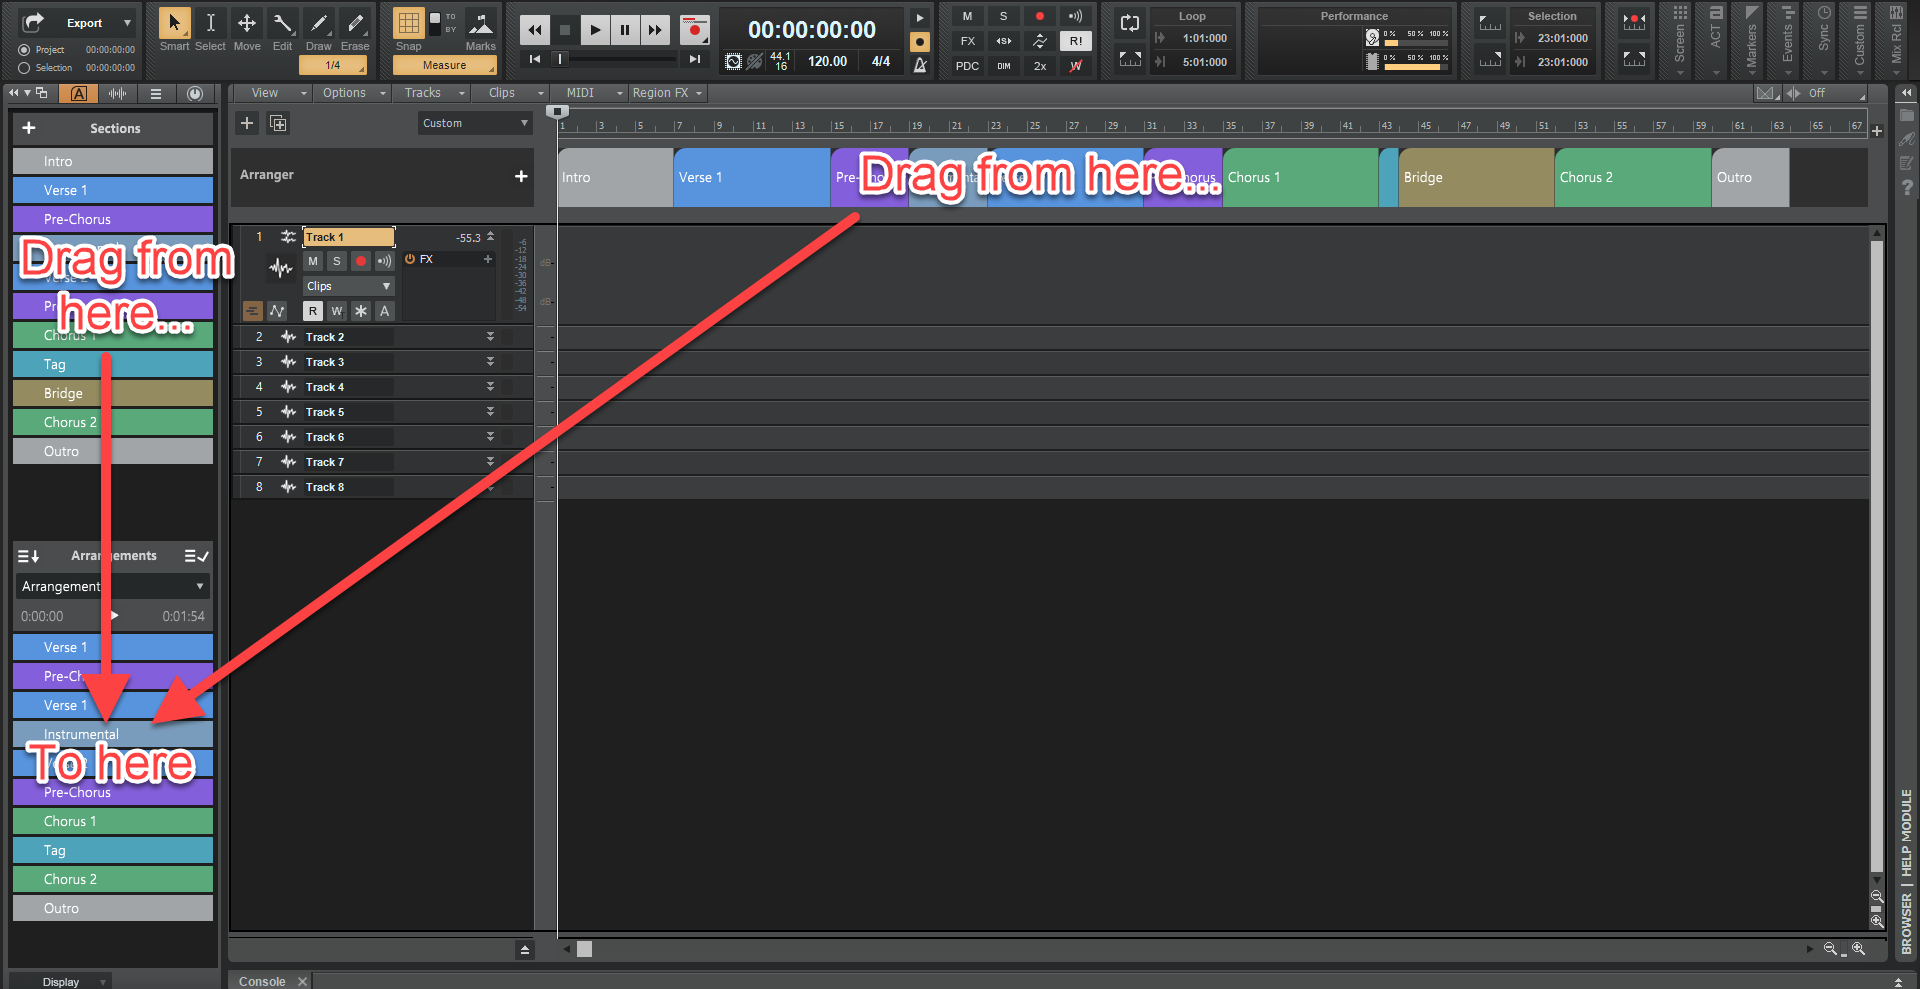
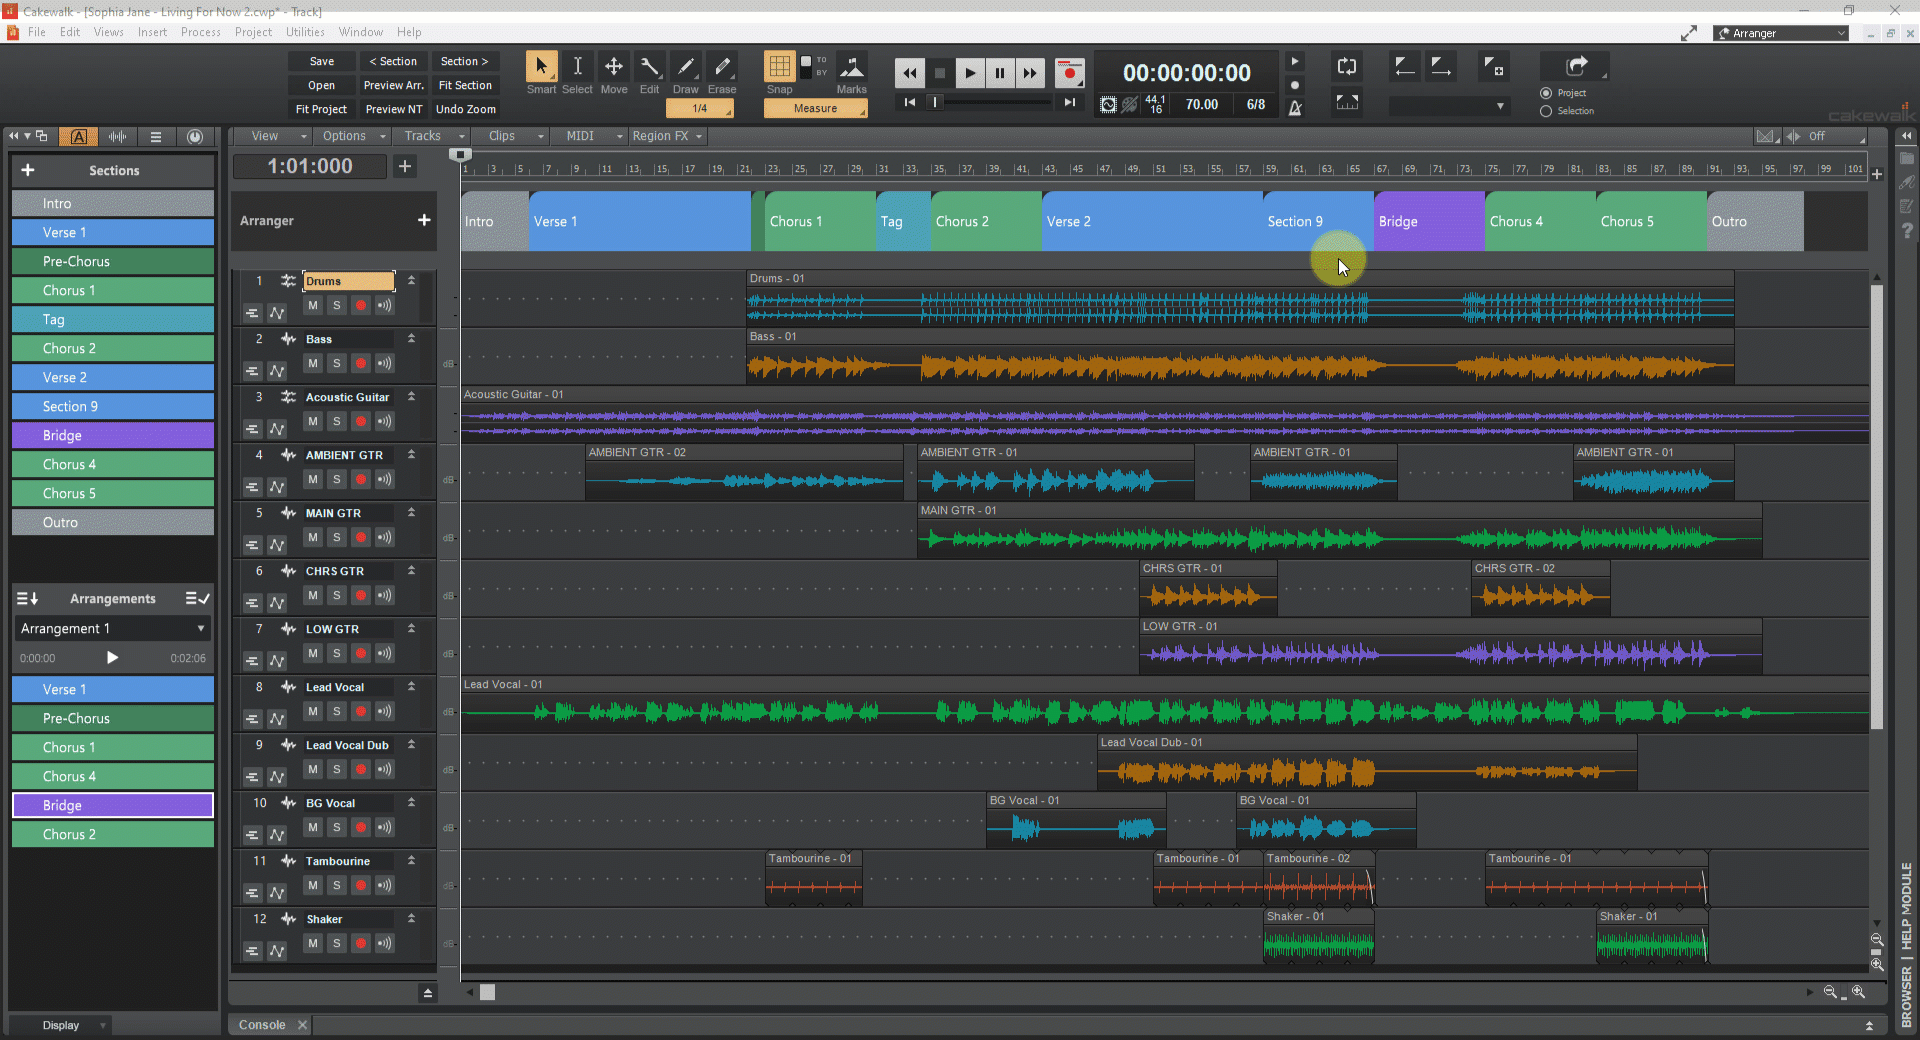
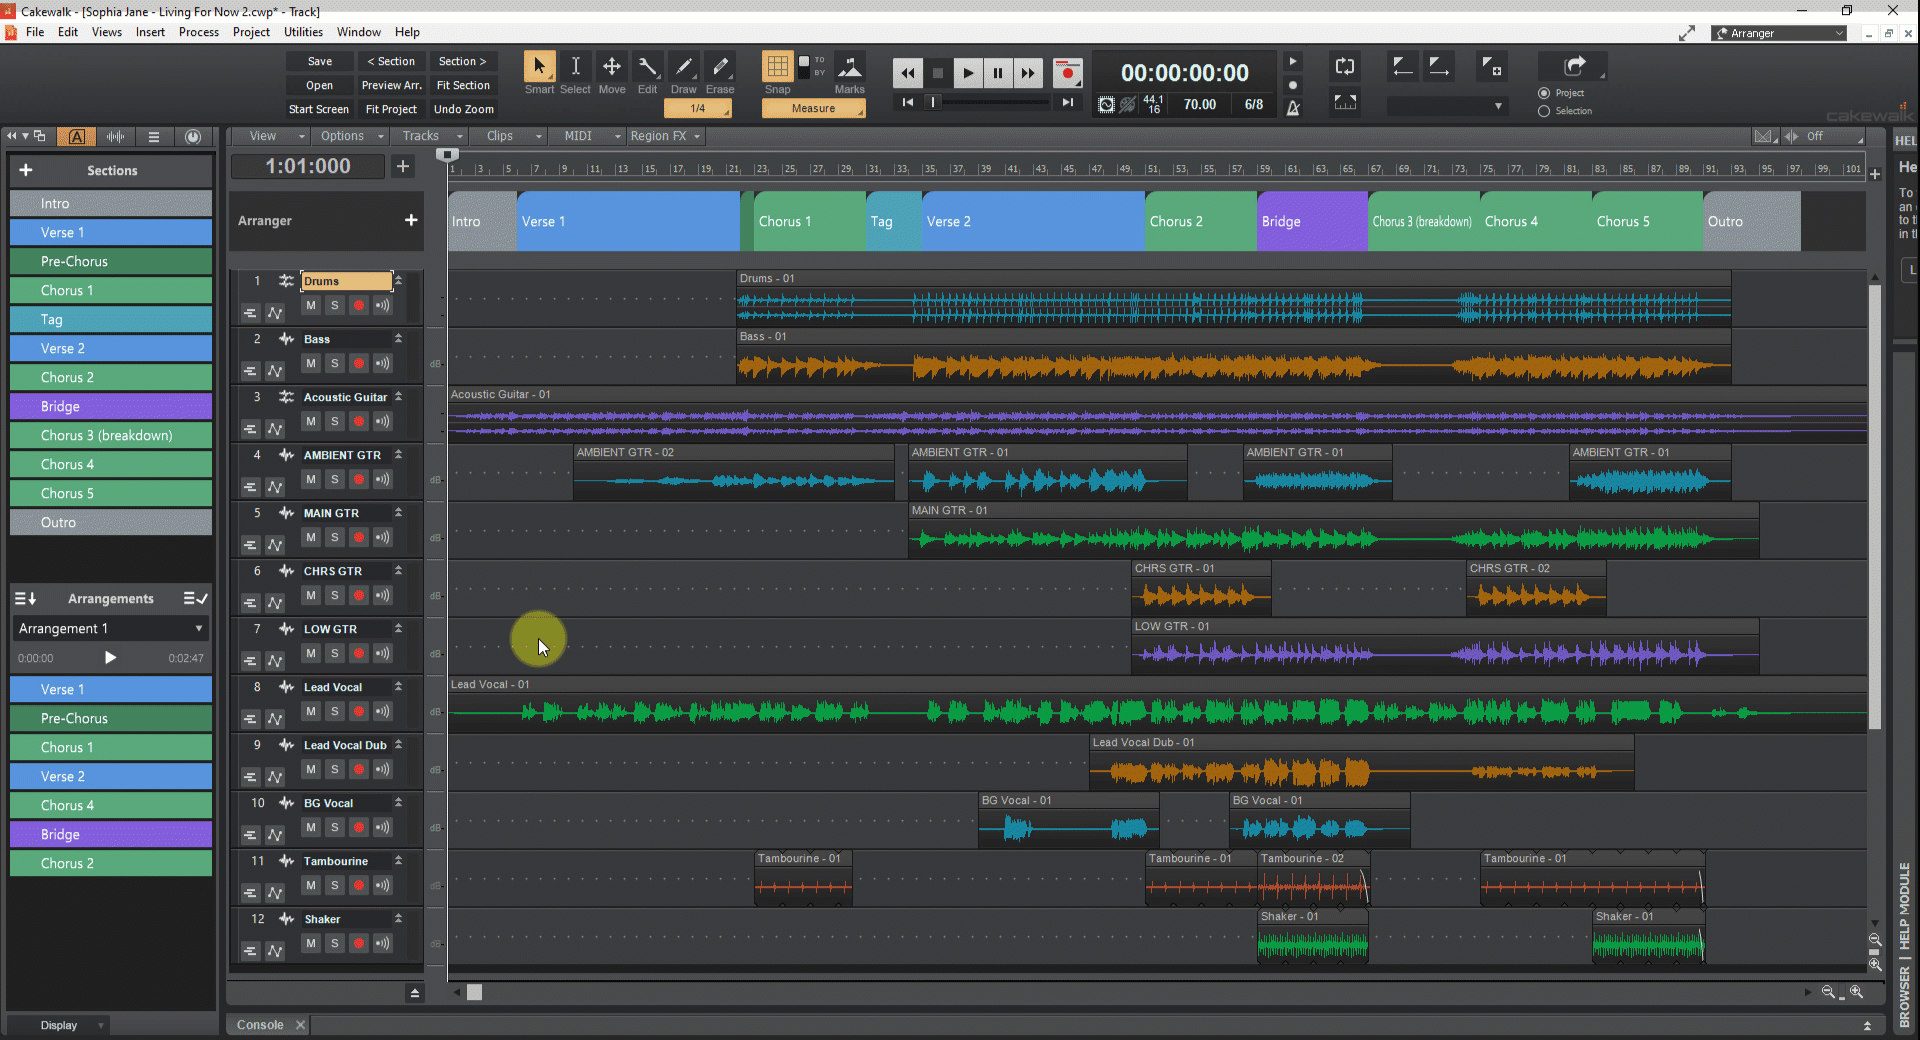
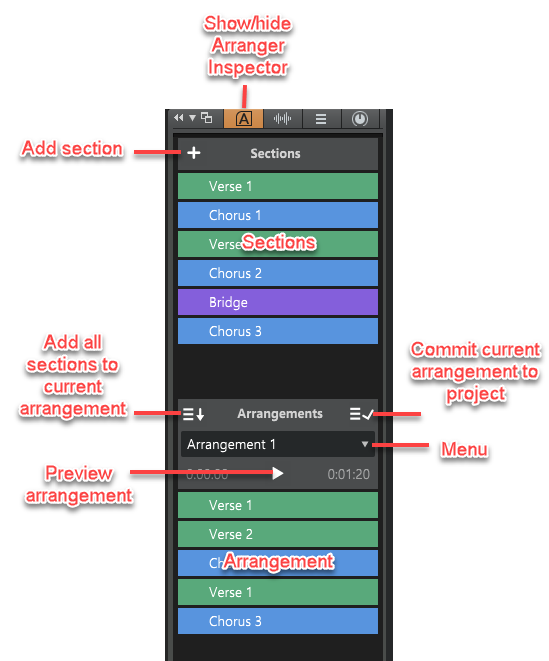
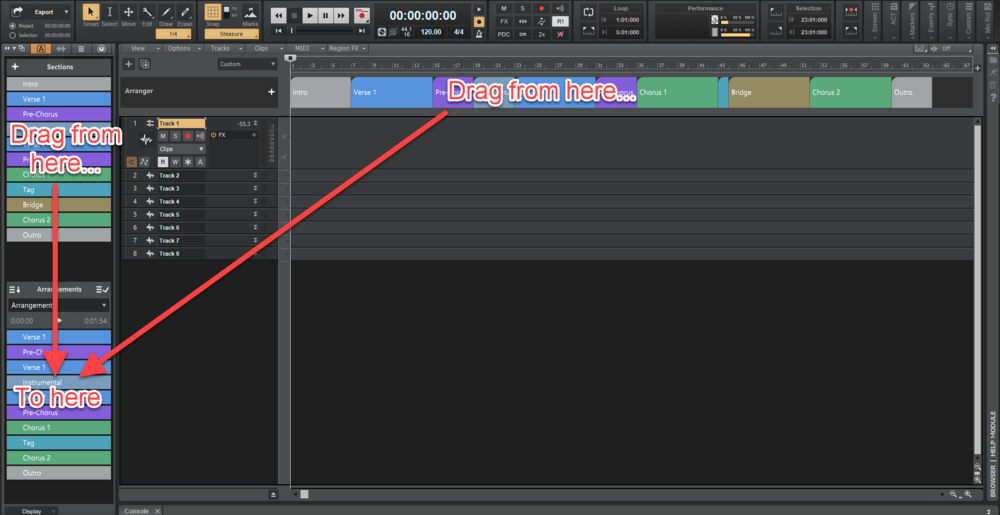
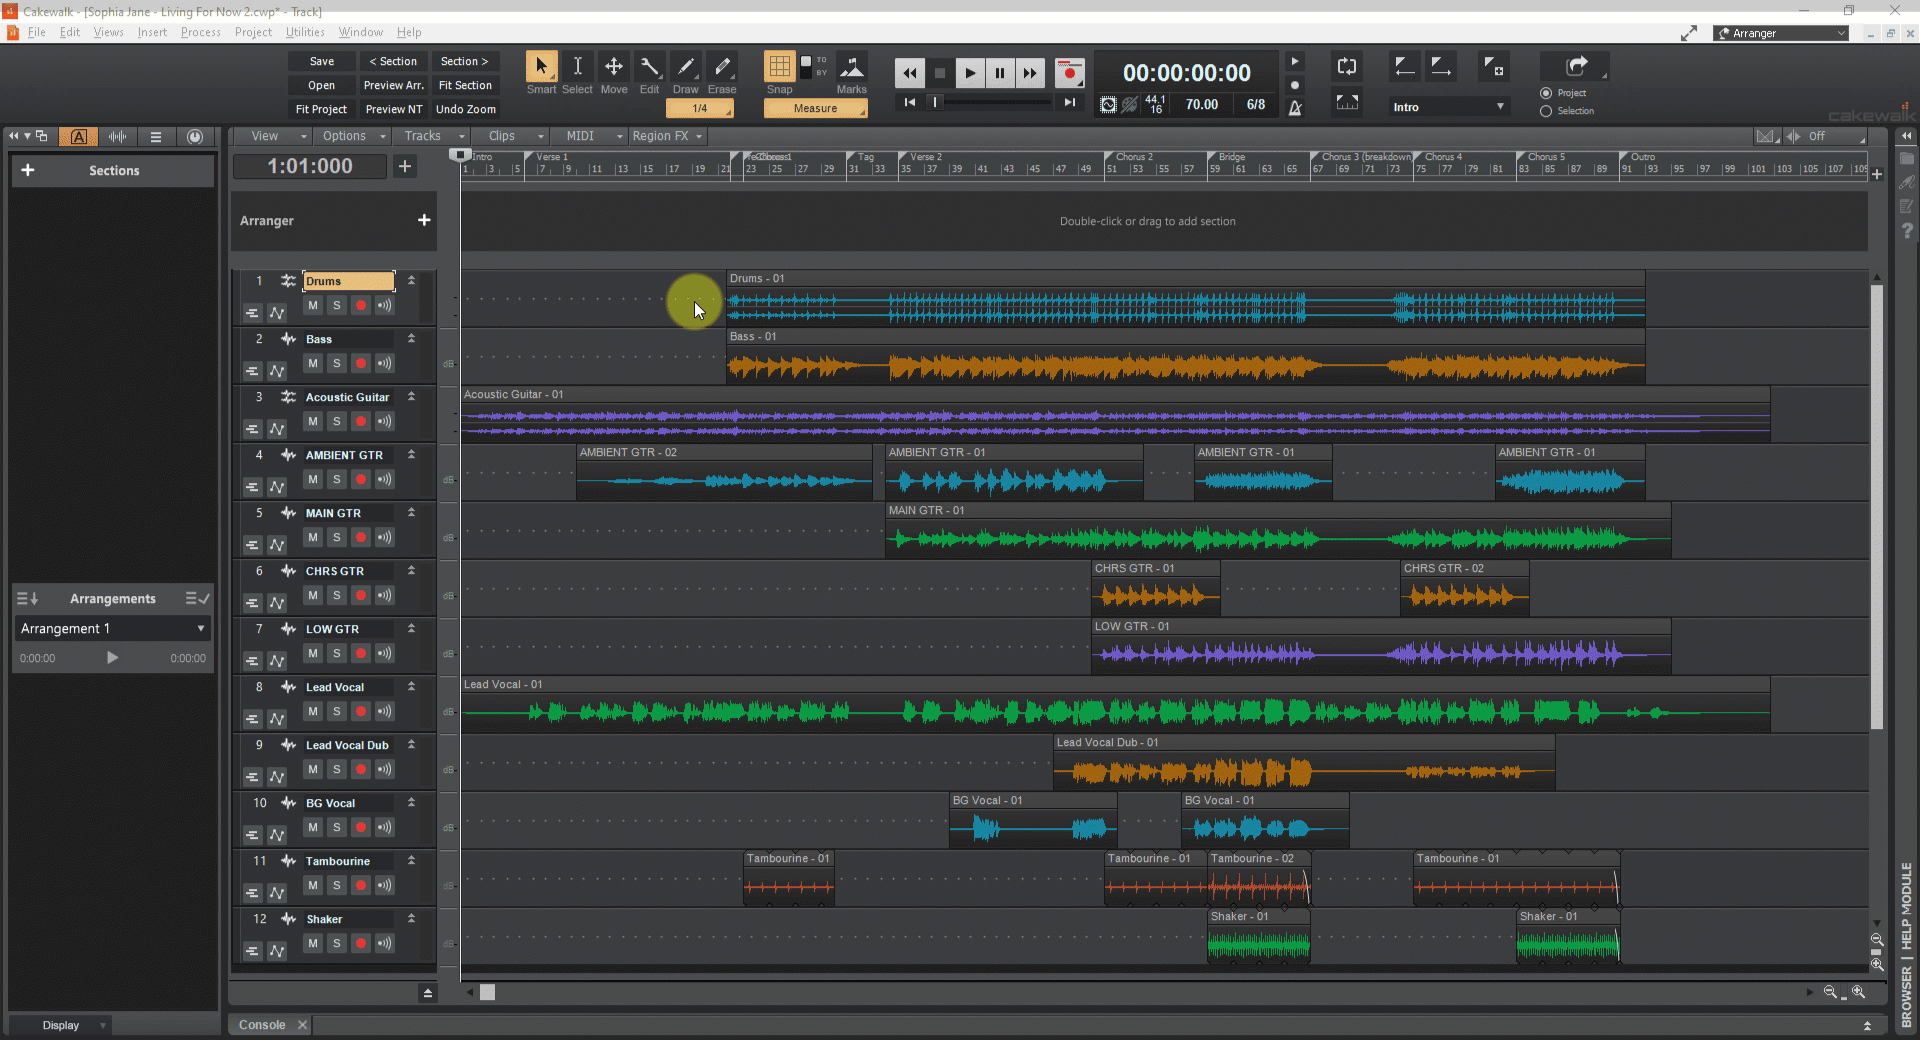
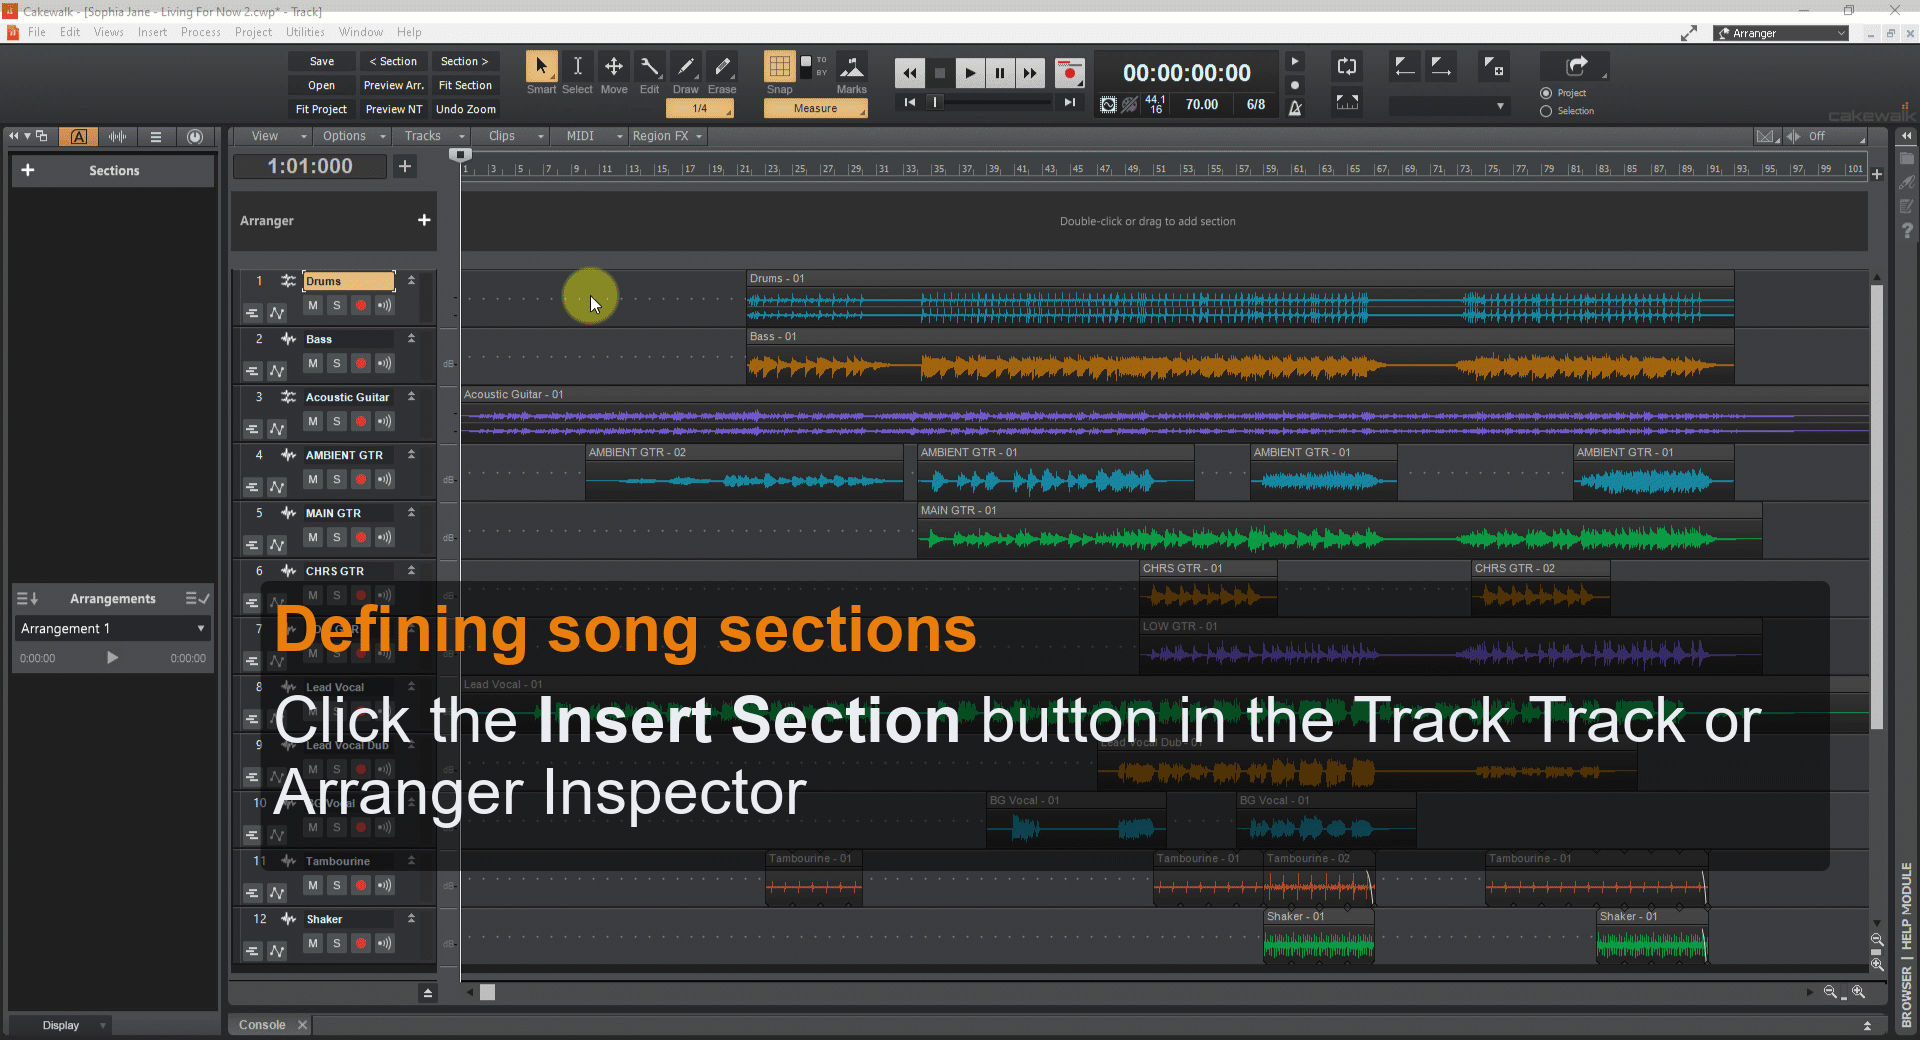
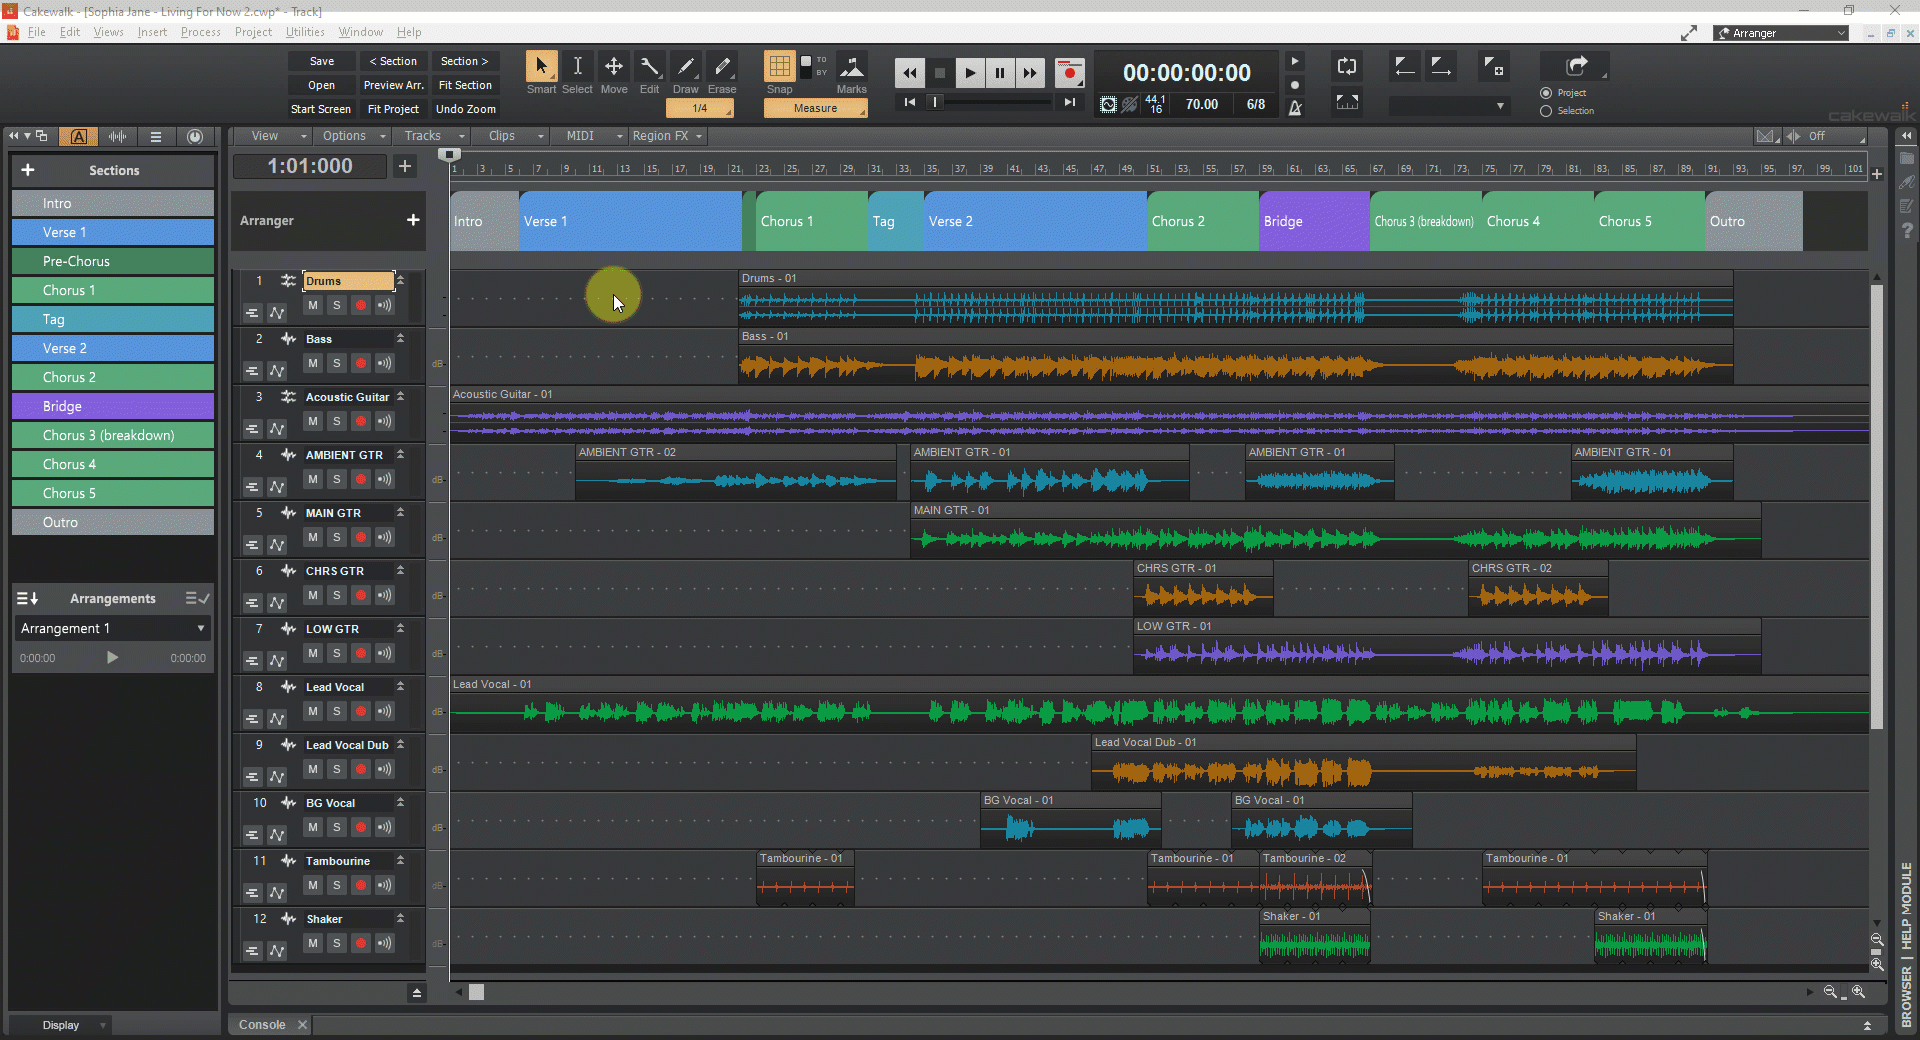
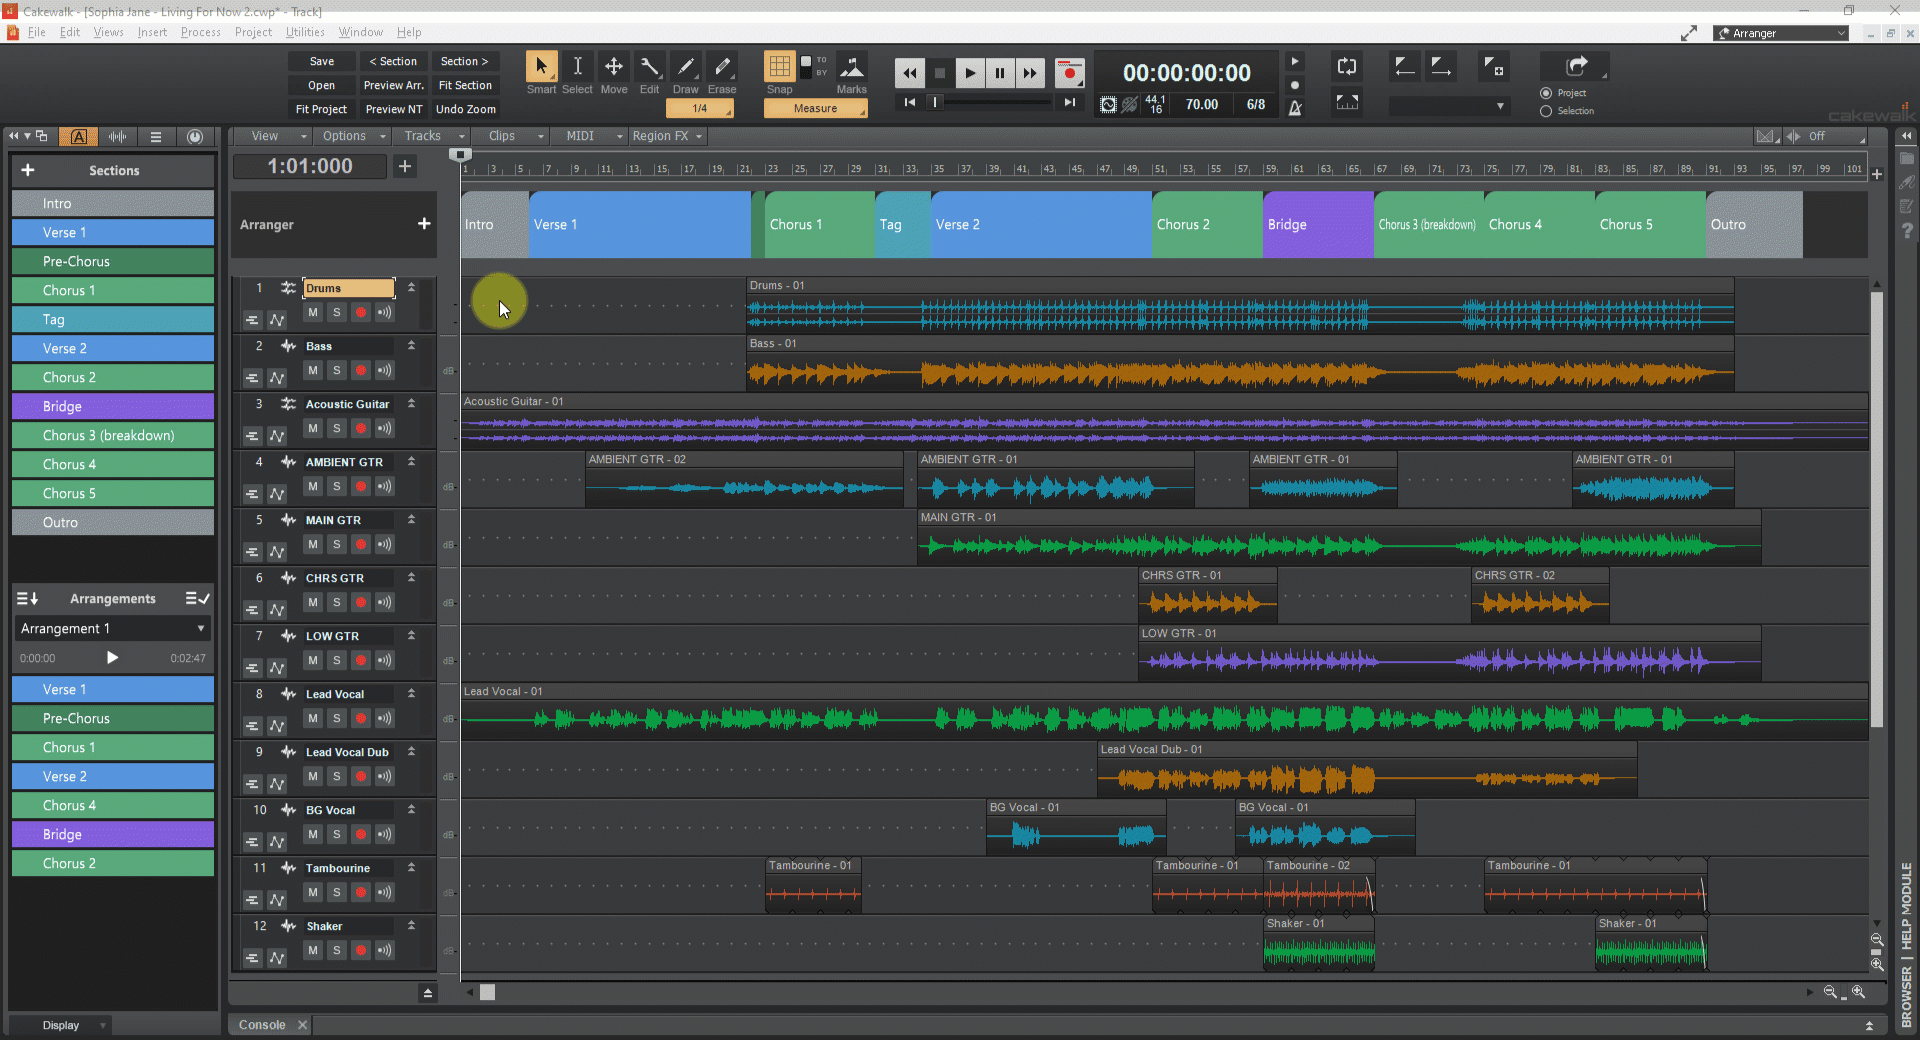
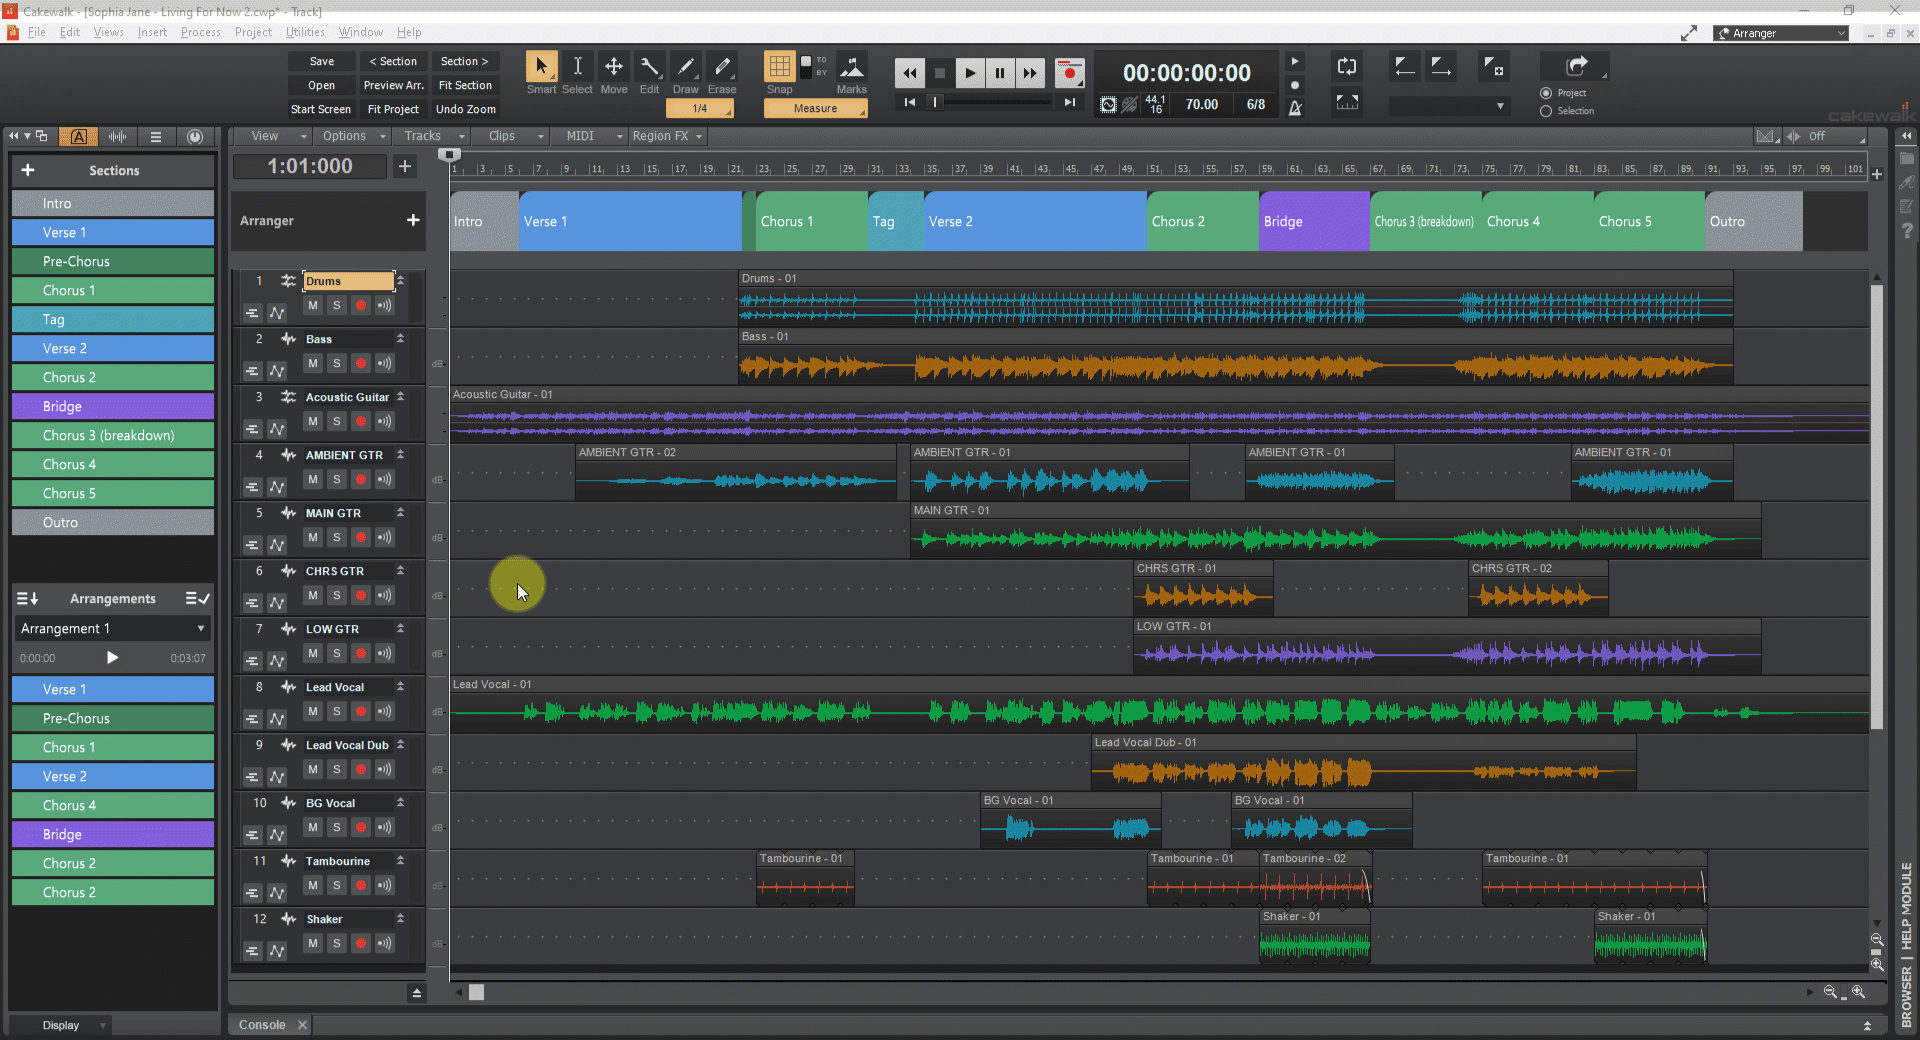
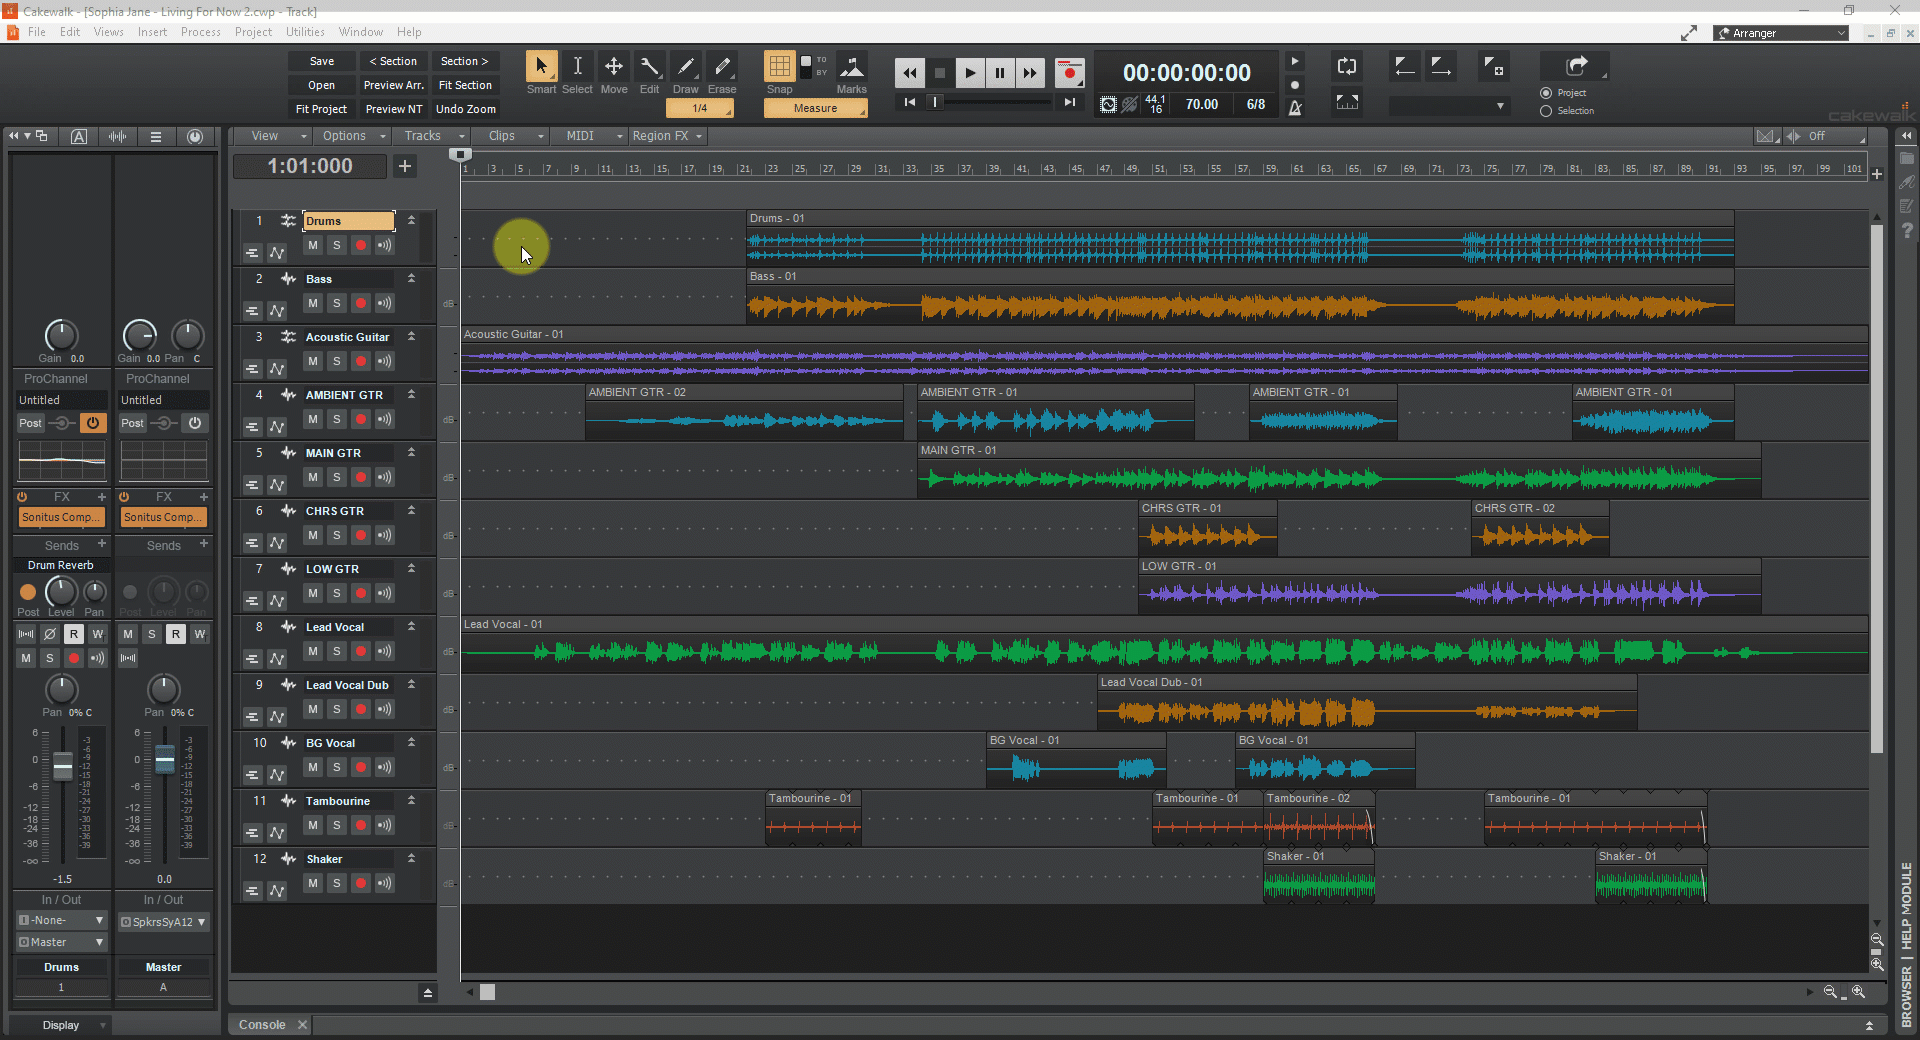
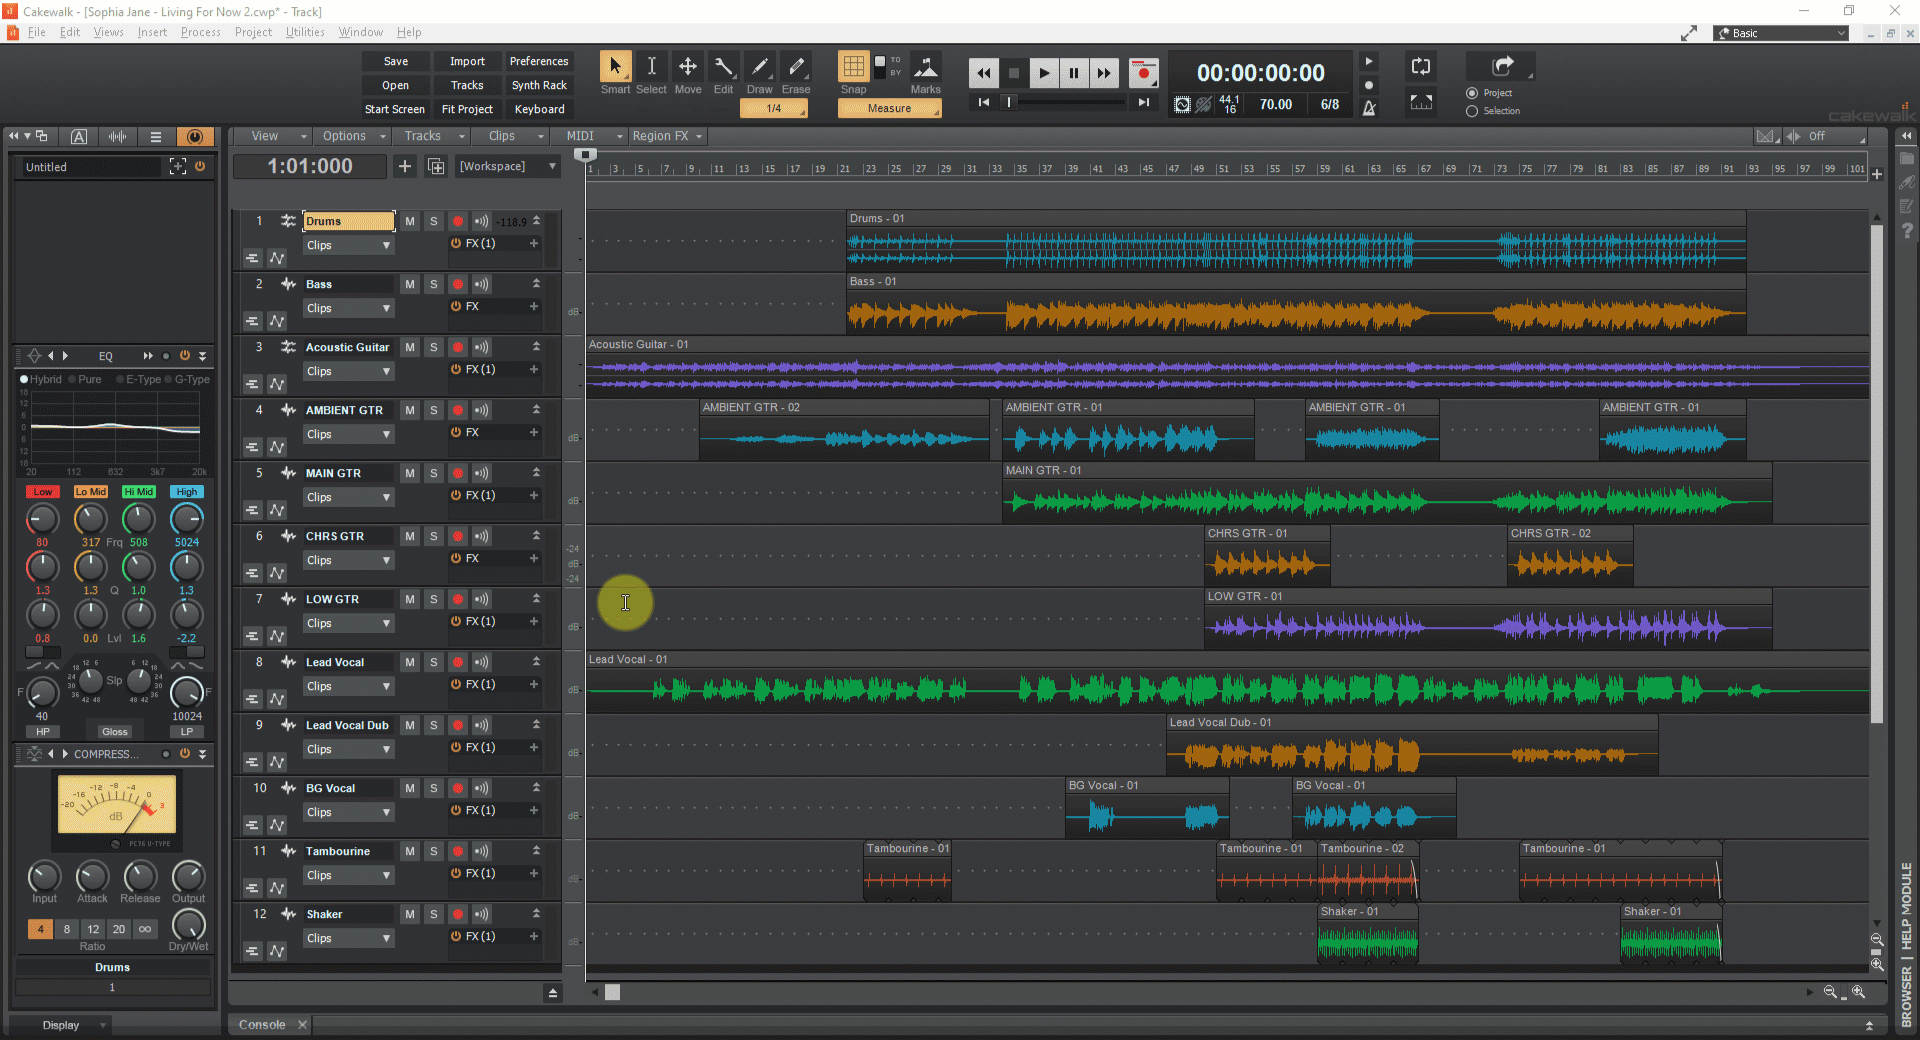
We're pleased to announce the 2020.04 release, our biggest release to date which also celebrates two years of active Cakewalk by BandLab development! This release introduces an exciting non-linear Arranger Track feature that is very useful for song creation and creative experimentation. Also included are many other significant feature improvements such as ProChannel module presets, instrument track improvements and many bug fixes, all in keeping with our goal of making CbB as reliable and enjoyable as possible. Thanks, The Bakers For new feature details, see New Features. Should you need to revert to the 2020.01 release, you can download the Cakewalk 2020.01 Rollback installer. 2020.04 Features & Enhancements Behavior changes Add Track menu behavior change: The behavior of the Track(s) counter has changed when inserting a multi-timbral soft synth via the Add Track menu. When Instrument Track Per Output or Split Instrument Track is selected, the Track(s) counter now specifies how many Instrument output tracks to create instead of how many unique instances of the synth to create. Changes to Delete Track: CTRL+DELETE deletes tracks. Delete Track only deletes the focused track if the focused track is not also selected. When a combination of tracks and track folders are selected, the context menu displays Delete Selected Tracks and Folders. Enable/Disable Enhanced Keyboard Editing Mode shortcut is unassigned by default. The default keyboard shortcut (0 on the numeric keypad) to enable/disable Enhanced Keyboard Editing Mode has been removed. To enable/disable Enhanced Keyboard Editing Mode, go to Edit > Preferences > Customization - Keyboard Shortcuts and assign Enhanced Keyboard Editing to an unused keyboard shortcut. Bypass All Audio Effects shortcut is unassigned by default. The default keyboard shortcut (E) to bypass all audio effects has been removed. To bypass all audio effect, do one of the following: Go to Edit > Preferences > Customization - Keyboard Shortcuts and assign Bypass All Audio Effects to an unused keyboard shortcut. Click the Bypass all Effects button in the Control Bar’s Mix module. Horizontal zooming no longer centers Now Time. When zooming with the mouse wheel or CTRL+LEFT/RIGHT ARROW shortcuts, if the Now Time is currently within view, its position will be retained while zooming. If the Now Time is not present in the view, the zoom behavior is unchanged. CTRL+ALT+SPACEBAR is assigned to Preview current arrangement from the Now Time, and no longer plays the next event in the Event List view. Arranger Track Overview The Arranger track is an arrangement tool that provides several workflow benefits: Easily rearrange sections of the entire project as one unit instead of moving individual clips. For example, instantly swap the positions of the first and second chorus for all tracks, or copy the first verse in order to double its duration. Experiment with different song structures in a non-destructive and non-linear manner. For example, does your song work best in AABA, ABAB, or ABAC song form? Define time range sections and sequence them in any order without destructively moving any clip data. You can even save multiple arrangements within each project. Create a color coded overview of the song structure, and use the Arranger Inspector to quickly navigate around the project and jump to song sections. Create arbitrary song sections anywhere on the project timeline, then later string them together for seamless playback. Sections provide an additional way to perform time based selections and edits of the project. Create an unlimited number of arrangements per project, which can all be exported simultaneously. Arranger functionality is distributed across two views: Arranger track. To show or hide the Arranger track, click the Track view View menu and choose Arranger Track Show/Hide, or press A. The Arranger track timeline shows all defined sections. You can drag to create and rearrange sections, then freely move them along the timeline. Any changes in the Arranger timeline are immediately reflected in the Arranger Inspector’s Sections list, and vice versa. Arranger Inspector. To show/hide the Arranger Inspector, click the Show/Hide Arranger button at the top of the Inspector pane, or press ALT+SHIFT+I. An arrangement is comprised of Sections, each spanning a unique time range. Other section properties include name and color, to clearly delineate regions of time and track content by musical function. Important: By default, clicking an Arranger section also selects underlying track events. Clicking again deselects track events, while retaining selection of the section. This behavior allows you to easily determine whether or not track events are included in section edit operations. Note that the selection highlight in the Clips pane indicates selected track events. To disable automatic selection of track events when selecting sections, click the Track view Options menu and disable Select Events with Sections. Arranger Inspector Sections are the building blocks that make up the song. Each section defines a time range in the project, such as Intro, Verse, Chorus, etc. An arrangement is an ordered set of sections. You can sort the sections in any order to define the playback order. To do so, drag the sections from the Sections area down to the Arrangements area in the Arranger Inspector. The Sections area lists all the arranger sections defined in the project’s timeline, from which a custom arrangement can be built. The order of the sections reflect the order in which they appear in the timeline. The Sections list provides an additional way to edit time based selections of the project. Any operation performed in the Sections list is immediately reflected in the project/timeline, and vice versa. To copy all sections to the current arrangement, click the Add All Sections to Arrangement button . If one or more sections are selected, only the selected sections will be copied. The Arrangements area allows you to sequence sections in a non-linear manner without destructively moving any clip data, regardless of which order they appear in the project’s timeline. Defining sections of your song To use the Arranger track, you must first define time range sections such as Intro, Verse, Chorus, etc. Sections can be of any duration, but it is common to start/end them at measure boundaries. New sections can be created by any of the following means: Draw a range within the Arranger track timeline (below the time ruler). Double-click a blank area in the Arranger track. The new section duration is inherited from the last clicked section. Right-click in the Arranger track timeline and select Insert Section Here, Insert Section at Now Time, Span Sections, or From Selection. Click the Add Section button in the Arranger Inspector or Arranger track. Editing sections Drag sections to move them around on the timeline. Drag a section edge to resize the section. Right-click a section to access edit options. Converting markers to sections To convert markers to sections, make a time selection in the time ruler that spans the text markers, then right-click in the time ruler and select Create Sections from Markers. Creating a custom arrangement Sections can be sequenced in any order to create arrangements, without affecting project data. The sections don’t have to live on the project timeline in any specific location or order, because the arrangement determines in which order they are played back. To define the section playback order, drag sections from the Sections list down to the Arrangements list. You can also drag sections directly from the Arranger track. Previewing an arrangement To play the current arrangement, click the Preview button or press ALT+SPACEBAR. During Arranger preview, the main transport Play button shows a small “A” icon to indicate it is playing back an arrangement instead of following the project’s linear timeline, and the active section shows a progress indicator. Committing an arrangement To (destructively) render the current arrangement to the project’s timeline, click the Commit Arrangement to Project button . Exporting arrangements You can export one or more arrangements without first having to render it to the timeline. To do so, click the Arrangements menu and select Export as Audio. ProChannel module presets In addition to saving presets of the entire ProChannel chain (all modules), you can also save and load presets of individual modules. The per module preset controls are located on the left side of each module header bar. To select a module preset Click the module’s category type icon to open the preset menu, then select the desired preset. The category type icon tooltip shows the name of the selected preset. To save a module preset Adjust the ProChannel module controls to the desired settings. Click the module’s category type icon to open the preset menu, then select Save Preset. Type a name in the Save Preset dialog box, then click OK. To select the next preset To select the next preset, do one of the following: Click the Next Preset button . Hold down the CTRL key and click the module’s category type icon. To select the previous preset To select the previous preset, do one of the following: Click the Previous Preset button . Hold down CTRL+SHIFT and click the module’s category type icon. To delete a module preset Click the module’s category type icon to open the preset menu, then select the preset you want to delete. Click the module’s category type icon to open the preset menu again, then select Delete Preset. Copy/paste settings between ProChannel modules You can copy settings from any ProChannel module and paste the settings to any other instance of the same module. on any track or bus. There are two ways to copy/paste settings between identical modules: Drag and drop In the Console view, show the ProChannel for both the track/bus you want to copy from, and the track/bus you want to paste into. Hold down the CTRL key, and drag from the source module’s header bar (i.e., the module title) to the target module. The source and target ProChannel modules must be identical. Note: If the target module has not been enabled/initialized yet, it will automatically become enabled after pasting. However, if the target modules has been manually disabled, then it will remain disabled after pasting. Copy/Paste menu commands Click the source module’s category type icon to open its preset menu, then select Copy Settings. Click the target module’s category type icon to open its preset menu, then select Paste Settings. Append per-output Instrument tracks When you insert a multi-timbral soft synth, you can specify how many Instrument output tracks to create, up to the maximum supported by the synth. If you do not initially create the maximum number of available output tracks, you can later add additional tracks on demand from the Synth Rack view. To do so, do one of the following: Right-click the instrument in the Synth Rack (Views > Synth Rack View) and select Append Instrument Track. Right-click the instrument track strip in the Track view and select Append Instrument Track. Note: If you originally created used per-output Instrument tracks for that synth, then Cakewalk will create another per-output instrument track. If originally created split instrument tracks, then Cakewalk will create another split instrument track. Misc. enhancements App has been updated for all languages. The Display Clip Fade Attenuation option in Edit > Preferences > Customization - Display is now available as a key binding. Audio Driver Mode in Preferences now changes immediately without needing to click the Apply button. Updated to latest VST3 SDK, which includes VST bug fixes. Bug fixes Applying a Workspace/Screenset referencing track based views to an empty project can crash or cause unexpected behavior. Crash when freezing archived track. Crash when freezing track after setting input to None. Crash when cancelling a real-time Freeze operation. Crash on undo of Ripple Edit delete. Missing project file patch causes crash. Hang on project close. User reported crash: Cakewalk.exe!CFretControlBar::resetNow() Line 220. Cannot remove ARA plug-in as Region FX if the plug-in is not installed. iZotope Relay does not draw Advanced tab in VST3. iZotope plug-ins display track names incorrectly. SPACEBAR doesn't work with new Waves StudioRack plug-in. Background not repainted in Waves StudioRack plug-in when opening module or resizing from UI. Seeking with lower Disk Buffers/Higher Audio card latency causes audio to cut out. Archived Aux tracks pass signal. Soloing Aux tracks mutes metronome on playback. Having no playback master selected causes loss of audio with no reported errors. Cancelling Freeze can cause Interleave and Phase buttons to change unexpectedly. Incorrect audio range when bouncing or exporting with no audio drivers present. Inspector strip context menu appears on wrong monitor. Double-click to open Clip Properties Inspector not working as expected. Inspector displays wrong output strip after clicking Inspector strip with track sending to aux. Inspector flickers when switching between tabs. Some Inspector keyboard shortcuts fail to close tabs. Aim Assist gets stuck at time zero after dragging a plug-in from the Browser. Reverse touchpad scrolling direction in some views. Marker view 'Lk' column does not show locked status in Tungsten theme. Dragging clips with Snap By can have unexpected results. SHIFT+rigt-click behavior not consistent with MIDI tracks. Screensets and view state unnecessarily persisted for unused internal views. Using mouse wheel in "Locked & Centered" Control Bar results in left aligned Control Bar. Instrument tracks mute MIDI channel when using ALT+M. Verify failed duplicating instrument track. Keybinding for Input Echo does not update Simple Instrument Tracks in Track view. Unexpected behavior with Instrument tracks when adding MIDI ports. Adding or removing MIDI devices can cause soft synths to be assigned to incorrect ports. Custom project load affirmations truncate messages that are more than one line. Custom project load affirmations display unexpected characters in multibyte languages like Japanese and Chinese. Deleting multiple tracks in folders removes folder from project. Project looping turns off after recording. Editing text in Piano Roll view Drum Map triggers keyboard shortcuts. Hardware MIDI devices with the same names cannot be opened. Latest release notes are here. See prior release notes. Check out all new features released to date.


 7 points
 -
Hi Folks, The final 2020.04 release is out. Please download it from bandlab assistant. It should resolve any language issues observed since it now contains all the latest language updates. Please note that due to a bug in the early access release you may not receive a notification of an update in Cakewalk. It should be visible in BandLab Assistant, however. Thanks to all of you for your great feedback and participation in the early access. It has helped us make this one of our strongest releases.6 points
-
Use code : 9ntx9xjc at pluginboutique.com for added discount. down to £28.37 ($35.00)5 points
-
Thanks. It was 7 years ago. That is why I laugh here when some get upset about little things. Music is my escape and I intend to keep it that way. Plus the humor here is my weird type😁5 points
-
I have been using the Early Access version which has been great. Loving the Arranger and Pro-Channel presets. Go get it! Thanks Bakers!4 points
-
4 points
-
Arturia presets are 50% off. Go to the store in Analog Lab. There is some stuff here! There is an earlier thread discounts on the synths which mentioned this in passing in one of the replies.3 points
-
Run the SAA to update3 points
-
I knew that wold be the case. They were off base closing them down in the first place!3 points
-
Yep, my brother-in-law had to grown siblings who took their lives 4 years apart - tragic. And sadly, the church often misses the mark - I've worked there for 40+ years and have been burned many times. I've learned that the complexity of the Gospel is it's simplicity - we humans sure can make a mess of things! On topic, unlike the Gospel, the complexity of doing business with IK is it's complexity 😁 Love you Pete!3 points
-
FWIW these don't load in Nectar 3 or Vocalsynth 2 (I know, I tried) - look like duplicates of presets in the v3/v2 anyway3 points
-
Hey guys! We've logged this. It will be fixed in the next release of BandLab Assistant. Sorry for all the trouble!3 points
-
True and I really was joking. I wouldn't be here 10+ years if I wasn't enjoying myself. Of course that segues nicely into KVR as I'll admit that's probably the only thing that's nearly broken me over those 10+ years. There has been some nastiness for sure, with a marked improvement lately even if it still can seem a bit heated compared to somewhere like here. I did have the advantage of an existing rapport with many users there pre-IK as I believe I had 4,000+ posts before my IK tenure started. Another tangent is that I stipulated to both KVR and IK that I must be able to use a separate and clearly-branded IK username as would any IK rep in the future. Glad to stick to that, though I really could have made that 4K post count SO much higher otherwise. Either way, "sock puppets" were a huge problem back then (and some argue still are, but I think it is far better now) so I didn't want to get associated with anything like that and wanted to remain above board.3 points
-
An updated Reference Guide PDF will be available next week.2 points
-
Lemar - many thanks!2 points
-
I decided to get it and am very happy. I do love a lot of the unusual sounds of all those KeySuite Electric instruments, but for me the big discovery was Austrian Grand. I always feel like I have more pianos than I could ever use, but then something like Noire comes along that is truly different. As soon as I tried this, I started writing a new song. It was inspirational. The same thing happened with some of the KeySuite Digital sounds too. I always feel with most of my pianos that they lack a certain power that I want. The grands are very subtle and are good for classical and subtle songwriting. The uprights sound like uprights. The supposedly rock grands just sound brighter to my ears, like they added high end to the regular patch. This sounds muscular to me, if that makes any sense. It has a little something I wanted that no other library has before. After playing it, I thought back to their video that has all these different kinds of great musicians playing it in different styles and saying how much they like it. I thought it was just hype, but now I don't think so at all. I think this is really a great virtual instrument, one of UVI's best. I hope they take it out of the Key Suite Bundle someday, because everybody should be able to get it without spending so much $$$$2 points
-
And I still won't be able to get a good mix! 😄2 points
-
I agree. Keeping everything cool is one of the most important things you can do for performance or your cpu and mobo will throttle and you won't see any performance benefits. I treat my pc like a server and have it located on a shelf in the adjacent room to my studio so that I don't have to compromise between noise and cooling too much. I get the benefit of a quiet studio and a well cooled PC at the same time but I understand not everyone has that luxury.2 points
-
They all sound really good to me.....where to start is the question. So far, I got Synth Voices, Tangled Dreams, JMJ Tribute, and Future Bass.2 points
-
The newish "Tangled Dreams" for sure and there is also a Vangelis Tribute II now. Probably good to try the demo sounds in Analog Lab to get an idea of each pack, I have found sometimes the less obvious ones are useful outside the intended genre.2 points
-
You can press left click+on the marker and press delete. You can also drag markers (which will snap) to a different location.2 points
-
Actually, I tried the Press and Hold + Delete here, and it works fine. I am used to the Markers View, so I had not paid attention to that way, but as I said, it works. You need to have the cursor change to the Marker cursor. that appears when you move the Marker with the mouse, two little arrows with an "M". Keep the mouse button pressed and hit Del. Edit: I did not read to the bottom @User 905133 beat me to it.2 points
-
I should imagine that the amount of dust they must have had to blow off of this actually is a toxic biohazard.2 points
-
♫ Cecelius, you're breaking my heart.....♫2 points
-
https://www.arturia.com/products/analog-classics/analoglab/overview2 points
-
I agree that it's needlessly obscure. Should be in the right-click context menu but it ain't.2 points
-
Open the Markers View. Select your marker(s). Hit Delete, or the minus (-) icon. Done. It is very convenient to keep the MV open and floating somewhere (you do not need it streched too big), for Markers navigation. You also have the Markers module in the Control Bar, but I prefer the MV.2 points
-
I also tend to leave MIDI 'live' until mix time at least, and often all the way to final rendering of the Master bus. This doesn't preclude mixing with audio, which I mostly do. In the case of a multitimbral synth or sampler like Kontakt, it just means setting up to use multiple audio outputs so you can have control of the individual audio streams. I was recently reminded that one reason I like to leave the MIDI live is that I can start playback anywhere, and it picks up cleanly with no sound carrying over from the previous measure/beat. I don't use a lot of continuously droning pads, so this works fine for me most of the time, and just sounds more natural - like asking the band/orchestra to pick it up somewhere in the middle of a piece. Plus there's just something cool and inspiring about knowing that the audio is being generated in the moment through the 'miracle' of MIDI. ;^) One caveat: It's a good idea to freeze/bounce/record everything at some point in case you eventually lose access to a synth/patch for one reason or another, and can't get 'that sound' back. Don't ask me how I know this.2 points
-
Well, the original reason for this thread was a few of my projects got messed up by this VSTi switch out issue . . . seems like Cakewalk has found a fix for it recently, and I really only had it happen a small number of times, hard to find the reproducible steps, and a few others here concurred . . . so, it's great Cakewalk has addressed it , so I don't expect see that bug's ugly face ever again hopefully !2 points
-
That's what she says. "EZBapu !"2 points
-
To make a mix that sounds good on other systems you have to mix on really fine, and usually very expensive, speakers. Computer speakers just won't do it. That's what pro monitors are for: To get an accurate image of the sound, warts and all. That's desirable, because if you can't hear what's wrong you can't improve it. I hope you listen to a lot of classical (not film!) music and study scores. When I finish a symphony it usually takes me about 2 years working on it every day. Much of that time is spend in MIDI programming--attacks, releases, velocity and cc7 or 11, moving notes forward or backward away from the beat, sample-set choice, etc. It's time consuming. You have to think how a player would attack a note, express a phrase, create gesture and intention. Using lots of tempo variation, even slight, also helps. The problem is that a computer can play perfectly in time. That easily degrades into a mechanical, artless, lifeless sound. It's up to the musician to counteract that with techniques to bring expression, randomness, clarity and a sense of human intention into the MIDI sequence. I'd start with basic classical piano pieces, i.e. Bach inventions or fugues, and learn that way. Taking on producing The Rite of Spring requires not only an incredible amount of time and energy, but also top notch gear and a lot of knowledge of music. If you have that, go for it. Here's a masterclass I did a few months ago on this topic: http://www.jerrygerber.com/soundbytesinterview2019.pdf And here's a new symphonic work you can probably learn something from: http://www.jerrygerber.com/symph10complete.htm Jerry2 points
-
https://sonicscoop.com/2016/11/10/diy-studio-design-part-2-build-cost-effective-bass-traps/ Fixing your room will do more for you than all the sample libraries and reverb in the world.2 points
-
The tools have been completely rewritten. All have font support, light and dark styles. Upsample Editor now supports in table edits. VST Inventory has selectable columns. Old Launchpad users make sure to copy "CbB Tools.exe" into the old Launchpad folder. Others may copy the "CbB Tools.exe" where ever they like such as "C:\Program Files\CbB Tools" I will leave the old versions available as the new ones no longer support 32bit SONAR. I added font size selection to a few of my CbB/SONAR utilities. There are updated versions of Launchpad - an alternative to the start screen Plug-in Upsample Editor - a tool to manage upsample data in Aud.ini Tools Editor - a program to manage the tools section of the Utility menu available here along with a few other CbB/SONAR related things. The utilities are about half way down the page. As always, if there are questions or issues with anything on the page just let me know. For best performance, whitelist the "CbB Tools.exe" process in your antivirus software. Inventory Tool really benefits from whitelisting. Enjoy Edit: Launchpad v1.6 released 14 Aug 2019 Edit: Launchpad v1.7 released 24 Sep 2019 Edit: Launchpad v1.8 released 25 Sep 2019 Edit: Launchpad v1.9 released 2 Dec 2019 Edit: ToolsEditor v1.3 released 31 Dec 2019 Edit: Launchpad v1.10 released 12 May 2020 Edit: Launchpad v1.11 released 14 Aug 2020 Edit: v2.0 of all tools released 18 Mar 2021 Edit: v2.0.1 through v2.0.4 released 19 Mar 2021 Edit: v2.0.5 released 20 Mar 2021 Edit: v2.0.6-2.0.7 released 21 Mar 2021 Edit: v2.0.8 released 1 Apr 2021 Edit: v2.0.9 released 10 Apr 2021 Edit: v2.0.10 released 4 May 20231 point
-
T-bone rules and doesn't require ilok like softtube does. Have it installed on each of my computers. Have been shocked at how frequently I use it.1 point
-
Thanks Larry. After un-installing it t'other day I saw this excellent and informative post by @TheSteven so I might do a clean install and relocate all the samples somewhere useful1 point
-
FREE Nectar 2 and VocalSynth Presets https://www.pluginboutique.com/product/1-Instruments/31-Synth-Presets/4175-FREE-Nectar-2-and-VocalSynth-Presets1 point
-
1 point
-
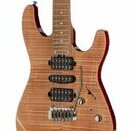
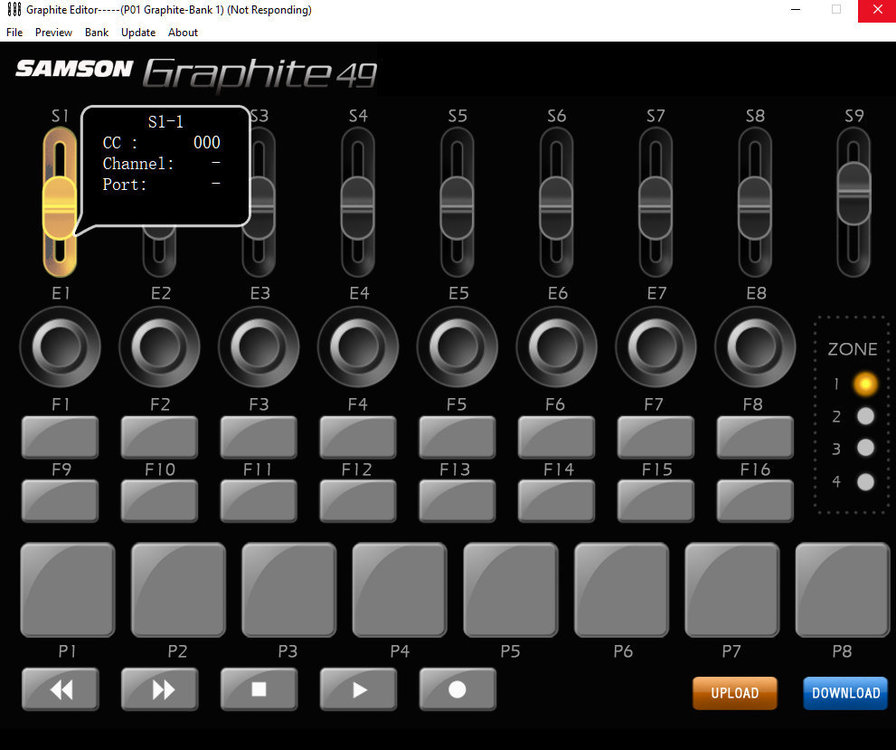
@msmcleod I just noticed there's a v2.50 firmware for the Graphite 49 on Samson's webpage. I would imagine that you have already updated but wondered if that might help with the key velocity issue? Were you able to improve the situation at all by adjusting the velocity curves? http://www.samsontech.com/support/samson/resourcesandmanuals/usb-midi/keyboard-controllers/p/graphite49/ The Editor Software for Windows also looks like it could be useful. I ran it just to have a peek although obviously without the keyboard it doesn't do anything.
 1 point
 -
We fixed a bug a few days ago that would explain at least part of what you're describing, that is when hardware MIDI ports are removed or added, and you have multiple instances of the same synth, the VSTi synth assignment gets messed up. But although this should fix the synth reassignment issue, I'm not sure all hardware MIDI devices will recover from sleep - it largely depends on their drivers. This is because the internal hardware state of the MIDI devices might not match what Windows thinks their state is when woken up.1 point
-
Really sorry about your brother. It is hard to believe but also inevitable that an obsession with dogma can overwhelm basic human decency. You deserved better in your hour of need. I hope you found it. I meet a lot of people whose loved ones have died by suicide. It is nearly always appalling for those left behind. Incredibly difficult. I wish you and your family all the best.1 point
-
Yes Bob . . . It's a great suggestion, I sometimes forget you can do that to get your latency back to a playable level, with a complex mix already in place. Mostly, it's the look ahead plugins that cause problems at lower ASIO buffer settings, causing cracking sounds . . . but yeah, turn off all the "stuff" and you can record live parts in again, just have to live with the rawness of the mix for a bit . . . and not forget to turn the "stuff" back on1 point
-
Wow, Sorry to hear that bro. There are really bitter people who had a bad experience with some people in "religion". I don't blame them for being bitter. There are all types out there and I think some of those places attract the kinds of people who think their purpose in the word is to tell everyone how right they are and how wrong everyone else is in a very condescending way. Been there seen some of it. No thanks. Yep for sure!1 point
-
Love the video Particularly the DOS download. A nice touch.1 point
-
Mesa Recto https://store.two-notes.com/en/index.php?controller=tnLicenses&fbclid=IwAR24SzpU9Pt40jLSw9vO_thPZDka1KlNRh9_m8jUxBSym6jGcAIkdjLb4BM1 point
-
Maybe you could rule out plugins by freezing the tracks with vst on them. And then try the usb port as it's easy and quick test. And then inspect the usual culprits: wifi and antivirus.1 point
-
If you tether your cell phone to your PC, you can setup a temporary internet connection for your PC.1 point
-
WAX'IN (feat. Philippe Bussonnet /b -ex- Magma and Christophe Godin-guit )1 point
-
email from the old Cakewalk servers was stopped in 2017 contact support@cakewalk.com to regain access to your old Cakewalk account1 point
-
Happy to help out in any way, Mike! I've been the beneficiary of a lot of help in this forum, also. One dude you may want to reach out to is Tapsa. He's been very helpful and generous with his time, and as a legit pro, he knows what he's doing. He's offered me some great help and encouragement.1 point
-
hehehe. I was thinking how much work there would be for the outstanding theme developers like yourself.1 point