Leaderboard


Popular Content
Showing content with the highest reputation on 01/24/2020 in all areas
-
Ok, I've played around with the clip automation a bit more, and actually what you're describing is pretty quick/easy to do once you know how:4 points
-
That I have not been contributing much here since September last year, I know a couple of tunes have been posted but they were nearly done. The reason is that in September I was diagnosed with skin cancer, it appears that three inches of red-brown fur and a heavy jacket is not sufficient to protect the Wookiee skin. Perhaps I also need to check the UV shields on the Millennium Falcon. Anyway two surgeries later and a 6.5cm by 5cm by 1.5cm deep (3" by 2" by 1/2") hole in the forearm of my right fore paw has limited my ability to do anything very much other than listen, which I have done quite a bit and found it to be quite enjoyable. Typing or using the mouse has been and still is quite painful, as to playing keys or my guitars impossible. Anyways thanks for all the music and hopefully now I have received the all clear, for this location, once the wound heals some more I will be back making noises and commenting to you guys and girls about your music. Thanks for keeping this furry alien from total madness with your music.3 points
-
HoRNet ELM 128 MK2 is a metering plugin that complies with the EBU R128 standard. The plugin provides five different loudness measurement: momentary, short-term, integrated, dynamic range and true peak. The plugin supports mono, stereo and 5.1 surround metering with a handy history graph that you can use to see the loudness of your signals up to 12 hours earlier, the GUI is also now resizable to fit in every screen. This kind of loudness metering comes from broadcasting and aims to reduce the difference in the perceived levels of different programs, to help with this task HoRNet ELM128 MK2 also provides a normalization function that adjusts the gain in realtime so that no signal exceeds the reference set by you, the normalization can work using any of the loudness reading of the EBU R128 standard (momentary, short term and integrated) ELM128 MK2 is available now for just 14,99€ (about 16 USD) on www.hornetplugins.com, if you already own ELM128 you can upgrade to the new ELM128 MK2 for just 1,99€ Oh and on every plugin we make we offer 100% money back guarantee within 15 days from purchase if you are not satisfied! https://www.hornetplugins.com/plugins/hornet-elm128-mk2/3 points
-
Well you guys were certainly not wrong about the savings using EveryPlugin . I was expecting a few dollars but the upgrades I wanted came down fro $88 to $60! The process of getting the upgrade code from Waves and making the purchase through EP was very smooth. Incidentally, returning to the original issue I experienced the same issues on my android phone too!3 points
-
While HoRNet plugins won't win a beauty contest, they're very affordable, rock-solid utility plugins and well worth the modest price.3 points
-
How did you get into S.L.I.P.s gallery?3 points
-
Picking a higher sample rate in the export dialog will not help at all if the original project is at a lower sample rate. The project isn't converted to 96k. All the export is doing is upsampling the FINAL output of the render, essentially processing and mixing all tracks at the lower sample rate and then converting the final result. This isn't very useful other than producing a file at 96K. If you want to take advantage of upsampling in plugins you should use the the plug-in upsampling feature which will add a upsample -> process -> downsample stage to all plugins you choose to upsample. Or have all the tracks in the projects at 96k.3 points
-
Hey Mesh, It took a while to download all of the new stuff as Waves Central insisted on downloading all of the HD sample content for the Inspire instruments, even though I already had it for 2 existing instruments. The download speed was also a bit slow so I left it going while I got on with other stuff. Anyway, after a very brief play with OVox I think I would find more uses for it than I have for, say, Vocalsynth 2. Right off the bat the presets seem to be more musical and work better on the vocal tracks I tried. Definitely worthy of more investigation and I can also see myself using it mixed in subtly with non-effected vocal tracks to add interest.3 points
-
1: Visual clip gain please.2 points
-
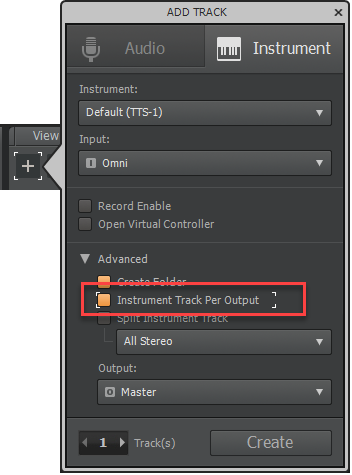
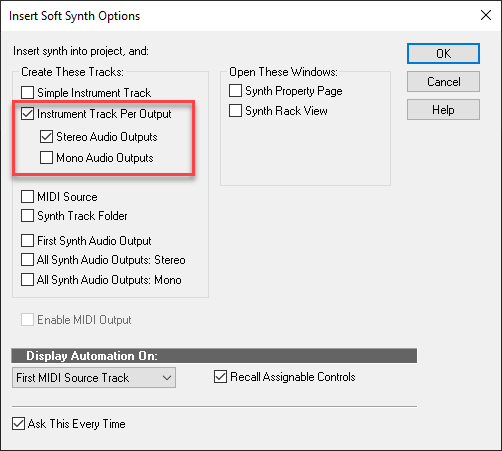
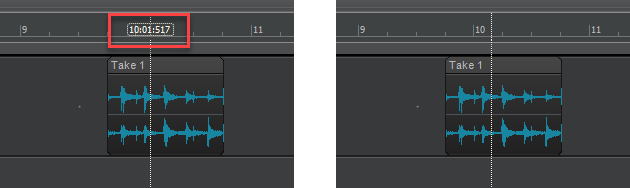
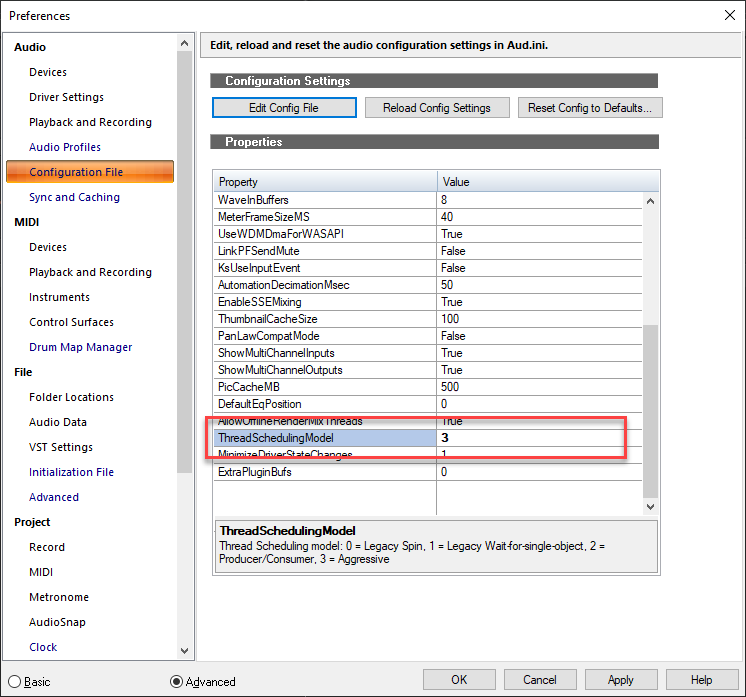
2020.01 Early Access installer now available! We're pleased to announce the Early Access for 2020.01, which includes many significant improvements and bug fixes, all in keeping with our goal of making CbB as reliable and enjoyable as possible. We'd love for you to check it out before we drop the official public version, which should be in roughly a week. Please note that Early Access installers are update installers, which only update from a specific version. To install the 2020.01 Early Access build, you must be on the latest public release of 2019.12. Download Cakewalk 2020.01 EA installer If you haven't already done so, please read about the Early Access Program before participating. Thanks again for your participation! The Bakers 2020.01 Highlights Behavior changes The Duplicate Clip command now respects Snap By. Multi-timbral soft synth enhancements Instrument Track Per Audio Output In Cakewalk 2019.11 and earlier, Simple Instrument Tracks are limited to one track per instance of a VSTi, and a single stereo audio out. Cakewalk 2020.01 has a new Instrument Track Per Output option in the Add Track menu and Insert Soft Synth Options dialog box for multi-timbral soft synths that support multiple outputs. It pairs a MIDI track with a separate audio output track (mono or stereo) for each synth output, assigning sequential MIDI channels. This allows you to have multiple Instrument tracks for a single instance of a synth. The Instrument Track Per Output option is similar to the All Synth Audio Outputs: Stereo and All Synth Audio Outputs: Mono options, except Instrument tracks are created instead of Audio tracks. Note: As with Simple Instrument Tracks, you must split the Instrument tracks if you wish to edit MIDI automation. MIDI chase support for MIDI event buses MIDI chase is now supported for VST3 MIDI event buses that support it (e.g. Vienna Symphonic Library). Show/hide Aim Assist text in Time Ruler You can now show/hide the Aim Assist text in the time ruler. To do so, do one of the following: Go to Edit > Aim Assist and select Show Aim Assist Time. Right-click in the time ruler and select Aim Assist > Show Aim Assist Time. Press ALT+X (can be reassigned to any other shortcut in Edit > Preferences > Customization - Keyboard Shortcuts). CPU metrics Diagnosing glitches in audio playback is now easier with the new Engine Load and Late Buffers metrics in the Control Bar's Performance module tooltip. To view these new metrics, hover the mouse over the Performance module. Note: you must have Show Tooltips enabled in Preferences > Customization - Display to see this. The Engine Load value is a percentage of the total time the engine took to process an audio buffer. If it takes 100% or more of the allotted time, the buffer is processed too late and it will result in audio glitches/distortion. The value in parenthesis represents the max engine load since the time the engine started. Engine load is a better metric to help troubleshoot audio glitches during playback since it accounts for other delays in synchronizing and processing audio workloads beyond what the CPU meters report. It's normal for engine load to be higher than the average CPU meter value shown. The Late Buffers count indicates the total number of buffers that took too long to process since the time the engine started. Too many late buffers will result in audible glitches or distortion in playback due to the audio device not receiving buffers in time. Note: It's OK to have a few sporadic late buffers during playback since it will not result in audible glitches. Optimizations Experimental aggressive task scheduling model We continue to work on improving our multi-threaded engine performance and have added a new "aggressive" task scheduling model. The aggressive task scheduler utilizes more efficient task management that can result in better multi-processing and fewer thread context switches. This feature is still experimental so report back if you notice any improvements or problems when using it. The new scheduling model is activated by setting the ThreadSchedulingModel value to 3. This can be done via Edit > Preferences > Audio - Configuration File. This value is at the bottom of the list. Bug fixes WASAPI Exclusive mode fails to open inputs on multi-channel audio devices WASAPI Shared mode kills audio in other apps Edit tool has inconsistent drop arrow in Mercury theme MIDI Chase should support VST3 event bus Duplicate Clip command doesn't obey Snap By, only Snap To Split tool uses fade-in curve for both fade-in & fade-out CPU meters do not work at buffer sizes lower than 1 msec Audio engine won't restart when changing latency while Preferences is open

 2 points
 -
Product Features: Offering authentic sample sounds with the playability of a modeled piano, hybrid modeling technology embodies over 400 GB samples. (learn more) Style Designer helps set the piano’s musical style with a simple knob, be it pop, jazz, rock, classical or soft, and change internal parametric. HD Velocity Layers can express up to 65,536 velocity layers and around 1000 layers have an audible difference. (learn more) DFD/RAM system enables users to relocate resources and ensure the best performance under every individual project. Scala Tuning System allows users to experiment with different tunings and choose from more than 10,000 tunings. The Multi-Dimensional Resonance engine perfect represent different resonance inside a piano. (learn more) Adjustable sympathetic resonances. Artificial Intelligence Tools will check the response of your keyboard and pedals automatically to find your ideal velocity response curve in seconds. Differnt GUI mode for standard resolution and 4K resolution Expand Your Musical Capabilities with a Dynamic Piano Engine Software This is your opportunity to create deeper, richer Upright sounds just like the original pianos themselves. Get our Upright Grand today and truly enhance your ability to create beautiful, unforgettable sounds. On Sale Now, 71% OFF on price!Limited Time Only! $169 now $49 http://www.supremepiano.com/index.html?upright.html2 points
-
Hi all, Thanks for your reports on yesterday's authorization issue. We're happy to report the SG team resolved it quickly once it was diagnosed. We apologize for any setbacks or concerns the outage may have caused. This was a momentary server side issue, so no resolution was possible from the desktop side, either from BandLab Assistant or CbB. Bottom line: CbB is no longer launching as "Not Activated". Such issues are infrequent, typically affecting only fresh installations as they tend to get resolved quickly. Please note that the team is taking steps to minimize the likelihood of this reoccurring in the future. All being well otherwise, the Bakers continue to crank away on the next release - looking forward to sharing some great stuff soon to come! Have a great weekend! The Bakers2 points
-
At Plugin Boutique https://www.pluginboutique.com/product/1-Instruments/4-Synth/1296-MPowerSynth2 points
-
Oh, forgot to mention that AIR Transfuser also installs a "TransfuserFX" plugin version. With that you can insert it in a audio track FX bin. Then assign the audio in with the THRU-SEQ and use the various onboard Transfuser effects modules to mangle the input audio signal. Not really a synth but there are filter, LFO, and envelope modulations available, in addition to stock time based effects, etc. Fun to experiment with!2 points
-
Add fancy studio booking, famous engineers' fee and even the full price will seem like non-existent.2 points
-
It's in the sauce.2 points
-
What the ?2 points
-
Very nice! Thanks Soundiron. (I had to do a Kontakt batch resave to make the new presets see the original samples... took about 5 minutes... just pointing it out in case someone gets the new presets and they do not automatically see the samples.)2 points
-
Don't recall this ever being a problem but there are several versions of the Rapture expansion pack installers. I prefer to use the Rapture Classic series from SONAR Platinum. Not sure if they all look for a valid Rapture install but it seems reasonable that they would. IIRC, some very old installers did not look in the registry for the Multisamples Folder. This caused problems for users that modified the registry to alter default locations. AFAIK, Rapture uses one Multisample Folder path. I let Rapture and all expansion packs install using their defaults. Instead of messing with the registry, I prefer to use directory junctions when relocating folders for the sfz engine synths like Rapture. This allows all the installers to work regardless of when they were built because the installation looks like it is running with all settings at their default values.2 points
-
Maybe old news for some, but I only stumbled across him for the first time today and really enjoyed both his personality/presenting style as well as what he did. I'll certainly be checking out his other videos when time permits.2 points
-
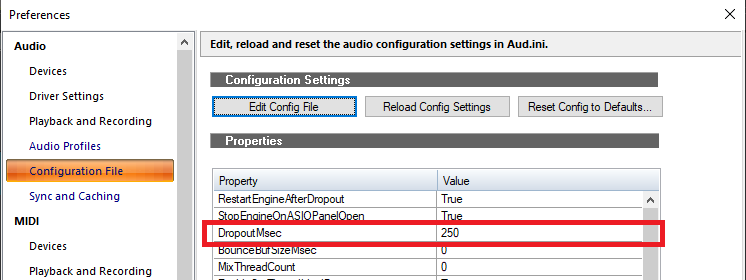
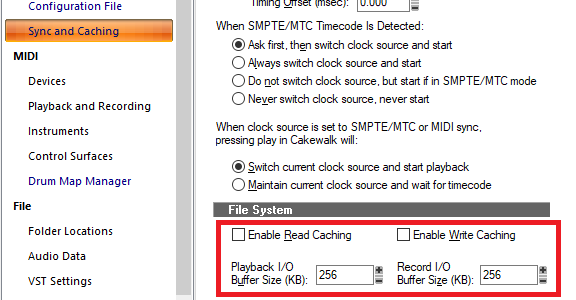
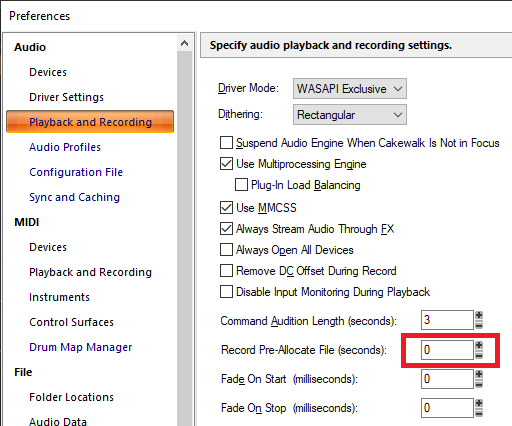
The dropout code should give you some indication as to why this is happening. One thing I would check though, is what your dropout threshold is: "Internal" dropouts can actually occur pretty often, especially when there's a lot of FX processing going on and the CPU simply doesn't have enough time to process everything before the next buffer. Increasing this value will allow more of these to be "ignored" before Cakewalk actually gives up and stops the engine. The other thing that could affect recording drop outs in particular, is file access. You shouldn't experience issues with an SSD, but if you're using a HDD fragmentation or seek delays can cause recording to drop out. One way to mitigate this is to increase the amount of hdd space allocated to the audio file before recording: According to the help file: "Record Pre-allocate File (seconds). When this option is set to a value greater than zero, Cakewalk will pre allocate the file to be recorded to the size specified (in seconds). This means that the file will not be resized while recording until it reaches the allocated size. The setting has the potential to reduce disk activity while recording and allows for more possible tracks. The valid range is 0–14400 seconds and the default value is 0. A reasonable setting would be 10 minutes (600 seconds) to 30 minutes (1800 seconds)." Finally, you could consider increasing your Record I/O buffer size (in steps of 128): Again, from the help file: File System Enable Read Caching and Enable Write Caching. Choosing either of these options lets Cakewalk use the Windows disk cache while reading or writing audio data. Cakewalk will usually perform best with all caching disabled, which is the default setting. If your computer has an older IDE disk controller, or a disk controller that does not use DMA transfers, enabling caching may improve Cakewalk's audio performance. Note: Changes to these settings only take effect when you restart Cakewalk . I/O Buffer Size. This value determines the buffer characteristics for transfers to and from the disk. Changing this value does not affect audio latency, but will affect the disk throughput for audio tracks. The default setting is 128. A higher value causes more audio to be buffered from the disk ahead of the playback cursor. If you are hearing consistent dropouts/clicks in your audio and if your project contains high bit depth (32/64 bit) or high sample rate audio (88.2K or higher), it may be indicative of a too small I/O buffer size. If so, try a higher I/O buffer size like 256 or 512. If audio problems persist, reset to 128 and try a different remedy. Also, if you are playing a large file, and using maximum latency, a too-small I/O buffer size may cause dropouts or crashes. Try increasing the buffer size by blocks of 128.
 2 points
 -
Never knew where the 2x really apply until now. If I could sum up from a usage perspective: - No real benefit if export a project recorded at a lower rate to a higher resolution, since the project is processed at the low rate. - For plug-in that produces harmonic (distortion or saturation type plugs), higher resolution will reduce the anti-alias or artifacts that got 'bounced back' into the hearing range. To improve this, use Cakewalk "2x" button AND the plug-in options "Upsample on Playback - Upsample on Render". - To mix an entire project at a higher resolution, have to create a new project at the higher rate and import the individual tracks in.2 points
-
Thanks for that. The new authorization/download manager I saw at the post-NAMM meeting will make it even easier.2 points
-
….and I paid $225 for my Samsung 250GB SSD (back in 2013) ….still going strong though2 points
-
Hybrid modelling... I seem to remember that TruPianos used that technique... and that doesn't need either 40 or 400 gb. If you want a great sounding (IMO) modelled piano, check out Pianoteq1 point
-
Oh and if you can't afford to spend money, there's Piano in 162 (SFZ, Kontakt, Kronos) and Upright Felt Piano (Kontakt) as well as Wolno (VSTi).1 point
-
That would be useful. However I believe in the case of Cakewalk, it is a fundamental DAW signal flow design limitation. Cakewalk has a strict track definition model for audio, instruments, and MIDI. And the signal flow for track inputs and outputs is explicit for each type of track. Cakewalk in general does not have a capability to allow audio signals to be routed to instrument plugins (in contrast to fx plugins), even if the instrument provides for an audio input. There may be a few hacks possible by putting an instrument in an FX bin of an audio track, but I have not had much luck with that method. I first ran into this issue when I tried using the TX16Wx sampler to live sample an audio input in Cakewalk. No success. The TX16Wx dev says it is strictly a DAW limitation. But it easily works fine in Reaper, with its "one size fits all" universal track definitions and flexible signal routing scheme.1 point
-
Not a secure site, I will pass, lol1 point
-
I don't think I've seen these cheaper, ever. What I like about these is that they add said frequencies but not only that, they mangle the audio so it "always" sound good. Still 79 is way beyond the Waves price so I will pass (29 I still think is expensive lol, imagine 79).1 point
-
$7.56 with code GROUP at JRR https://www.jrrshop.com/catalogsearch/result/index/?dir=asc&order=price&q=Beatskillz1 point
-
Well done lads....we made it Friday!!!1 point
-
Very timely lyrics. Great job.😊👍1 point
-
First, sending beams your way for a speedy and complete recovery. I enjoy your songs and look forward to hearing new songs in the near future.😊👍1 point
-
Michael Jan has released Key Repeat, a free beat repeat sampler for Windows and Mac VST3/AU. https://michael-jan.github.io/key-repeat/?fbclid=IwAR3_IVT-rE8WKSNWWMRgaRMdjyH5klbOQ1JXHBRBXnjrAYk6re7Y3bSlnYo1 point
-
More like "Kentucky Whole Grain", which is 190 proof!1 point
-
DJ Swivel said "hit records usually come easily'.....maybe a different sauce he's consuming as in 80 proof?1 point
-
I should have worn my wellies today. It's getting really deep in here.1 point
-
Thanks ZT. Most of the stuff I do is instrumental and not sure if this would be useful in that context. Possibly, I can use this on a vocal library (or loops)…..still on the fence.1 point
-
I like that's it's a free update for us V1 owners and appreciate the new features. One thing I'm liking in Harvest is that you can lock existing notes and then add new random notes to the pattern that co-exist on the same steps as the locked pattern to create chords. That would be a useful addition to Riffer although I guess you could achieve the same with multiple instances of Riffer.1 point
-
My "Abraham Plinkin' " is an all-pizzicato work. All of the instruments are from the East/West Gold sample library. Larry Graham Alexander1 point
-
All, My "Modes" features a very large pipe organ with orchestra. This composition alternates between major and minor modes. Larry Graham Alexander1 point
-
Yes, I happened upon Mr Michelmore on YouTube myself a couple of months ago. I've watched a few of his entertaining videos now. Not a bad guy for a mac user1 point
-
as above...plus...cough....everyplugin.com..cough insane to buy from waves directly1 point
-
1 point
-
Coincidentally, I just read this article before seeing your post. Pay close attention to the heading 'What You Need to Get NVMe'1 point
-
No need to be so harsh JB, could be just an oversight on the pricing. I've bought quite a few products from APD and have not had anything remotely 'suspicious' or dishonest. They've actually been quite good with their customer service. Of note, I see the full price showing $475 and not $399.1 point
-
Very cool suggestion about the "whisper" tracks. I'm almost ready to start vocals on a new one , definitely going to try that . Thanks .. mark1 point
-
This initially seems like a good idea. *however* "Hey look at me, I have a DAW at home, maybe a nice studio." Caser- Hmmmmmmmmmmmmmmmmmmmmmm.................maybe we should follow this one home.1 point
-
beatassist.eu has released Drag. Drag is a virtual synthesizer for Windows OS. It was designed for GOA/Psytrance leads. The synth has 4 oscillators, 3 of them phase distortion and 1 a basic oscillator. It features some master effects like Chorus, Reverb and Octave Stepper. With Drag the user can create all those acid and metallic leads that are used in Psytrance or GOA Trance. Price: Free. Read more at https://www.beatassist.eu/drag.htm1 point
-
Which makes it $24.99 if you have a $25 voucher...sadly those with $50 or $75 vouchers get the shaft1 point