Leaderboard


Popular Content
Showing content with the highest reputation on 10/14/2019 in Posts
-
Softube Tape & IK Tape Machine Collection are both excellent, Taupe is yet another flavour plus the strip model incorporates a comp & eq. All are useful, personally I like IK TMC the best for 2 bus or mastering , in fact it's the only IK product I've kept installed on my system. YMMV2 points
-
I'm totally with Tim on this. DON'T EVER underestimate how easy it is to do something stupid in such a big project. I actually save versions all the time, even for singles, let alone massive mixes like a 60 to 100 track 3 hour concert. It's a nightmare if you can't quickly go and grab a lost piece of audio from a previous version... sooner or later, you will need to backtrack. Sometimes clips are grouped that shouldn't be and you delete something, ect . with high track counts come high plugin counts, which makes the chance of a crash or even a corrupted file much higher too. It costs nothing to use a bit of disc space and delete the old versions once the project is signed off. One of the cool things about CbB which many other DAWs don't allow is to keep more than one project open at a time. If you ever need to grab audio from another version, just launch the old file while the new one is open, highlight, copy, switch to the new version and paste. As for backups, you guys north of the equator with your super fast internet, enjoy your cloud backups. Talk to me again when it all goes down for whatever reason! My backups are in a fireproof/ lion-proof/ elephant-proof safe2 points
-
Clip effects and Clip automation can be very useful esp in this scenario where you have many songs in one project. You may not want the same processing for all songs so adding an effect to the track would apply it to the entire project. (yes you could automate bypass but it gets confusing) There are different ways to do this such as by using bussing but clip effects are a convenient way to do clip specific processing. Like JL says, using too many clip effects can quickly add up the load while processing since they are always active (streaming silence) even when the clip is not playing.2 points
-
2 points
-
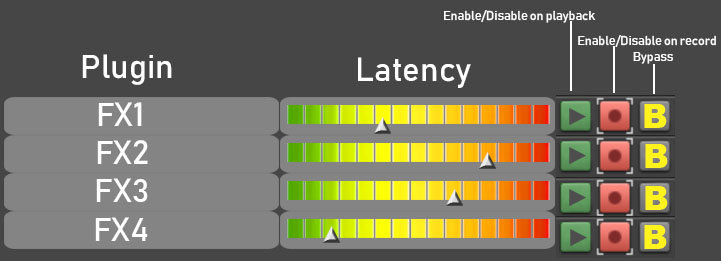
It would be very helpful to have a global FX latency meter/analyzer, which would have an option to disable/enable/bypass specific FX globally (all instances) for specific task to reduce latency. For example if I want a specific plugin to kick in only on playback... Or if I want the plugin to be present and set in the bin so it is ready for mixdown or audition, but so it does not affect audio engine latency (bypass) and more. Similar to "global" FX on/off button... but selective for particular plugins. I hope I am making sense. I do not know the depth of knowledge behind the processes, just a user opinion. Including a primitive drawing in attachment of how I see it.
 1 point
 -
Mine has Nylon Stockings...1 point
-
Nice seasonal post1 point
-
WASAPI will be more stable than ASIO4All. Its easy enough to try, Just switch the driver mode to WASAPI exclusive or WASAPI shared.1 point
-
Sad that racism still so prevalent1 point
-
Its almost surely some optimization case they are not handling in the plugin GUI. Its not something we could investigate on our end. It could be that they are relying on some DAW specific behavior to update their UI its hard to say. After investigating the issue internally if they need any clarifications about Cakewalk behavior they can contact me.1 point
-
And its not just small projects that work fine. I just loaded up a big project that we're using for AES. Contains Video, Lots of audio tracks and tons of Slate digital plugins. This plays glitch free at 192 samples on the surface book 2 all going through WASAPI shared mode. The I7 Surface book 2 (with graphics acceleration) still hasn't received the 1903 update so unfortunately I can't see if there is a further improvement. It does have the latest Surface firmware updates however.
 1 point
 -
I'm running Windows 10, Build 17763. I just created a new project and opened UVI Workstation and loaded a Synth Anthology 2 patch. IT WORKS! So you're right - some issue with that project I called up (Diverti.cwp) although the other VST work fine in it. ????? Go figure - There were 2 tracks routed to the UVI so I guess I'll have to reassign to some other VST or import the MIDI data into a new project that can load the UVI. Thanks for your help, Robert!1 point
-
I wasn't logged in, mine came to €29.501 point
-
My code worked...just FYI...made it 63.40...1 point
-
I don't think there ever was a 64 bit update for this unless you know differently for sure.The problem could be that the data file has been moved from the default location. The Virtual Guitarist program of the same era had an exe as part of the installer to set content location if moved from default, but I don't see that option for VB maybe because the data is only 500MB compared to about 7GB for VG ? Maybe try relocating the data file to default location and see if works then ?1 point
-
Tom's right. The only time you need to export tracks is if you'll be sending them to someone else for mixing. That's pretty common for collaborative projects in which multiple performers submit their tracks to one person who handles the mixing. Different collaborators will almost always be using different DAWs, or at least different configurations of the same DAW. In that scenario, audio files are the only universal currency. BTW, the synchronization problem is solved in that scenario by exporting every track from 00:00:00. You can also export files in Broadcast Wave format, which includes timestamps, but I don't recommend it. Just having every file start at zero is the simplest solution, with the only downside being larger files. But if yours is a one-man show and you intend to do all the mixing and mastering yourself, then there's (usually) no advantage to exporting as an intermediate step. You don't even have to freeze the tracks if your computer's got enough horsepower. The only preparation you may need is to simply bump up your buffer sizes.1 point
-
Latest version is 2019.09 BUILD 70.1 point
-
^^ THIS is pretty much my workflow too. Great advice!1 point
-
1 point
-
thank you MKerl1 point
-
My themes are at C:/CakewalkContent/Cakewalk Themes1 point
-
Like others, i prefer separate projects for each song, but i do it differently. Here is why... If you create all the projects at the start, you have to do lots of work again and again. I create a project for the first song alone. Mix it... Then make a copy of that project, delete audio. Save and close the project. Go to the audio folder for the new project and delete all audio. Next, in the long project made during the gig, set markers around the next song, split, bounce to clips, copy and paste into new project. Now the new project has all the fx and fader pan, sends etc set up while mixing the last song. If i do this for all the songs and when i finish go back and do the first two tracks again, the result is a fairly consistent mix. This is an old video now, but it shows some of what i describe above. If you end up working in one giant project, the navigator view can be handy. You can also save a snapshot per song making it easier to get back to compressor and limiter settings used to bounce each song.1 point
-
I have found Xpand!2 for $8.39 at JRR with GROUP discount code. https://www.jrrshop.com/air-music-tech-xpand-2 And I'm joining with "thank you!" to @Starship Krupa1 point
-
What I would do is select all the notes in the given track(s) that contains all the notes you wish to change. Then use Edit | Select | by filter to narrow the selection to the notes that have the velocity range that you wish to edit. Then use Process Nudge settings to define the milliseconds to nudge the notes by and then perform the nudge. If you are willing to convert the milliseconds to ticks, you can use Process | Slide and slide by the calculated ticks. If you use the Process | Slide command (and you convert the milliseconds to ticks), you could also write a CAL script for to this automatically.1 point
-
A couple of years back I did my band's live album / concert video and it was a case of getting everything more or less in the ballpark mix-wise first, setting up markers so you're not fumbling around with an hour of audio, trying to find out where you are, and then doing edits and clean-ups on the tracks after that. Then mix the thing as a whole. Unless you're swapping out instruments a lot, or that kind of thing, you'll get the most consistent and fast results treating everything as a huge hour-long song. Don't worry too much about gaps between the music just yet, just focus on the songs themselves. If you're planning to do a whole show thing, this is where Ripple Editing is super handy - you're easily able to cut sections out and tighten up the flow, and all of the audio and automation will fall into place. You'll need to be careful with crossfades between each song section, of course, but again - super quick, and really consistent from song to song since they share track effects. If you're just planning song by song exports, this is where your markers come in handy, like Noel said. Select all tracks then drag a selection range on the ruler, then use the Export Module to just export the selection. Do that for each song, then do any in/out fades, etc. on the exported file in any old WAV editor (or even in CbB itself as a new project if you like) just to tidy things up. Yes, it's absolutely MUCH easier doing the cuts first and working song by song, and if each song is DRAMATICALLY different, that's probably a better choice overall, but if you can deal with a pretty unwieldy file that you need to do a bit of forward thinking with setting up markers, etc. then this is definitely the faster workflow for a consistent set. Pro-tip: BACK UP THE RECORDING ASAP. You won't ever get that back if you have a disk error or you make a massive blunder mid-edit or something. Trust me on this, I had a disk go down mid-edit of our live album and lost a fair bit of work, but thankfully I could just go back to the archives and replace the missing files. Wasn't great, but the alternative without a backup was much worse!1 point
-
This is sadly how it was the last few BF.1 point
-
@Starship Krupa I just checked and yes, found it on sale at PlugIn Boutique https://www.pluginboutique.com/product/1-Instruments/64-Virtual-Instrument/1560-Xpand-2/?a_aid=5abf3e9769e18&gclid=CjwKCAjwlovtBRBrEiwAG3XJ-0ZrNyVMHFW_h7qSDX3e3gPWKjNxAmBuMYEhPXdocH-CcF2BwNA7CBoC2OEQAvD_BwE and here is the developer's webpage: https://www.airmusictech.com/product/xpand2#.XaPCSH97nZ5 Thanks for sharing that thought Starship Krupa! That is a great suggestion.1 point
-
I'm in Seattle, sale ended 2:30pm my time - 11:30pm his time. I let it skate by and bought some other s#!t1 point
-
50% off in cart - $11 each at JRR https://www.jrrshop.com/add-to-cart-for-50-off1 point
-
Wow it sounds great - I can see me using that in the piece I'm working on scoring a circuit of the TT!1 point
-
everyplugin.com jrr.com audiodeluxe.com bestservice.com audiopluginboutique.com All these guys will try their best to make what you need happen. Dealt with all of them and these are all good people. [edit] I am sure I forgot a couple of the good ones too. Larry can flesh this list out.1 point
-
Thanks @Soundwise.1 point
-
In the bad project can you capture a dump file when it hangs? Well try and reproduce it as well. Does the plugin that causes the problem on the aux track have delay (lookahead)?1 point
-
Regardless of genre or time, those vocals are processed very very well and they just pop from a mix that could bury them. Kudos. I liked the track and it's kind of soft industrial if so. A-ha meets Rammstein and the winner is . . . Dead Can Dance! very cool track, cheers, -Tom1 point
-
What a lovely song. Every instrument complements each other and the guitar is indeed very convincing. The mix is excellent with good separation. I really enjoyed this number. Great work!!!1 point
-
https://www.usb-audio.com/ They have the chip and the driver From the site: "Ploytec's Windows USB Audio driver and Mac OS X USB Audio HAL-plugin driver enable buffer sizes down to 32 samples (0.73 ms) and create an ultra highspeed USB audio connection, bypassing the operating system's audio, its mixing and samplerate conversion." Looks like all you need to do is wrap a mic around it.1 point
-
The following provided by pwalpwal from this thread: Improvements in the current Version 4.2.4 Melodyne 4.2.4 brings the following improvements and numerous minor optimizations all of which make your use of Melodyne more enjoyable, reliable and swift. (Starting from Version 4.1, which according to our database is the latest version you have.) New functions and improvements Compatibility: From Version 4.2.4 on, Melodyne is compatible with Apple’s macOS 10.15 Catalina. Better window management in Studio One 4: Melodyne’s zoom and other window settings now remain constant when you select a new audio region, instead of being displayed with individual settings as previously. Faster loading with ARA: In DAWs with ARA support, extensive projects now load considerably faster. ARA in Logic: Melodyne 4.2 supports ARA integration into Apple’s new Logic Pro X 10.4.3. With ARA, transfers are no longer necessary in Logic, and Melodyne follows all changes made to the audio track. The transfer path in Cakewalk/Sonar: When using the Melodyne VST3 plug-in in Cakewalk/Sonar, the transfer path is now created automatically within the current project (Cakewalk Projects / / Melodyne / Transfers). Improved interaction: Melodyne 4.2 interacts even better with Studio One and now requires Studio One Version 3.5.6 or later. Additional keyboard shortcut: You can now assign a keyboard shortcut from the Preferences dialog for the command “Reseparate Notes at Starting-Point Lines” that appears in the context menu in Note Assignment Mode; the shortcut is then also available in edit mode. Bug fixes Fixed: In Version 4.2.2, Melodyne in certain configurations displayed the message “expired” at start-up and refused to launch. Fixed: In Cakewalk, under certain circumstances, instead of new files being analysed automatically, you had to select an algorithm manually in order to trigger the detection process. Fixed: In the stand-alone implementation of Melodyne, closing a project without saving sometimes led to a crash if other projects were open at the time. Fixed: In Logic, validating the Melodyne plug-in sometimes slowed down the launch of the DAW. Fixed: In the stand-alone implementation of Melodyne, opening or importing projects under certain circumstances led to a crash. Fixed: In ARA mode, it could happen under certain circumstances that the monitoring during blob editing no longer functioned after starting and stopping playback. Fixed: In Cakewalk, selecting a new clip sometimes led to a misalignment of the Melodyne position display. Fixed: During ARA operation with Mixcraft and Cakewalk, blob monitoring and scrubbing were no longer available in Melodyne if you started playback in the DAW. Fixed: With Melodyne in Player Mode (i.e. without activating the program on the computer being used), the ARA plug-in sometimes crashed when you switched from Track Edit Mode to Clip Edit Mode. Fixed: If the detection was aborted after a transfer with the Melodyne plug-in and you subsequently tried to move audio material whilst holding down the ALT key, a crash was sometimes the result. Fixed: If an audio file was selected in the track pane of the stand-alone implementation of Melodyne studio, adjusting the fine tuning in the inspector sometimes led to a crash. Fixed: In Studio One, in projects with many Melodyne clips, the generation of additional Melodyne instances (using the command “Open in Melodyne”) sometimes slowed down the program. Fixed: In Studio One under Windows, the color of the note background used to change when you altered the zoom level. Fixed: In Studio One, the function “Unison Spread” sometimes shifted the notes in Melodyne several octaves. Fixed: In Studio One, use of the Note Separation Tool under certain circumstances led to a crash. Fixed: In Studio One, the note display (the lines superimposed on the waveform) was previously not updated when notes were deleted in Melodyne. Fixed: In Studio One, in the case of copied events, “Follow Clip Selection in the DAW” resulted in the wrong bars being shown. Fixed: In Cakewalk/Sonar, the export of a 16-bit audio file edited with Melodyne sometimes led to a crash. Fixed: In Cakewalk/Sonar, use of the Freeze function sometimes led to a crash. Fixed: In all DAWs with ARA, changes to the key or scale were previously not saved. Fixed: In all DAWs with ARA, use of the Compare switch stopped local playback in Melodyne. Fixed: In Logic 10.3, the opening of some projects with Melodyne could lead to a crash. Fixed: In Digital Performer, the opening of projects previously edited with Melodyne sometimes led to a crash. Fixed: In the plug-in, the command “Restore File to Original State” could under certain circumstances result in the wrong notes being deleted. Fixed: Canceling a transfer could lead to a display error or even (if you proceeded with editing ) to the DAW crashing. Fixed: In the plug-in, the assignable keyboard shortcut “Repeat Last Menu Action” did not work. Fixed: If the Scale Window was open when you switched from edit mode to Note Assignment Mode, the wrong area of the timeline used to be displayed. Fixed: In the Sound Editor, no peak values were displayed for the spectrum when Note Assignment Mode was active. Fixed: In Melodyne studio’s track list, the “Edit” and “Reference” buttons could both be activated by Alt-clicking. Fixed: In Melodyne studio, when multiple tracks were copied simultaneously, their contents were sometimes swapped. Fixed: In Melodyne essential, the assignable keyboard shortcut for “Separate Notes as Trills” was missing. Fixed: In Melodyne essential, opening a document saved by Melodyne studio sometimes resulted in the wrong track being displayed. Fixed: In the stand-alone application, it was impossible to copy and paste notes in Tempo Assignment Mode. Fixed: In the stand-alone application, a new detection sometimes led to the audio being offset in the timeline. Fixed: In the stand-alone application under macOS Version 10.12, crashes sometimes occurred when the import audio function was used.1 point
-
Devil = Hell:1 point
-
This one’s a good vid:1 point
-
That acoustic Guitar is very convincing. Is the verb on that part of the library or did you add it? Very sweet. Enjoyed this quite a bit. Tom1 point
-
@Josh Wolfer Problem is, these are all new features just added within the past few months. I highly doubt they will change these. Been using Cakewalk since Pro Audio days (1998) So im almost as DOS as you are . I was simply trying to throw out some work arounds. Sometimes I can come off as ignorant though. My apology's if I did in my first comment. FWIW, you have my ear for every feature you listed above (all 3). I hope they will (at minimum), Make some sort of... "Let me turn this thing off" in Track view menu. Personally I think the timeline was small it enough as it was, but now its become very difficult to navigate with these new features. Im set in my ways and get cranky when my workflow is changed, but its also important to note.. I haven't given these features a fair chance yet. But that Aim Assist # tag is just like a curtain blocking the view. Cheers from Boston, MA, Charlie1 point
-
ACT is Cakewalk API for Control Surfaces. MackieControl.dll is also ACT based. They label "ACT" Plug-in Dynamic Mapping, which is a part of ACT API. And they call "ACT MIDI" one of DLLs. A bit confusing... AZ Controller should work correctly with any resolution up to 14bits. By "correctly" I mean careful precision auto-detection, including 7bit transmitted over 14bit messages (most "Mackie compatible" devices which do not claim high resolution explicitly). Exotic value ranges (some iCon devices used that) are also supported. 7bit controls apply special (non linear but invertible) mapping, so pan center can be set exactly. Touch sensitivity and feedback are supported. Too good to be true? Yes... Unlike "plug-and-play" MackieControl.dll and simple to configure ACT MIDI, AZ Controller is a DIY platform 😉1 point
-
These is not an issue of having a selection. The selection only inverts the color and adds the green top line and flags, which I really like. The issue is detailed in my response I made a second ago. It's purely about stacking the aim assist, MB ruler, stop sign, and markers. There is no reason why the layout couldn't be modified so that each of these things is completely unmasked by the others. That's my point And none of it is a deal breaker. I've been using since Sonar 1.0. I just feel like Bandlab is listening to bugs and features now, so I'd submit a couple.1 point
-
Don't feel too bad. I've been b**ch slapped by Fleer more than once. But it did help me see things clearly. (and $70 is a real good price for that)1 point
-
Hi Bjorn, Great relaxing tune, lovely acoustic guitar playing. Thanks for sharing. Good Job! regards paul1 point
-
A good deal but unfair as there's no crossgrade for Miroslav CE owners. I already paid $40 for that. And, as the normal sale price for Miroslav full lib was $150 back then if I'm not mistaken, the crossgrade should be $75 max. I'll pass. EDITH says: shut your big mouth fella and use those fr***king JAM POINTS!!!! Actually, I can use 30 jam points and get the thing for $70. I'm back in 🙂1 point
-
I thought that Zebra brass lead sounded quite nice to my ears. The acoustic guitar sounds very cool - so you did some good work there. It's a mellow tune, but it sounds happy mellow to me - kind of enjoying a sunny winter's day (as you say, in Sweden).1 point
-
Jumped on the upgrade from Neutron Advanced 2 for $125. I see Neutron loading faster, lower CPU hit, and a few new bells & whistles. Plus all the other goodness in MPS. I swear I think it sounds better than Neutron 2, but I'll make myself believe ANYTHING after hitting the Pay Now button. But I think it's for real this time.1 point
-
John, Many thanks for keeping this thread active. I finally figured out how to login here using BandLab by connecting to my Seaweed Audio gmail. Just wanted to share some good news. We finally have a dedicated company server up and running, which means we now have an automated email list based on sales. The first development update will go out this week (2/15/2019), and will continue very unobtrusively once a month with software releases. Membership on the list is optional and will never include marketing of any kind. This should make things a lot easier. Also, we will have a real installer soon. It's actually coded already but still requires a beta test to make certain it is easy for everyone to use. Thanks to everyone here at Cakewalk who stuck with us despite our covert marketing. Everett, Founder Seaweed Audio.1 point